Introduction to wikis
In any organization, having a centralized space to share knowledge, document processes, and collaborate effectively is essential. Whether you’re managing project documentation, standard operating procedures, or simply need a reliable place for team members to share ideas, an internal wiki provides a powerful solution. By enabling everyone in your team to contribute, update, and access important information, wikis help eliminate information silos and improve overall productivity.
That’s why we’ve created this guide to help you harness the full potential of wikis. From setting up your first wiki page to leveraging advanced features like tagging, version history, and rich formatting, this guide covers everything you need to know to get started. And we’ll be using Backlog as a practical example to illustrate the key features and best practices.
This guide is useful for:
- Project managers looking to streamline project documentation,
- Team leads aiming to improve collaboration and information sharing,
- New users interested in learning how to effectively use wikis,
- Experienced Users wanting to explore advanced wiki functionalities, and
- Organizations seeking a centralized knowledge management solution.
Whether you’re new to wikis or a seasoned user looking to optimize your approach, this guide will equip you with the knowledge and tools to make the most of this versatile platform.
Internal wiki vs external wiki: What’s the difference?
In this guide, we’ll focus specifically on internal wikis—the knowledge management tools that companies use to streamline information sharing, collaboration, and project management. However, it’s helpful to understand the distinction between internal and external wikis.
Internal wiki
An internal wiki is a knowledge-sharing platform used exclusively within an organization. It serves as a centralized space for employees to share information, manage projects, and document processes. Key benefits of using an internal wiki include:
- Confidentiality: Internal wikis are secure and only accessible to team members. Sensitive company data, project details, and internal policies remain protected within the organization.
- Enhanced collaboration: An internal wiki encourages seamless communication across teams. Employees can share insights, updates, and best practices in one accessible location.
- Effective knowledge management: It enables efficient knowledge organization, making it easier for employees to find important information, onboard new team members, and reduce the time spent searching for documents.
External wiki
An external wiki, on the other hand, is accessible to the public, typically used to share content like product documentation, FAQs, or educational resources with customers, partners, or the general public. Some key features of external wikis include:
- Public accessibility: External wikis are open for anyone to view, often indexed by search engines.
- Customer support: They provide a platform where customers can find self-service solutions to common questions or issues.
- Brand awareness: External wikis help improve brand visibility and provide valuable content to users outside the company.
Key differences at a glance
| Feature | Internal wiki | External wiki |
|---|---|---|
| Audience | Employees, internal teams | Public users, customers, partners |
| Content type | Company processes, sensitive information | Public documentation, marketing content |
| Security | Restricted access, password-protected | Open to anyone, publicly searchable |
| Collaboration | Facilitates internal teamwork and knowledge sharing | Focuses on user-generated content and support |
| Knowledge management | Centralizes internal knowledge for efficiency | Helps with external support and brand presence |
While external wikis are great for customer-facing content, this guide will focus solely on internal wikis used by companies for knowledge management, information sharing, and project collaboration. Internal wikis are vital tools for improving efficiency, enhancing team collaboration, and ensuring that valuable knowledge stays within the organization.
Knowledge management in the workplace
The amount of information necessary to do our jobs is constantly accumulating. There’s information going from the top down, directing various departments and teams on vision and company-wide goals, as well as information going from the bottom up, keeping leadership aware of the wins and shortcomings of day-to-day operations.
If your company is like most, you probably already share information using various methods. But information sharing is just one part of the puzzle. What often gets overlooked is the need for knowledge management—organizing, refining, and applying that information so it’s truly valuable over time. If you’re reading this, you’re likely looking for a way to standardize both information sharing and knowledge management across your company—or perhaps you’ve tried to do just that in the past, and your methods have fallen short.
If you’ve struggled with either information sharing or knowledge management, you might have experienced problems like the following:
Symptoms of poor knowledge management
1. Important information is not being shared.
- Example 1: Only A knows the process for ordering new equipment using the company system, so when A isn’t here, no one can order equipment.
- Example 2: I’m the only one who understands how to use the company system in this department, so when I get questions from coworkers, I have to drop everything to help them.
2. It’s difficult to find necessary information.
- Example 3: The information is kept in a Word file buried in one of hundreds of shared folders on the server. To find the file, you have to ask several people, causing unnecessary delays.
- Example 4: An important project update was emailed out last month, but it’s lost in an inbox full of other messages. Every time someone needs the update, they have to dig through their emails or ask the sender for it again.
3. Shared information is old and outdated.
- Example 5: A process was shared with your company internally a while ago, but it’s changed since then and now requires a different form. Every time someone uses the outdated process, they need to follow up to complete the additional form.
- Example 6: A project timeline was last updated months ago, but several deadlines have shifted since then. Team members keep using the old version, causing confusion and delays in meeting the correct deadlines.

In organizations with poor information sharing and ineffective knowledge management, employees often face confusion, delayed responses, and unnecessary back-and-forth. The right information may be shared, but it’s not always easy to find or keep up-to-date, and the knowledge that could prevent future issues may not be captured or applied effectively.
By improving both information sharing and knowledge management within your organization, you can reduce questions, streamline answers, and make your whole organization more efficient. The key is to not only share information but to capture and organize it in a way that’s easily accessible and continuously updated.
But how exactly can manage all of this effectively? We’d like to introduce you to a powerful tool for both information sharing and knowledge management: the wiki.
Wiki: the knowledge-management tool you’ve been waiting for
A wiki is a website that anyone can freely contribute to. Anyone can add or edit pages, and everyone sees the same version at the same time. All types of information—from company policies to project updates—can be shared, making it an ideal platform for both information sharing and knowledge management.
Within your company, you might have an internal website that only certain employees (like members of Human Resources or IT) can edit. These can be useful for sharing static, rarely updated information relevant to specific teams. However, they are limited in scope and fail to provide a centralized, dynamic knowledge repository. That’s where an internal wiki or company wiki comes in.
Wikis make information sharing a collaborative effort, allowing knowledge to flow freely both from top-down and bottom-up while also ensuring the information is organized and maintained for future use.
Organizations that use a company wiki for knowledge management enjoy the following benefits:
Benefits of wikis
1. Share information easily
A wiki allows knowledge that was once only accessible to a few key members of your organization to be shared across teams. This makes it easy for people to find the answers they need on their own—without continually disrupting the people who hold the answers.
While follow-up questions might still be necessary, checking the internal wiki in advance will greatly reduce the time spent on those conversations, helping employees work more independently and efficiently.
Furthermore, sharing information becomes a collaborative effort with a wiki, allowing employees to easily contribute their knowledge while also creating a central hub where everyone can access up-to-date information. This reduces dependency on specific individuals and makes information flow freely across the organization.
2. Find information easily
Wikis are searchable, meaning that employees can quickly locate the information they need with just a few keywords. In addition, you can link to other wiki pages or external resources within the text, allowing readers to seamlessly navigate between related content. This enhances knowledge management by organizing everything in one place and making it easy to access and build upon.
3. Update information easily
If users come across outdated or incorrect information, they can update the content or add a note indicating what’s wrong. This continuous refinement of content helps maintain the accuracy and relevance of your knowledge base. It spreads the responsibility for knowledge maintenance across the organization, encouraging collaboration and fostering a culture of mutual understanding.

Wikis are not just a tool for sharing information—they are a powerful tool for knowledge management. When everyone in your organization contributes to the wiki, you create a dynamic, collaborative space where information is not only shared but also refined, expanded, and updated over time. This creates a culture of collaboration that encourages independence, reduces reliance on key individuals, and makes your organization more efficient and informed.
Basic features of a wiki
You may not have realized, but you’ve probably already used a wiki. The most famous example most people have engaged with is Wikipedia, the free internet encyclopedia that anyone can edit. While your company wiki may not end up containing quite as many answers, the concept and functionality are the same.
Wikis can have a variety of uses and applications, but they usually share a few key functionalities. We’ll walk you through each of these features using the wiki in Backlog.
Create a page
To contribute to a wiki, you’ll start by creating a page. All pages have a title and text. Unlike pages of a normal website, you won’t need to know any code to contribute content here. You can write and format text on a wiki page like you would an email.
When you’re done, all you have to do is click “Submit” to save the page, and it can immediately be read by anyone.
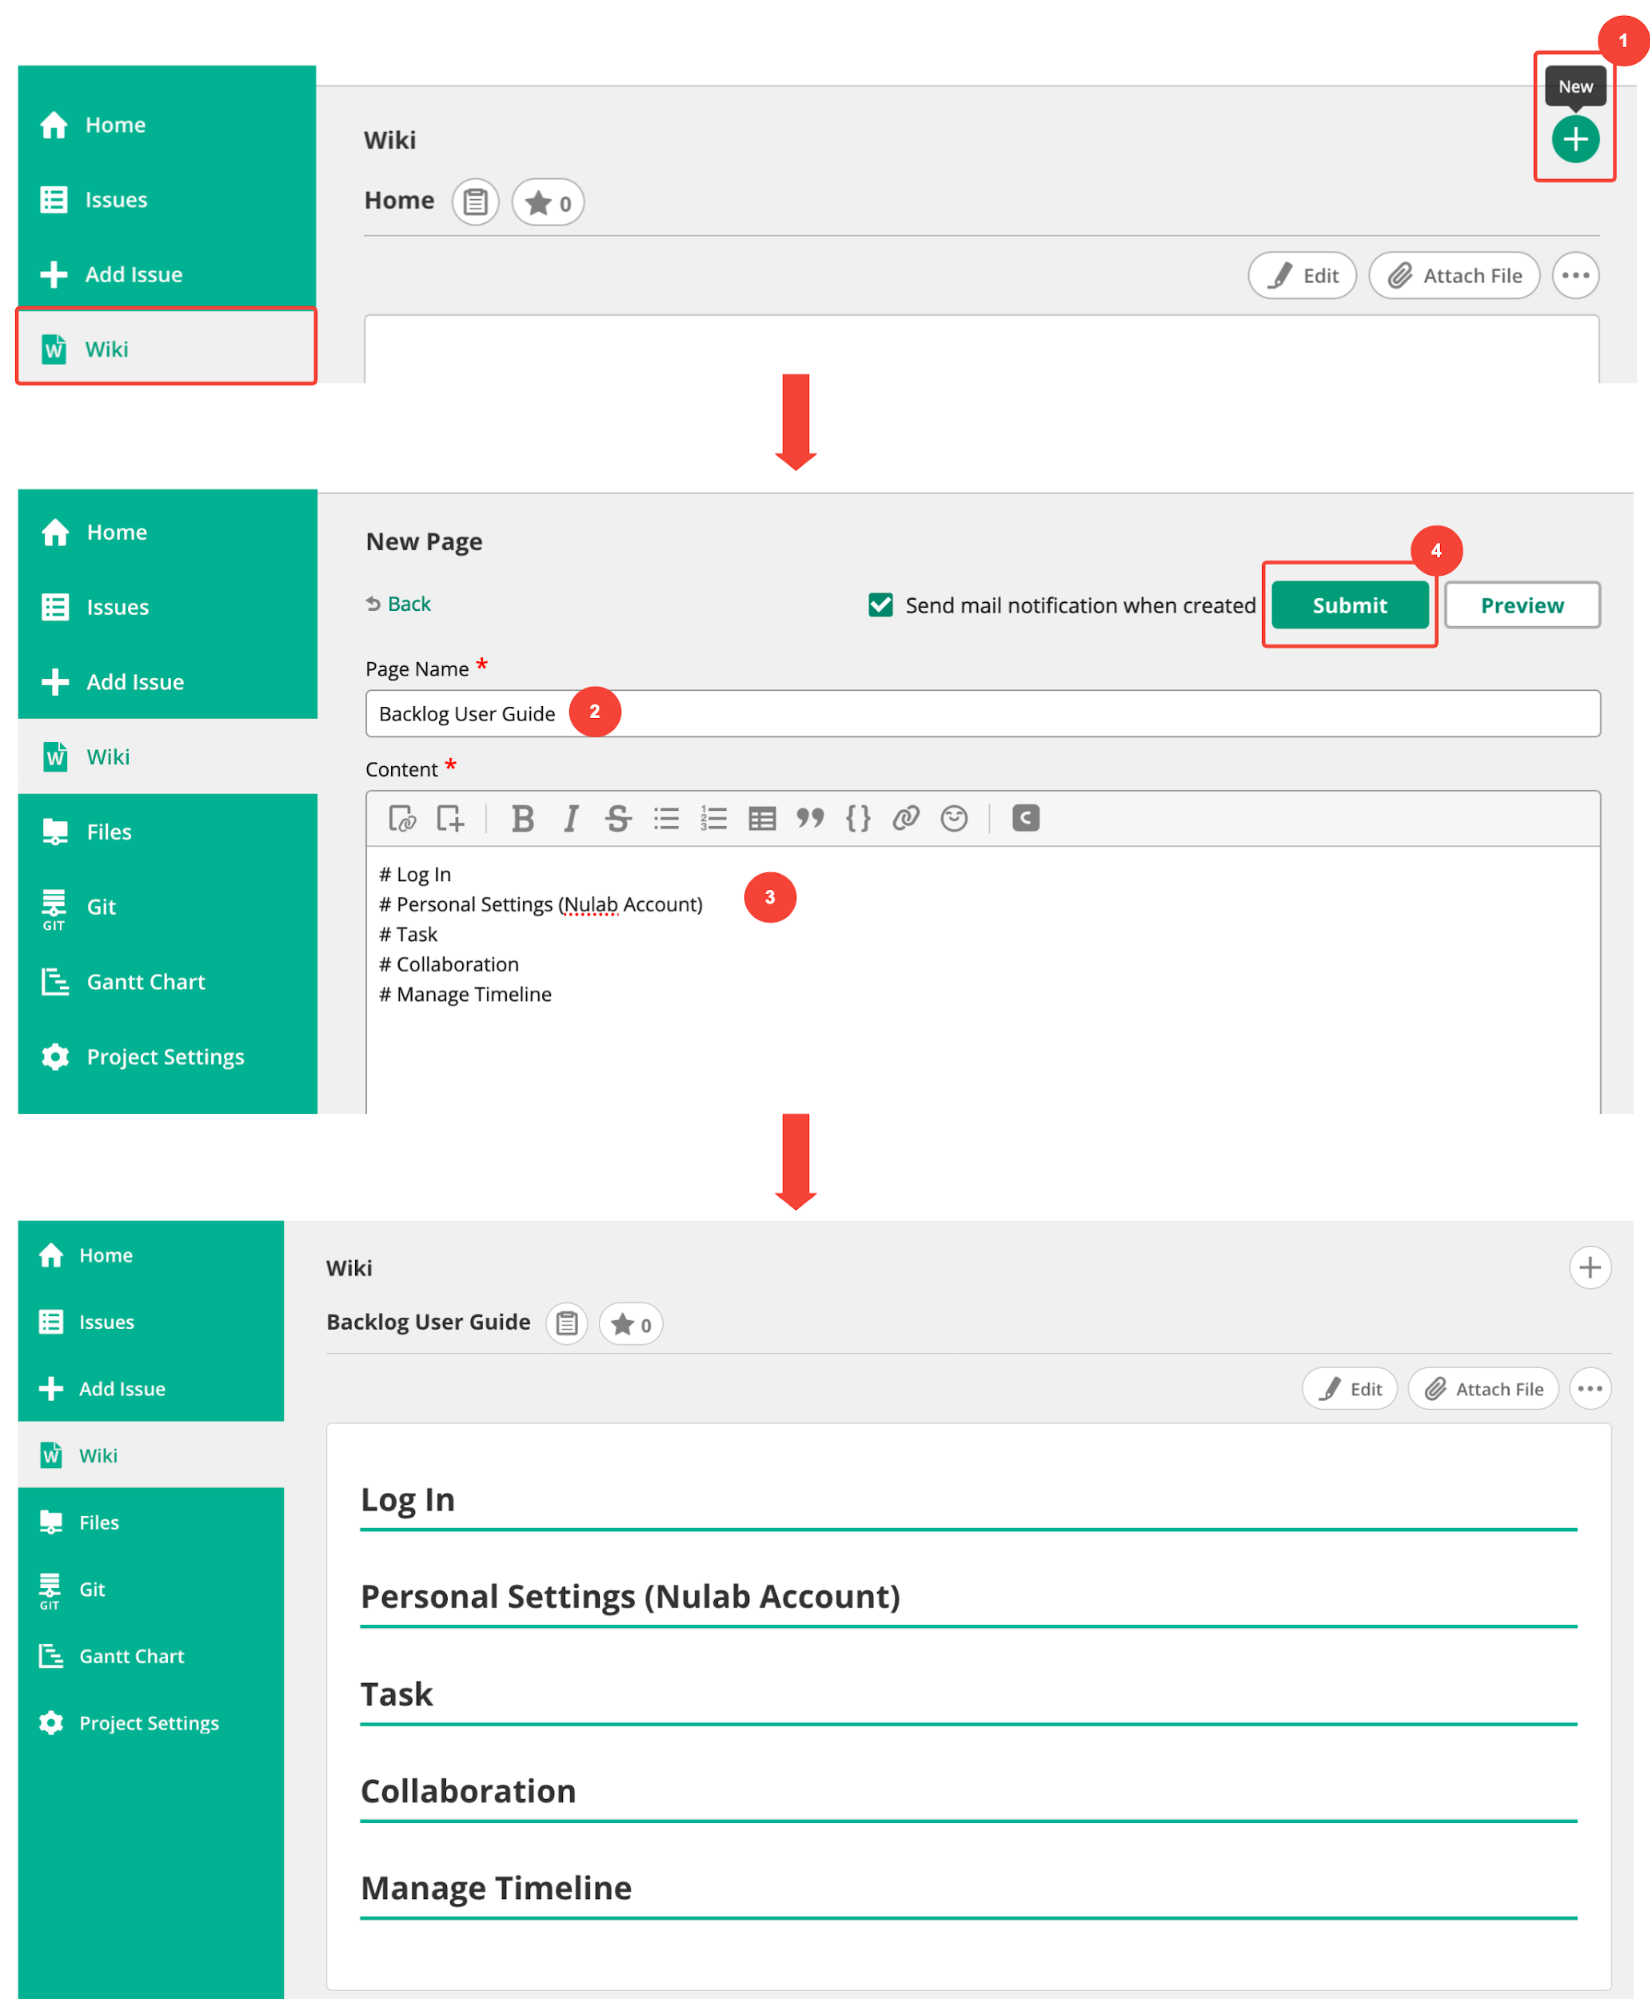
You can also use tables and images to enhance your content. Skip to Making pages easy to read to learn more.
Edit a page
Published pages can be edited by anyone who reads them. If, for example, you notice that a page created by someone else contains inaccurate/outdated information, you can open the editing screen and correct that information directly. Just “Submit”, and the page’s contents will update immediately.
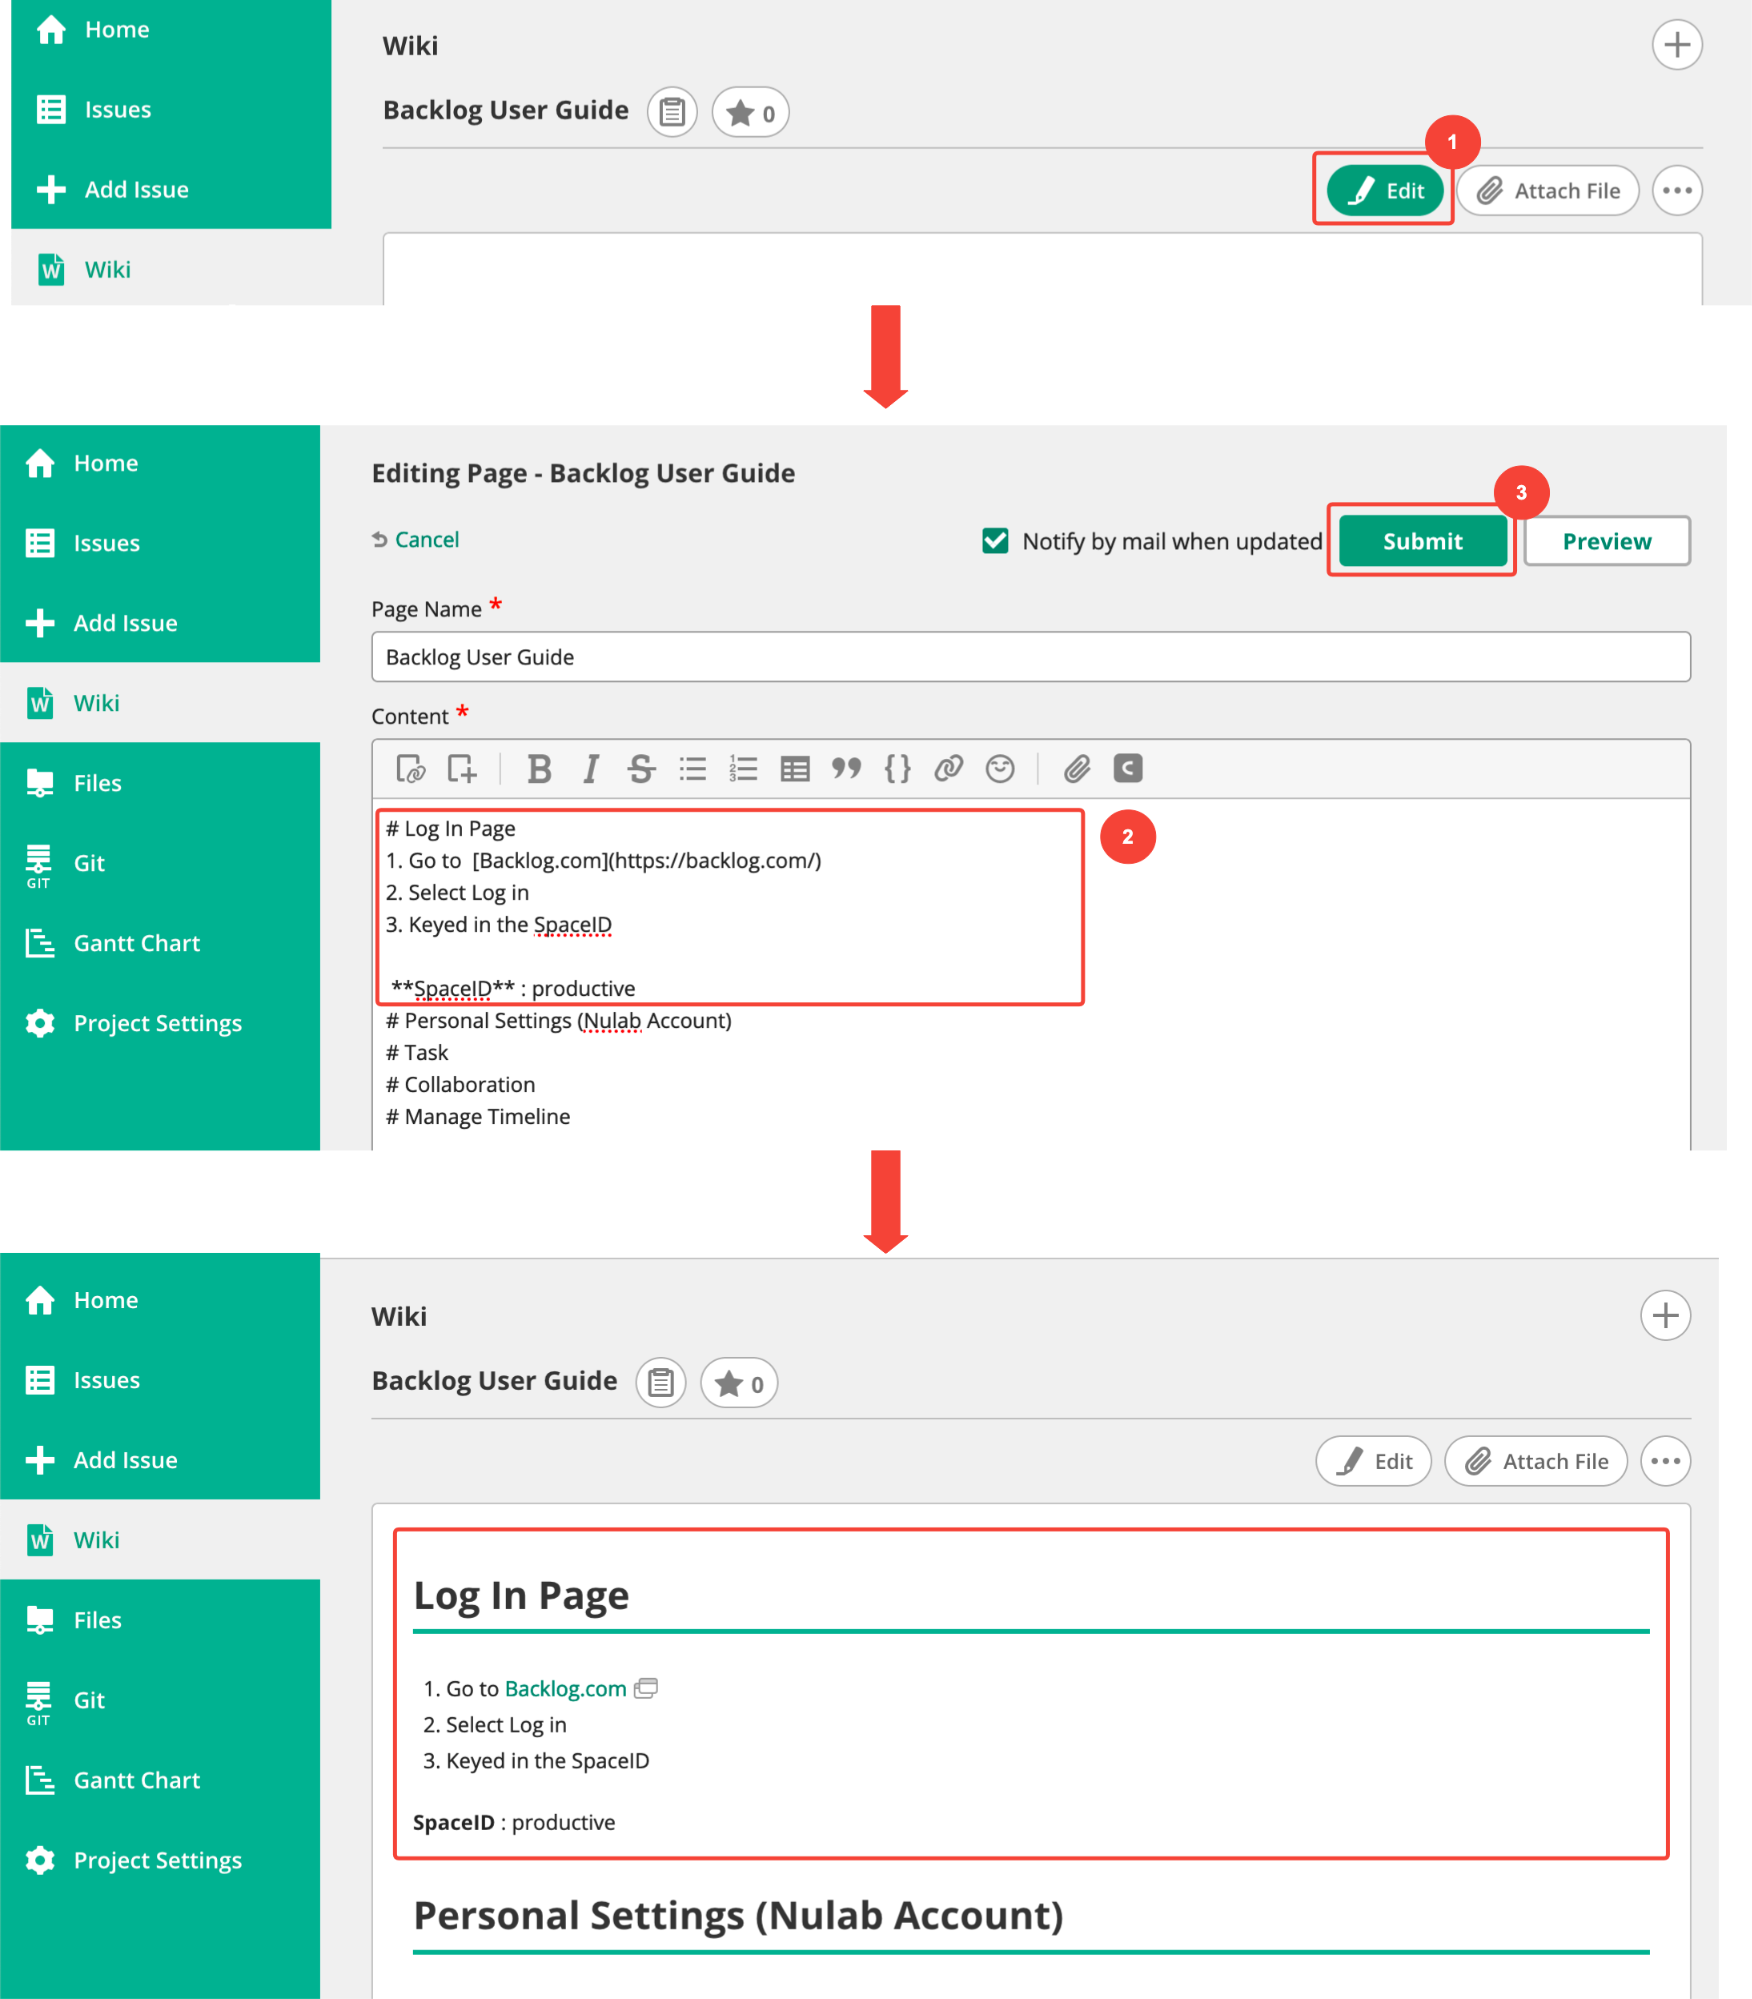
Some wiki services (including Backlog’s wiki feature) will notify the original author of any edits by email. This helps authors monitor contributions for accuracy and stay up to date on changes.
Link between pages
Linking between internal wiki pages makes it easier for readers to find secondary materials they may need, especially as your wiki grows.
When working in a Backlog wiki, for example, you can simply add brackets around another wiki page’s title (e.g. [[ Example Page Title ]]) to automatically link to that page.
The method for creating links may vary depending on your wiki service. For further details, please consult the manual of your wiki service.
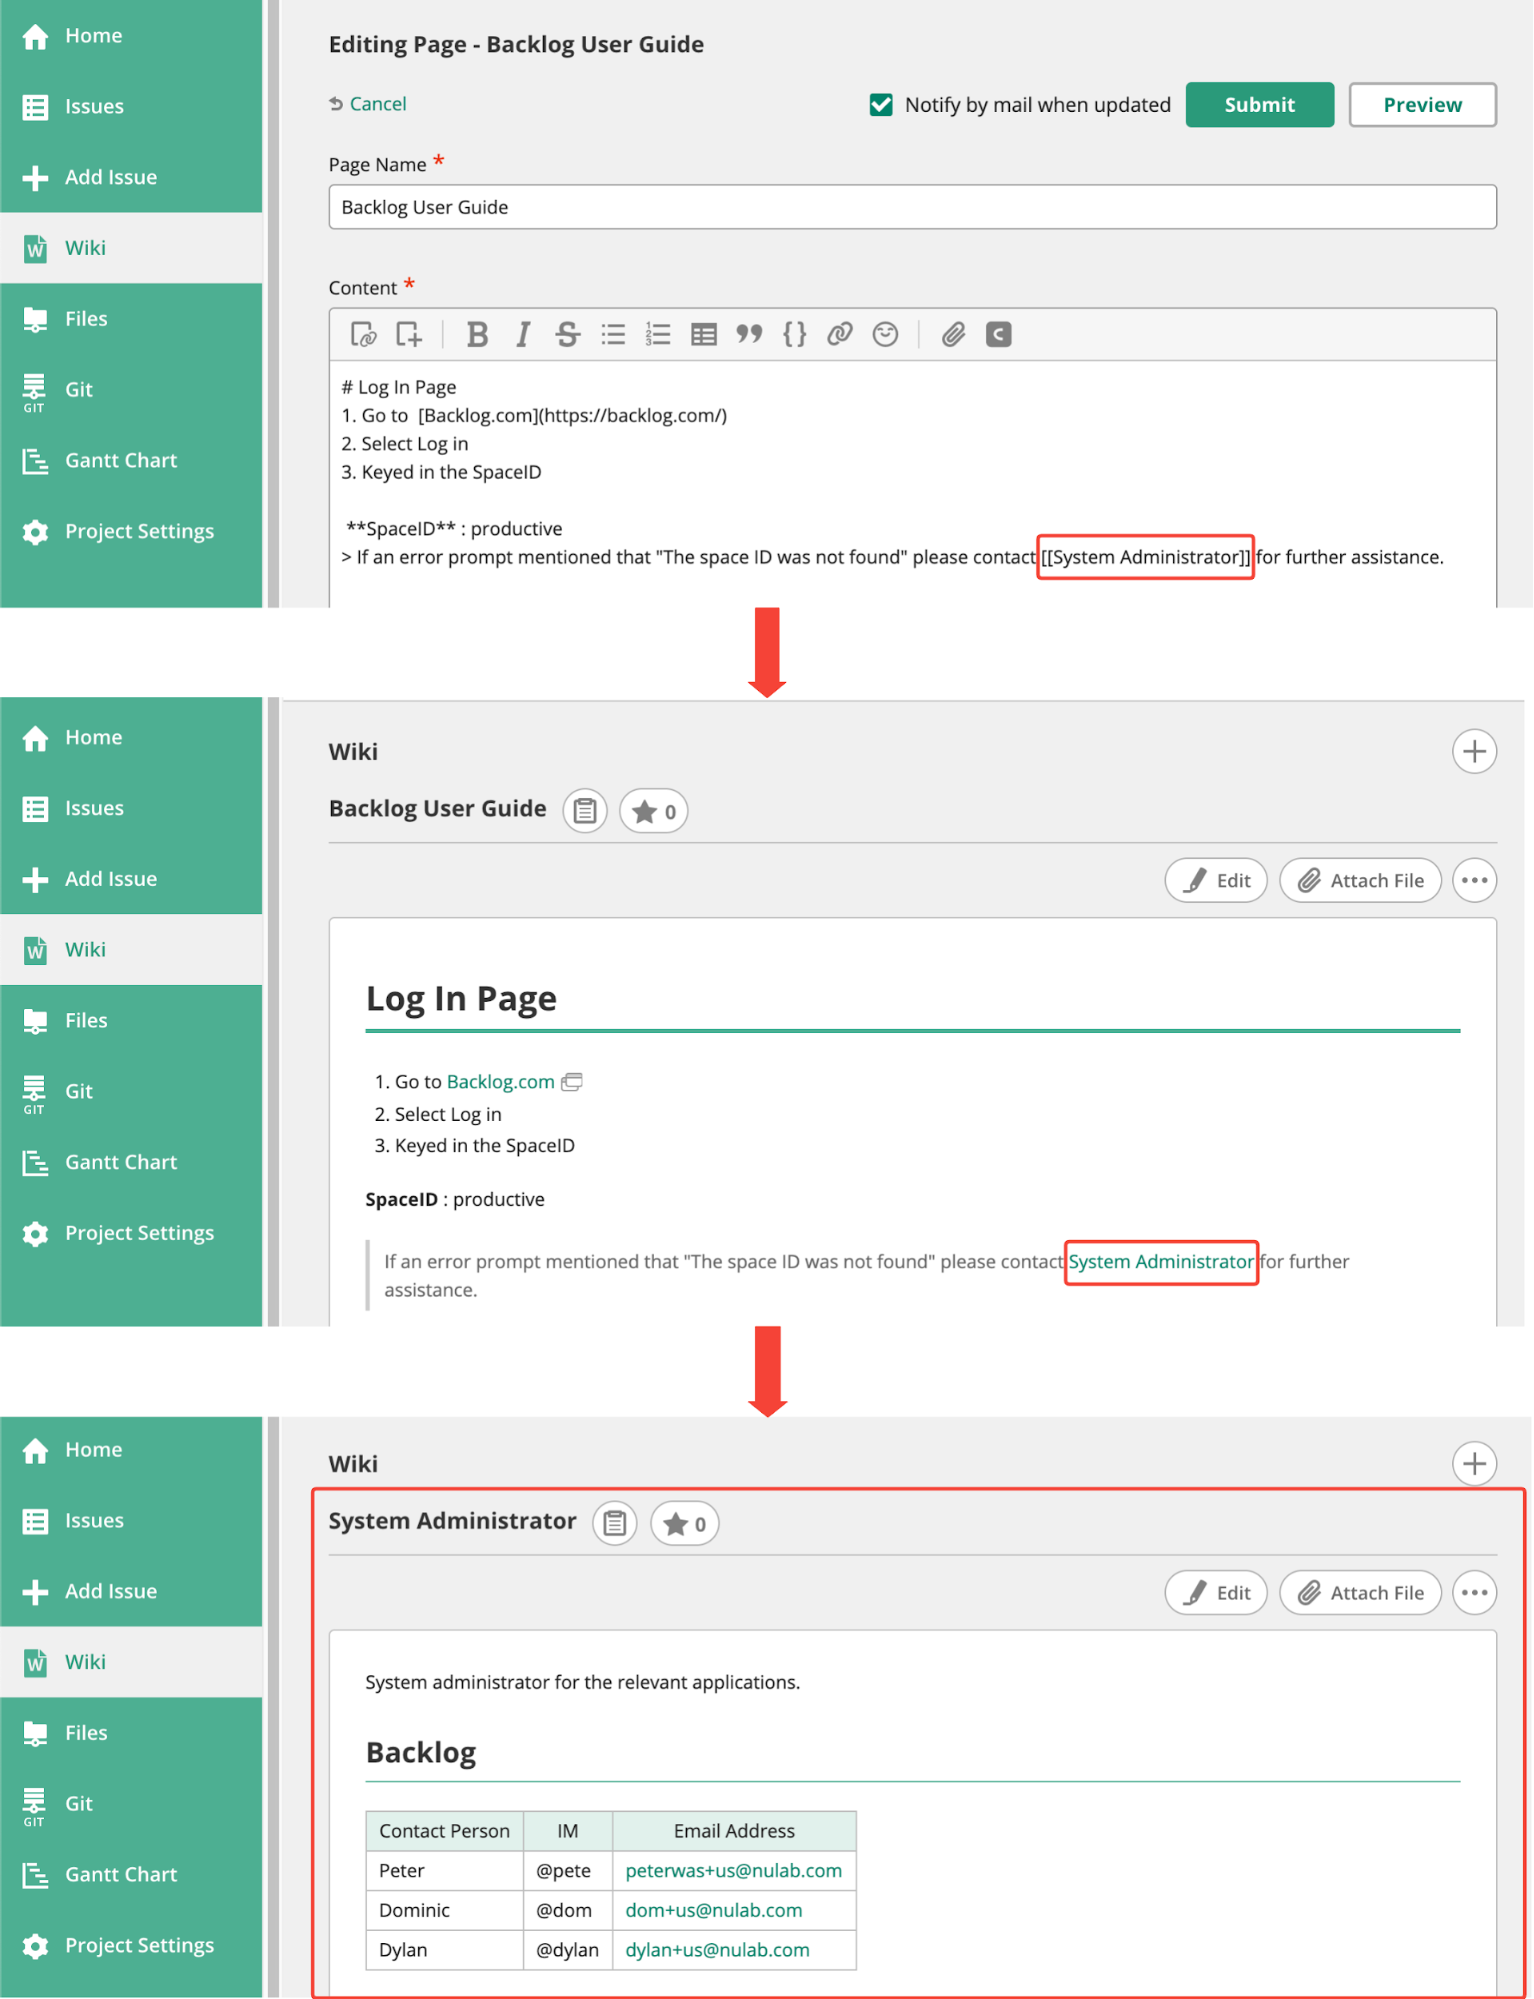
Most wikis also contain a few other features designed to make it easier to search for information. A few examples are:
- Full page search
- Hierarchical page display
- A list of the most recently edited pages
- Searching with tags
Other information-sharing tools
Adopting a company wiki doesn’t mean you have to stop using your other information-sharing tools. In fact, we recommend using your wiki to link to all of your organization’s information-sharing tools in one place.
Email, chat, instant messaging
These tools are designed for communication between individuals or a small group of people. As time passes, it can become difficult to find past conversations. By collecting the conclusions of your conversations on a wiki page, you can make the information easier to find in the future.
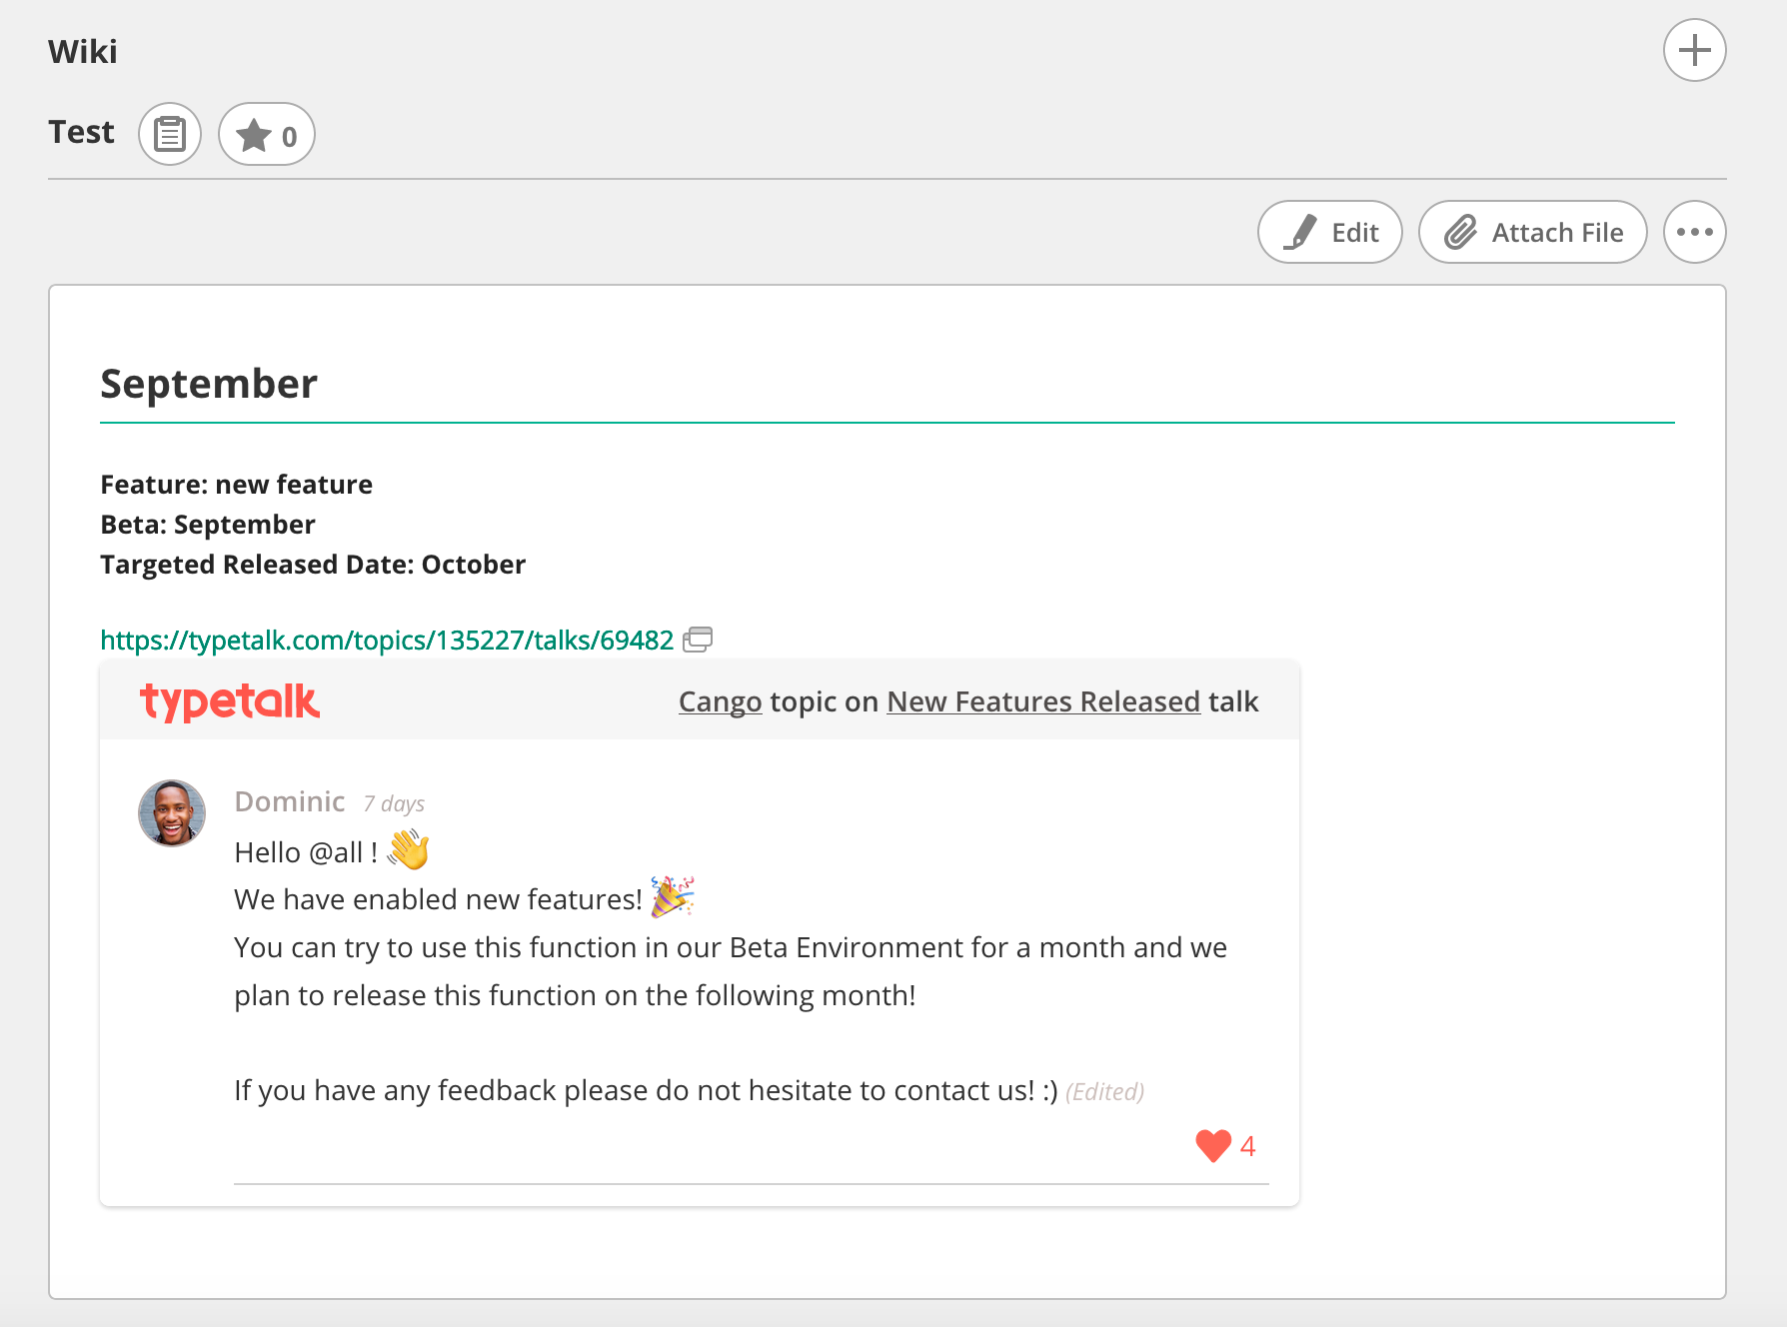
File sharing
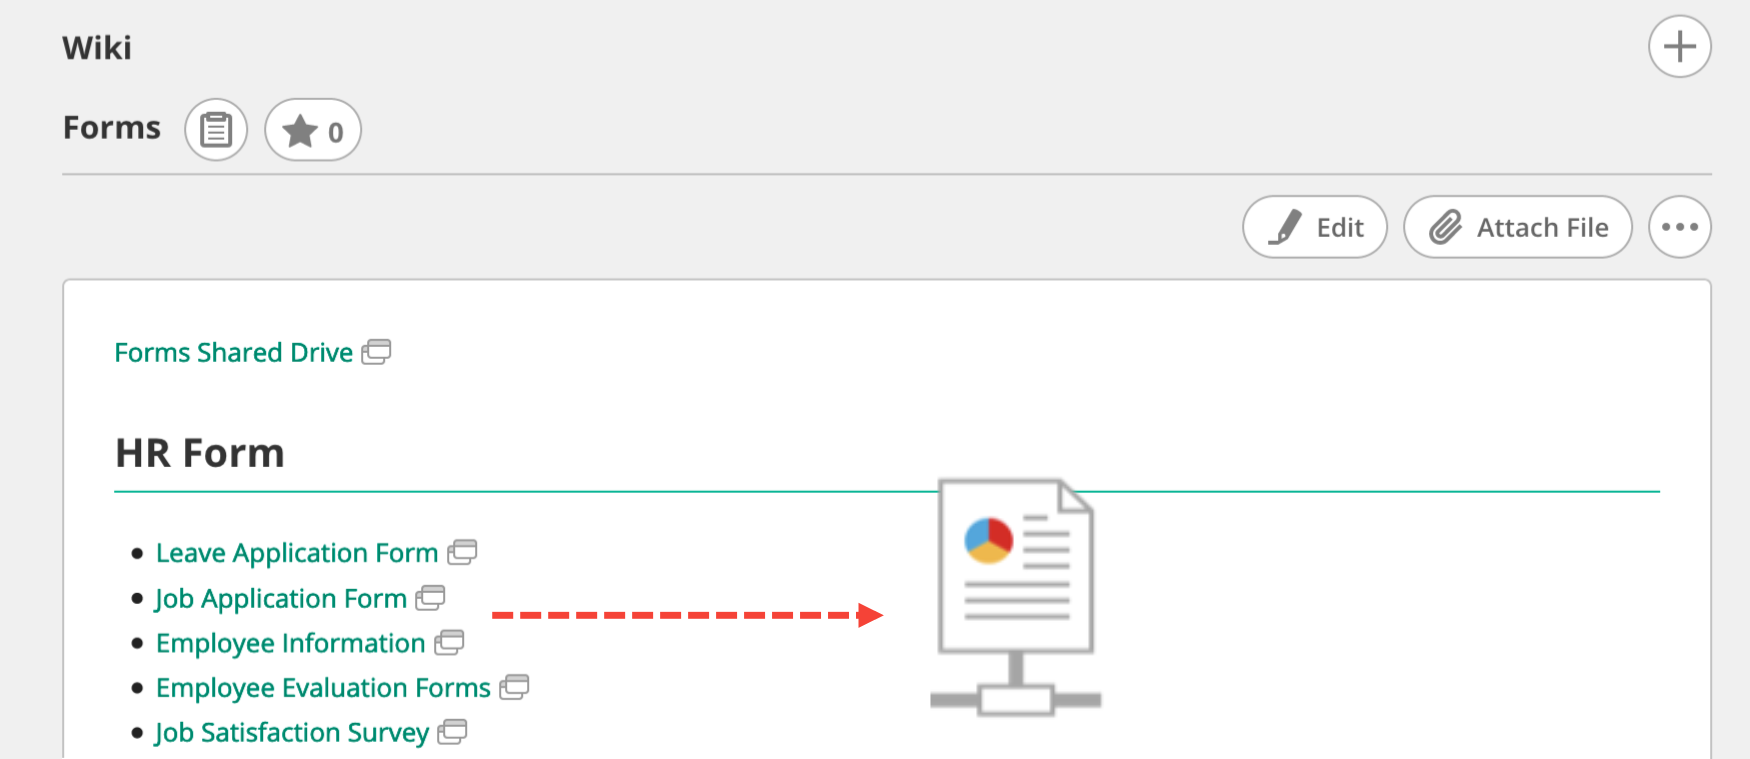
Wikis do not usually possess the rich formatting options of office tools like Microsoft Office. For internal company documents, you’ll probably want to continue creating files and sharing them on a file server. However, you can use your company wiki to show the file server’s directory structure and paths to important files.
Online office tools
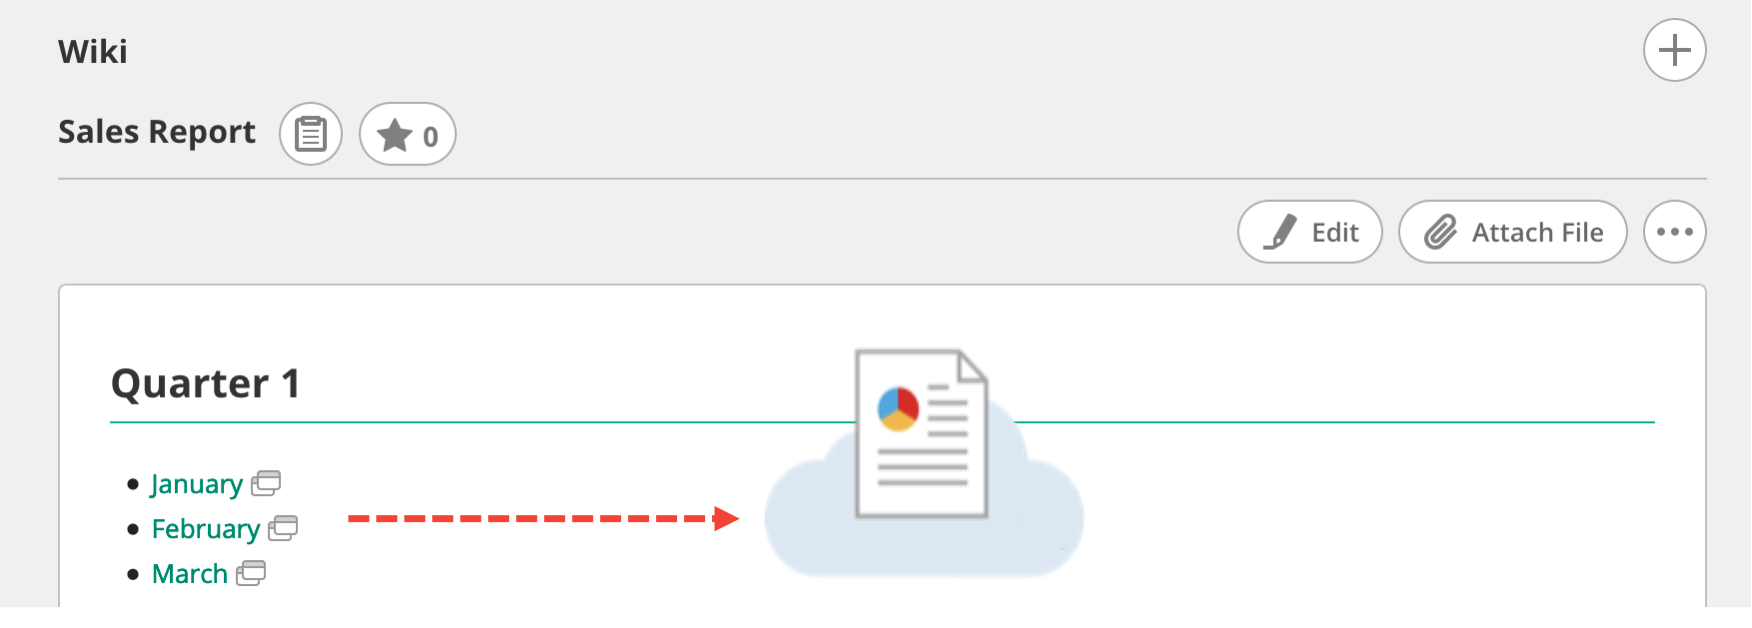
Suites such as Microsoft Office 365 and Google Apps are equipped with a variety of powerful applications you’ll likely still want to use. For materials featuring a large amount of images or charts, it’s best to create them using online office tools and link to their URL on the wiki.
| Information sharing tool | Realtime-ness | Expressiveness | Collaborative editing | Searchability |
|---|---|---|---|---|
| Wiki | Low | Average | High | High |
| Mail, chat, IM | High | Low | Low | Low |
| File sharing | Low | High | Average | Average |
| Online office tools | Average | High | High | Average |
For ways to document chat and email exchanges in a wiki, please refer to Using Wiki as a knowledge base.
Getting started with wikis
What information to add
At this point, you might realize that an internal wiki is the perfect solution for your organization, and be ready to get started!
However, it can take some time for everyone to start using a wiki at an organization that has never used one before. In that case, you will have to be the first wiki user.
Here are the steps you should take after introducing a company wiki to your workplace for the first time.
1. Information that’s useful to you
The first stage of adopting a wiki is to get into the habit of continually adding pages. You don’t need to write formally or go into deeper details to start; so long as the information is easy to understand, it’s fine.
While your motivation may be to communicate your knowledge to others, it will likely take a while for people to catch on. We recommend starting out by thinking of it as something you’re doing for yourself.
Example: If you’re creating a page on your department’s procedures for project handovers, you might start with bullet points like: ‘Step 1: Collect necessary documents’ and ‘Step 2: Notify stakeholders of handoff date.’ As you refine the page, you can expand it with more detailed steps and links to related documents.
2. What you know
Start out by writing things you’ve learned in the course of your job that you’re likely to forget. For example, try making the following pages:
- Records of meetings: Record simple minutes of meetings you participated in. Link to any relevant materials and provide an overview of any conclusions reached to the extent that they were relevant to you. You can then share your records with other participants.
- Links to important resources: Gather together important links to things like the company’s internal site, files on the file server, and external vendors.
Want more tips on pages to create? We’ll provide a few wiki page templates in the tutorial section.
3. Things you’ve heard from others
When you learn things about your job from others, create a new page. Then send the page URL to the person you got the information from, and ask them to review it for accuracy.
If you’re lucky, that person will edit the page themselves, resulting in a better understanding than you would’ve gotten through conversation alone.

4. Directions to search for information
Once you’ve accumulated a decent amount of information on your wiki, it’s time to tell people about it. Let them know what kind of info you’ve already added and how to search for it. When people know how to check for information on the wiki, you won’t have to stop what you’re doing to answer as many questions. This will help familiarize others while making work easier for you.
While getting people to start contributing right away may be difficult, the barrier to getting people to start reading it is much lower. And the more they read it and find it useful, the more likely they are to one day contribute to it themselves.
Create a page on how to search for other pages, and put it somewhere obvious (such as the top of the wiki’s front page).
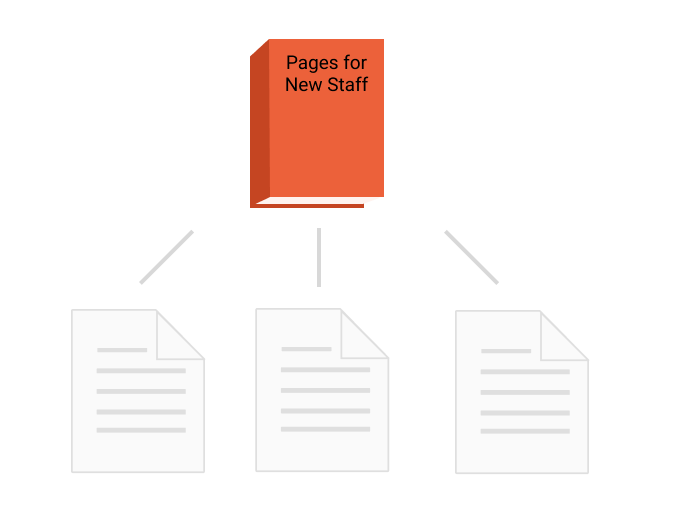
It can also be useful to create pages that link out to all of the pages certain staff might need, like when onboarding a new staff member. Simply create a “Pages for new staff” page and link to all the relevant pages.
As the number of Wiki pages increases, you’ll probably develop your own approach to searching for pages. For example, “This front page link leads here,” or “Type this keyword from the full page search.” It’s fine to have your own way of searching; just make sure you teach it to others, too.
Getting others on board
As your wiki grows in both content and readership, you’ll want to start getting others to contribute as well. A little guidance will go a long way.
Here are a few steps you can take to help users start contributing to the wiki.
Regularly reference the wiki
Permalinks
Each wiki page typically has its own permalink (i.e. a URL that doesn’t change over time.) Whenever the opportunity arises, share the URL and summarize what can currently be found on your wiki:
- If you have meeting-related pages, include their URLs in your meeting materials.
- Whenever you’re asked a question, add the answer to the relevant page and share the URL to follow up.
Notifications
Some wikis include a feature to automatically notify people whenever a page is added or updated. If few people are checking the wiki by themselves, try taking advantage of this feature.
Teach people how to create & edit pages
History feature
Most wikis have a history feature, so even if you make a mistake while editing, you can restore the page to its former state. People are more comfortable making changes knowing they can easily reverse if necessary.
Have new users deliberately mess up a page and then restore it to its original state.
For more on the history feature, go to the “Reverting page edits[d]” section.
Editing
Editing existing pages is an easier task for new users than starting new pages from scratch.
Once users understand the history feature, have them review a batch of existing pages and make corrections or add relevant information.
Creating pages
Eventually, you’ll want others to start contributing unique pages.
The simplest way to have a user create a new page is by copying an existing page. For example, have them create a minutes page for the next meeting based on a minutes page you created previously.
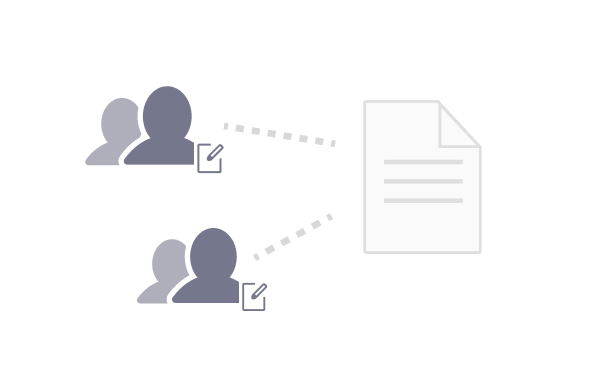
Some wikis have a feature to “star” or “like” a page. You can use these features to express your appreciation for others’ contributions.
Teach people how to organize their pages
Discuss searching and linking
You want your wiki to be easy to navigate for all users. This means regularly reviewing the links on reference pages to ensure they’re up-to-date and well-organized.
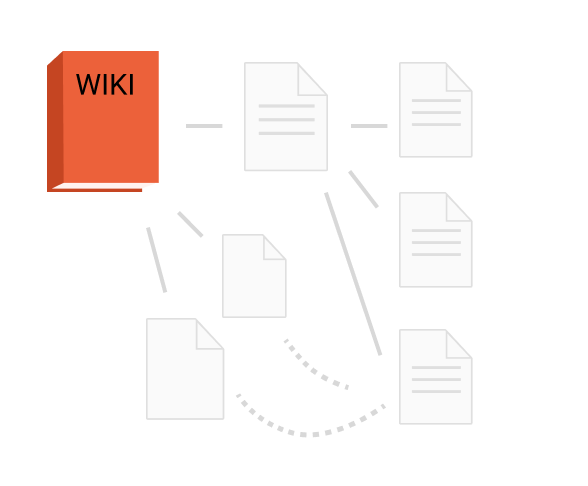
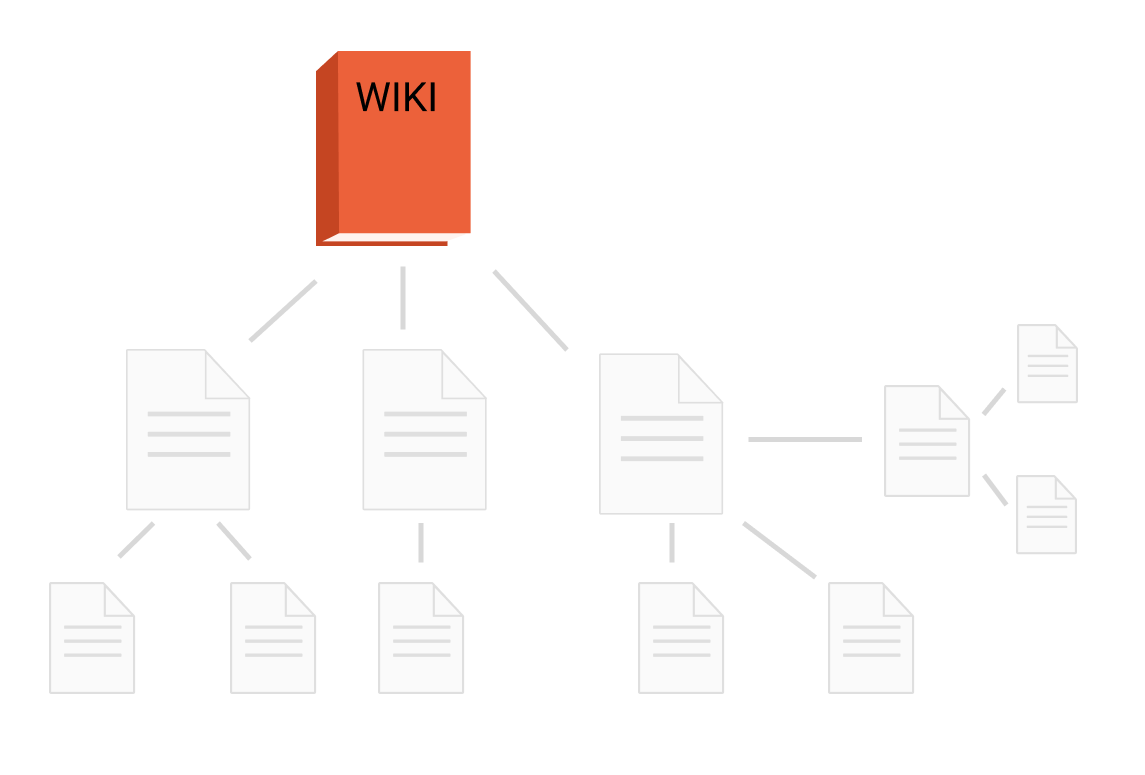
Some wikis will allow you to configure parent-child relationships (i.e. the page hierarchy) between pages. You can, therefore, collect, for example, procedural documents under a “Procedural Documents” page and minutes documents under a “Minutes” page.
Establish rules for titles
To ensure that groups of similar pages are easy to navigate, set up a simple titling format. If you make these rules too complicated, you’ll likely struggle to get others to follow them. So be sure to make titling formats simple and straightforward.
For example, meeting notes could be titled: “MM/DD/YYYY (meeting name)”. When you establish a standard titling format, it’s helpful to add it to the parent wiki.
When the wiki starts to take off
If the introduction of a Wiki goes well, the number of people adding pages, as well as the amount of information available, will steadily increase. Eventually, this can make searching for information more difficult, but we have some tips on how to handle the situation.
Company wiki vs project wiki
Having read this far, you might be wondering if an organization can/should have only a single wiki. However, it’s normal for a single organization to use several wikis for different reasons.
Many organizations have both a company-wide wiki and project wikis. The company-wide wiki generally hosts information that is always relevant, while project wikis focus on individual initiatives. Because projects are by nature restricted to a limited period of time and a limited number of participants, it’s unnecessary to have project-specific information on the company-wide wiki. Having a dedicated project wiki also makes it easy to know where to find project-specific information quickly.
However, if your organization is small or engages in few project-based initiatives, separating your wikis may not be necessary—and, in fact, may simply make searching for information more difficult.
We recommend every organization start with a single wiki and separate it into individual project-based wikis once team members have gotten the hang of things.
Best practices for effective wiki use
A well-structured wiki is a powerful tool for enhancing team collaboration, sharing knowledge, and centralizing project information. Platforms like Backlog offer robust wiki features that allow project members to create, edit, and organize content with ease. Here’s how you can make the most of your wiki, using Backlog as an example.
Organizing wiki content
Effectively organizing your wiki content is key to ensuring easy access to information. Wikis in Backlog are designed to be user-friendly, allowing you to create and categorize pages directly through your web browser—no special software is required.
- Tags and Categorization: Backlog supports tagging, which enables you to categorize wiki pages for easy retrieval. Simply add tags at the top of each page to group related content. The sidebar displays all tags used across the project, helping users quickly find relevant pages.
- Tree View for Page Hierarchies: For more complex documentation, Backlog allows you to use a tree view. This feature helps you nest pages under parent topics (e.g.,
Project Overview/Requirements/Specifications), creating a hierarchical structure. Enable tree view in project settings to branch or organize pages in a nested format. - Wiki Sidebar Navigation: Backlog’s wiki includes a sidebar that enhances navigation. It shows a searchable list of tags, a comprehensive page list sorted alphabetically, and a table of contents for the current page. You can expand or collapse these sections to streamline your viewing experience.
Managing access & permissions
Maintaining control over who can access and edit your wiki is crucial for preserving content quality.
- Role-Based Access: In Backlog, access to the wiki is managed through project-level permissions. Members with editing rights can create and modify wiki pages, while users with restricted roles (e.g., “Add issues only” or “View only”) can view content but not edit it.
- Version History and Restorations: Every change made to a wiki page in Backlog is saved, allowing you to view the version history. This feature is useful for tracking edits, comparing different versions, and restoring previous content if necessary.
Keeping your wiki updated
To keep your wiki relevant, it’s important to establish a routine for content updates.
- Email Notifications for Updates: Backlog automatically sends email notifications to project members whenever a wiki page is updated. This ensures that your team stays informed about the latest changes.
- Templates for Consistency: For streamlined content creation, Backlog provides wiki templates that you can use as a starting point for pages like meeting notes, project documentation, and standard operating procedures (SOPs). Templates help maintain consistency and save time.
Content review protocols
Implementing a content review process ensures that your wiki remains accurate and valuable over time.
- Manual Review Using Comments: Although Backlog does not have built-in automated workflows for content approvals, you can leverage the comments feature to gather feedback. Team members can leave suggestions or flag sections for review directly on the wiki page.
Creating templates for consistency
Having structured templates for key processes ensures consistency in how information is documented, making it easier to locate, reference, and track important details. Whether you’re taking meeting minutes or documenting project details, templates provide a consistent format that improves clarity and organization. Below, you’ll find examples of two common templates—one for meeting minutes and another for project documentation. These examples demonstrate how to apply the templates to your wiki pages, offering clear guidance on how to categorize and format your content for ease of use.
Meeting minutes template
Scenario:
Your team just wrapped up a meeting to discuss a new feature launch for your product, and you need to document the key points and next steps. Using the Meeting Minutes template in your wiki will ensure consistency and make it easy for everyone to follow up on action items.
Example Wiki Page:
Title: 11/15/2024 (Feature Launch Planning Meeting)
Attendees:
- Jane Doe (Product Manager)
- John Smith (Marketing Lead)
- Emily Chen (Design Lead)
- Mike Brown (Developer)
Agenda:
- Review project timeline for feature launch
- Discuss marketing strategy
- Assign responsibilities for design and development tasks
Meeting Notes:
-
Discussion Point:
Jane presented the updated timeline for the feature launch, confirming that the product would be ready for beta testing by December 10th. -
Decision Made:
The team agreed to finalize the marketing strategy by the end of the month and to begin the design mockups immediately. -
Action Items & Responsible Person:
- Jane will send out the updated timeline to all stakeholders by 11/17/2024.
- John will prepare a marketing campaign outline and present it at the next meeting (due 11/22/2024).
- Emily will start working on the feature’s UI mockups and provide updates by 11/20/2024.
Categorization:
- Tags: Feature Launch, Meeting Notes, 2024, November
- Parent Page: Product Launches 2024
- Tree View Placement: Product Launches/Feature Launch/11-2024
This example shows how the meeting minutes are documented and categorized. It’s clear, easy to navigate, and the action items are organized for follow-up. The page is tagged and categorized so that anyone in the team can quickly find it when they need to reference past meeting discussions.
Blank template
Title: MM/DD/YYYY (Meeting Name)
Attendees: [Names]
Agenda: [List of Agenda Items]
Meeting Notes:
- [Discussion Point]
- [Decision Made]
- [Action Items & Responsible Person]
Project documentation template
Scenario:
You’re working on a new internal tool development project, and your team needs to document key project details, including objectives, team members, and deliverables. The Project Documentation template helps centralize all project-related information in one place.
Example Wiki Page:
Title: Internal Tool Development – Project Documentation
Project Description:
This project is focused on creating an internal tool for the team to streamline customer support requests. The goal is to develop a web-based tool that integrates with our existing CRM system to improve response times and customer satisfaction.
Goals:
- Design and implement a dashboard for customer support agents.
- Integrate tool with CRM to sync customer data.
- Enable reporting and analytics features for management.
Team Members:
- Jane Doe (Project Manager)
- John Smith (Backend Developer)
- Emily Chen (Frontend Developer)
- Mike Brown (Quality Assurance)
Timeline:
- Start Date: November 1, 2024
- End Date: February 1, 2025
- Milestones:
- Design Phase Completion: December 1, 2024
- Beta Testing: January 10, 2025
- Final Launch: February 1, 2025
Documents:
Categorization:
- Tags: Internal Tool, Project Documentation, Development, 2024
- Parent Page: Internal Projects
- Tree View Placement: Internal Projects/Tool Development/Internal Tool Development 2024
This example shows how the Project Documentation template captures essential details about the project. It includes a description, goals, team members, timeline, and links to other documents related to the project. The page is categorized within the “Internal Projects” section and tagged for easy retrieval.
Blank template
Project Title: [Title]
Project Description: [Brief Description]
Goals: [List of Goals]
Team Members: [List of Team Members]
Timeline: [Project Timeline]
Documents: [Links to Related Documents]
Building a collaborative culture around your wiki
Promoting a collaborative culture within your organization is key to the success of your Wiki. Encouraging teamwork and collective participation can transform your Wiki into a vibrant and valuable resource.
Drive both individual and organizational success with these tips:
- Encourage collaboration: Create an environment where collaboration is celebrated and encouraged. Regularly acknowledge and highlight the contributions of team members to the Wiki, both in team meetings and through internal communications. Celebrate milestones and meaningful contributions to foster a sense of community and shared purpose among employees.
- Feedback mechanisms: Establish channels for continuous feedback and suggestions to continually improve the Wiki. Encourage users to share their thoughts on what is working well and where improvements can be made. Regular feedback loops ensure that the Wiki evolves to meet the needs of its users and remains relevant and useful.
- Recognition and reward systems: Implement recognition and reward systems to motivate employees to contribute to the Wiki. This can include public recognition in newsletters or meetings, awarding badges for contributions, or creating a leaderboard to showcase top contributors. Gamifying the process by awarding points for contributions can also increase engagement and foster a healthy, competitive spirit.
- Contribution leaderboards: Maintain leaderboards that highlight top contributors to the Wiki. This not only motivates individuals to contribute more but also fosters a sense of accomplishment and pride among team members. Regularly update and share the leaderboard to keep the momentum going.
- Gamification: Incorporate gamification elements such as badges, points, and levels to make contributing to the Wiki fun and rewarding. Recognize achievements with badges for first-time contributors, top editors, or those who provide valuable content. This approach makes the process engaging and encourages frequent participation.
- Developing internal champions: Identify and train internal champions who can advocate for the Wiki and assist their peers in using it effectively. These champions can serve as role models, mentors, and go-to resources for Wiki-related questions. Their enthusiasm and support can significantly accelerate Wiki adoption across the organization.
- Celebrate success stories: Share success stories and testimonials from teams or individuals who have benefited from using the Wiki. Highlight how the Wiki has improved efficiency, solved problems, or led to successful outcomes. By showcasing tangible benefits, you can inspire others to contribute and utilize the Wiki.
By fostering such a culture, you ensure that your Wiki remains a living, breathing document that grows and evolves with the organization, ultimately enhancing productivity and knowledge sharing across all levels.
Introduction summary
What you’ve learned in the introductory section:
- A Wiki is a website that anyone can freely edit.
- In organizations, the Wiki becomes a centralized location for collecting information often scattered throughout the organization.
- It usually takes time for everyone in an organization to begin using a Wiki.
- When starting a Wiki, focus on making use of the Wiki yourself, and growing the number of contributors one by one.
If you’re ready to try using a Wiki yourself, continue on to the Practice section!
Wiki tutorial
Using wikis with Backlog
In the Practice section, we will show you how to operate a Wiki using Backlog, our online project management and collaboration tool. While we’ll be showing you instructions specific to our tool, the basic Wiki features available in Backlog are similar to other services, so you can still follow along.
First things first: you’ll need to sign up for Backlog. If you’re already a Backlog member: great! If not, we offer a 30-day free trial, risk free.
Use an existing Backlog space
If you have an existing Backlog subscription, you can use your existing Backlog space—no need to create a new one!
To try out the Wiki feature, simply create a new project. You may need to ask someone with administrative privileges to create this for you if you yourself are not an admin.
After creating your Project, skip ahead to Selecting a text format.
Sign up for a new Backlog Space
From our pricing page, you can start your 30-day free trial of Backlog. The Wiki feature is available on any plan.
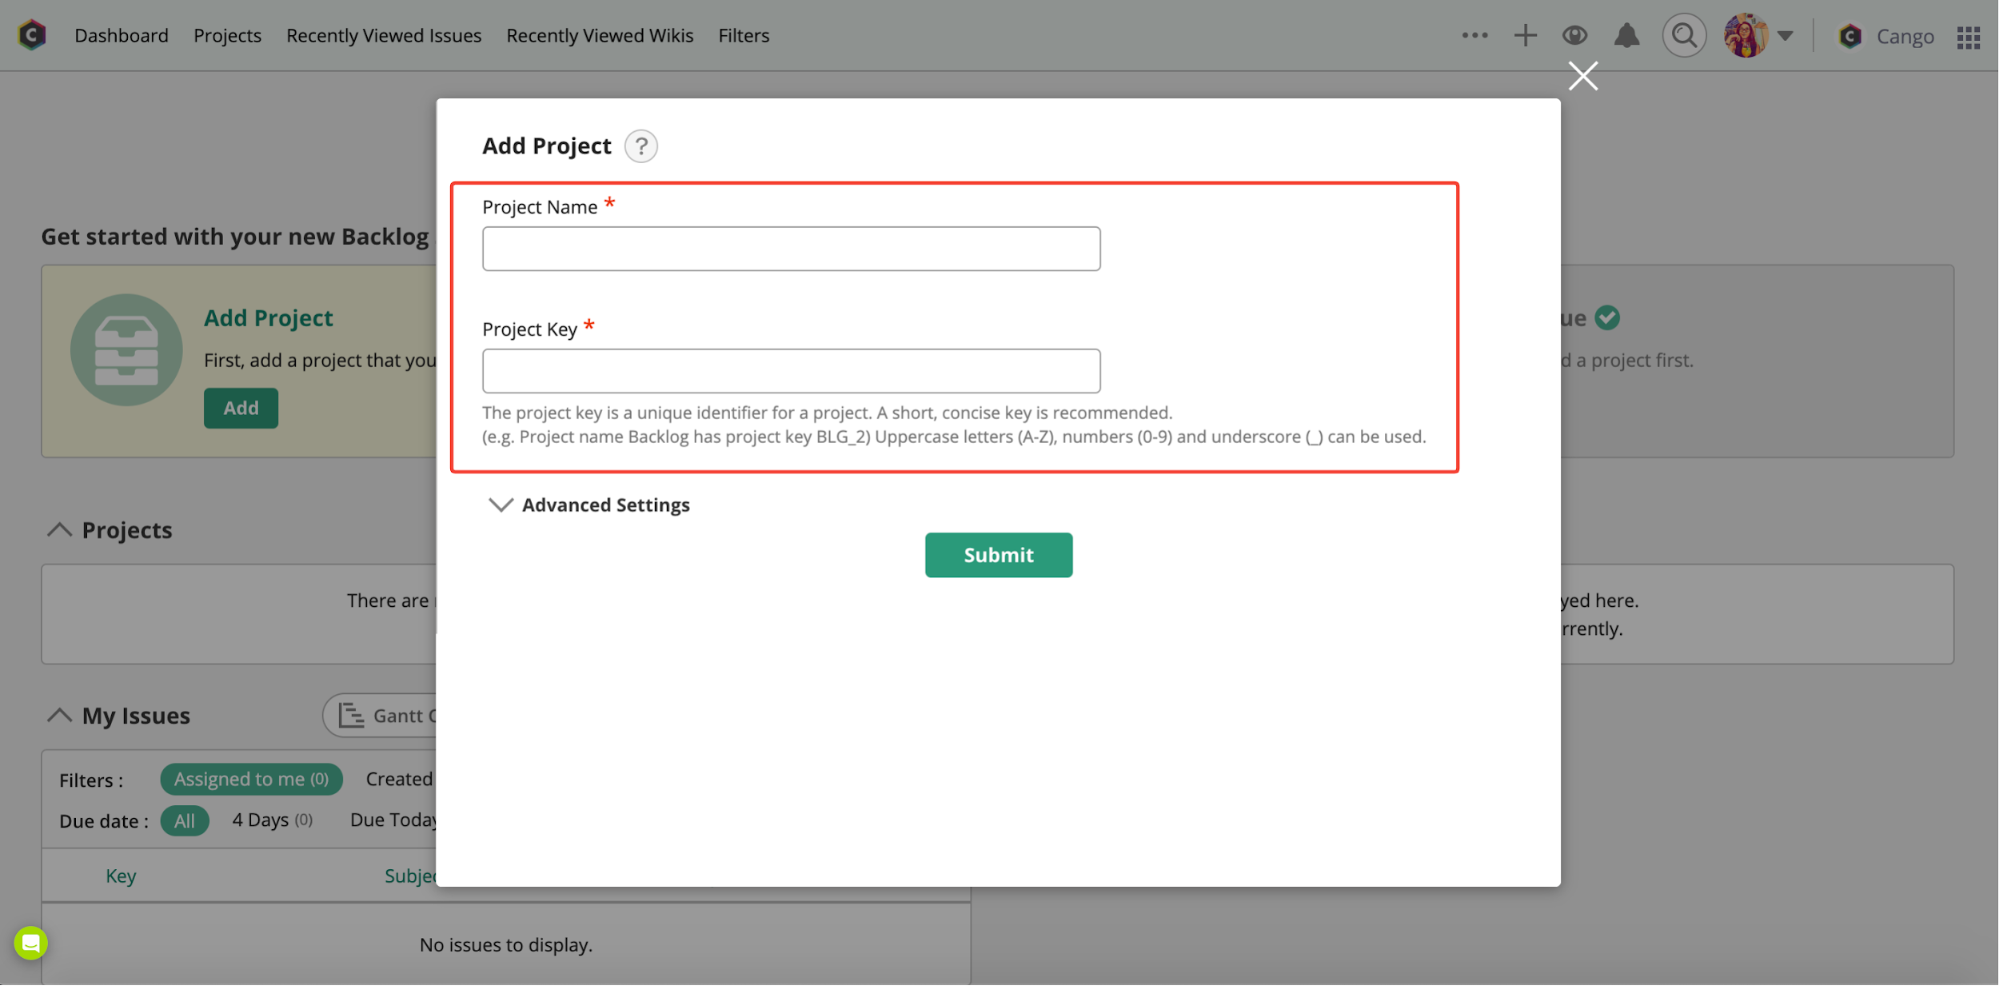
After acquiring your Backlog Space, you will be asked to input a Project name. Feel free to name this whatever you’d like—something like “Test” is fine. You can always change the project name later on. In Backlog, each Project has its own Wiki.
Your Backlog Space is where all of your organization’s project information, files, and members are located. There is usually one subscription (and one Space) per organization.
Next, you’ll be taken to the User Invite page. If you’re just trying out the features of the Wiki by yourself, you can hit “Skip”. If not, feel free to invite any team members you want to join you on Backlog.
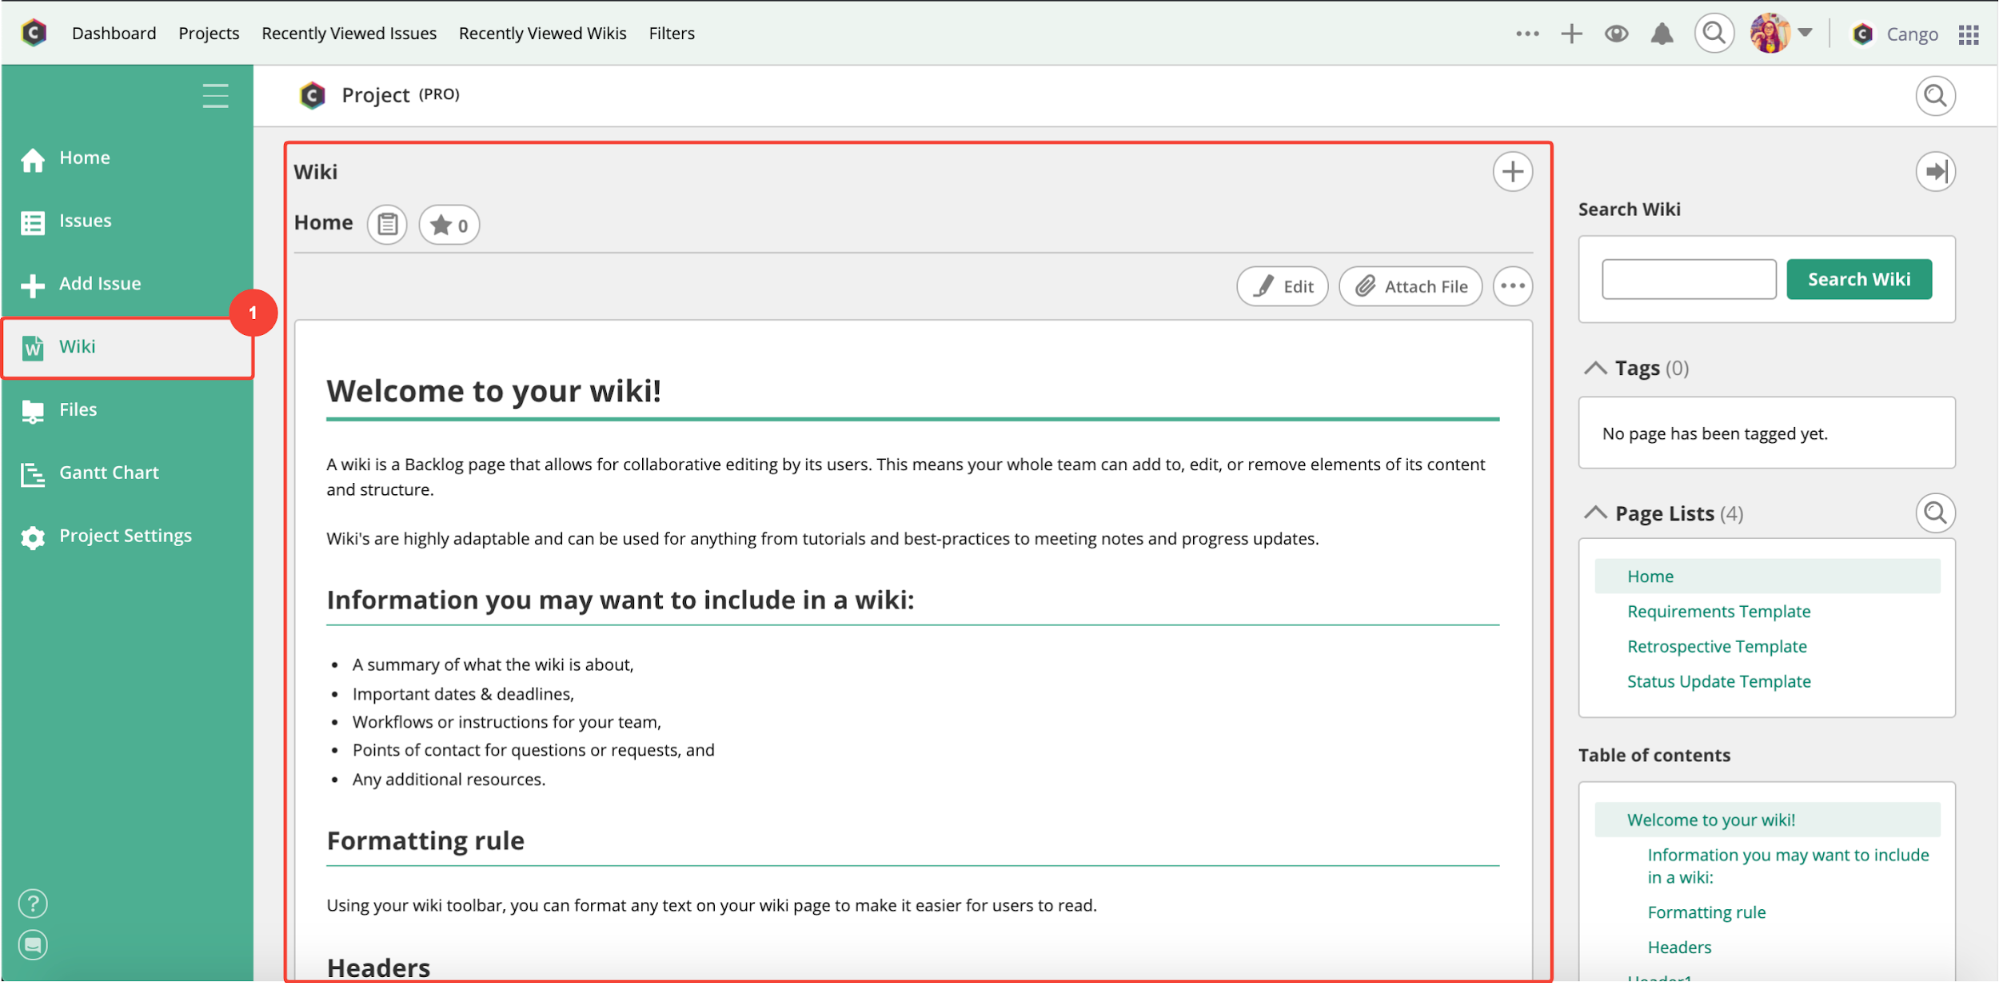
Now your Backlog Space is up and ready. Go to your new project and click “Wiki” on the left-hand sidebar to go to the Wiki’s home page.
Selecting a text format
You usually can’t write a Wiki page in HTML. Instead, you use a simpler set of rules that still contain some of the features of HTML text formatting. The way you write your articles will depend on the Wiki you use.
Backlog’s Wikis support two sets of text formatting rules. Whichever you select will apply to your entire Project.
The formatting rules supported in Backlog are:
- Markdown notation
- Backlog notation
If you’ve created a new Backlog Space
If you’ve just set up your new Backlog Space, Markdown notation will be selected automatically. In most cases, there’s no problem with continuing to use Markdown notation.
You can skip ahead to Adding a page.
If you’re using an existing Backlog Space
If you’re using an existing Backlog space, you should check which notation your Wiki is using by default. You can check this on the page editing screen: just go to your Wiki page and click the “Edit” icon in the top-right to open the page editing screen.
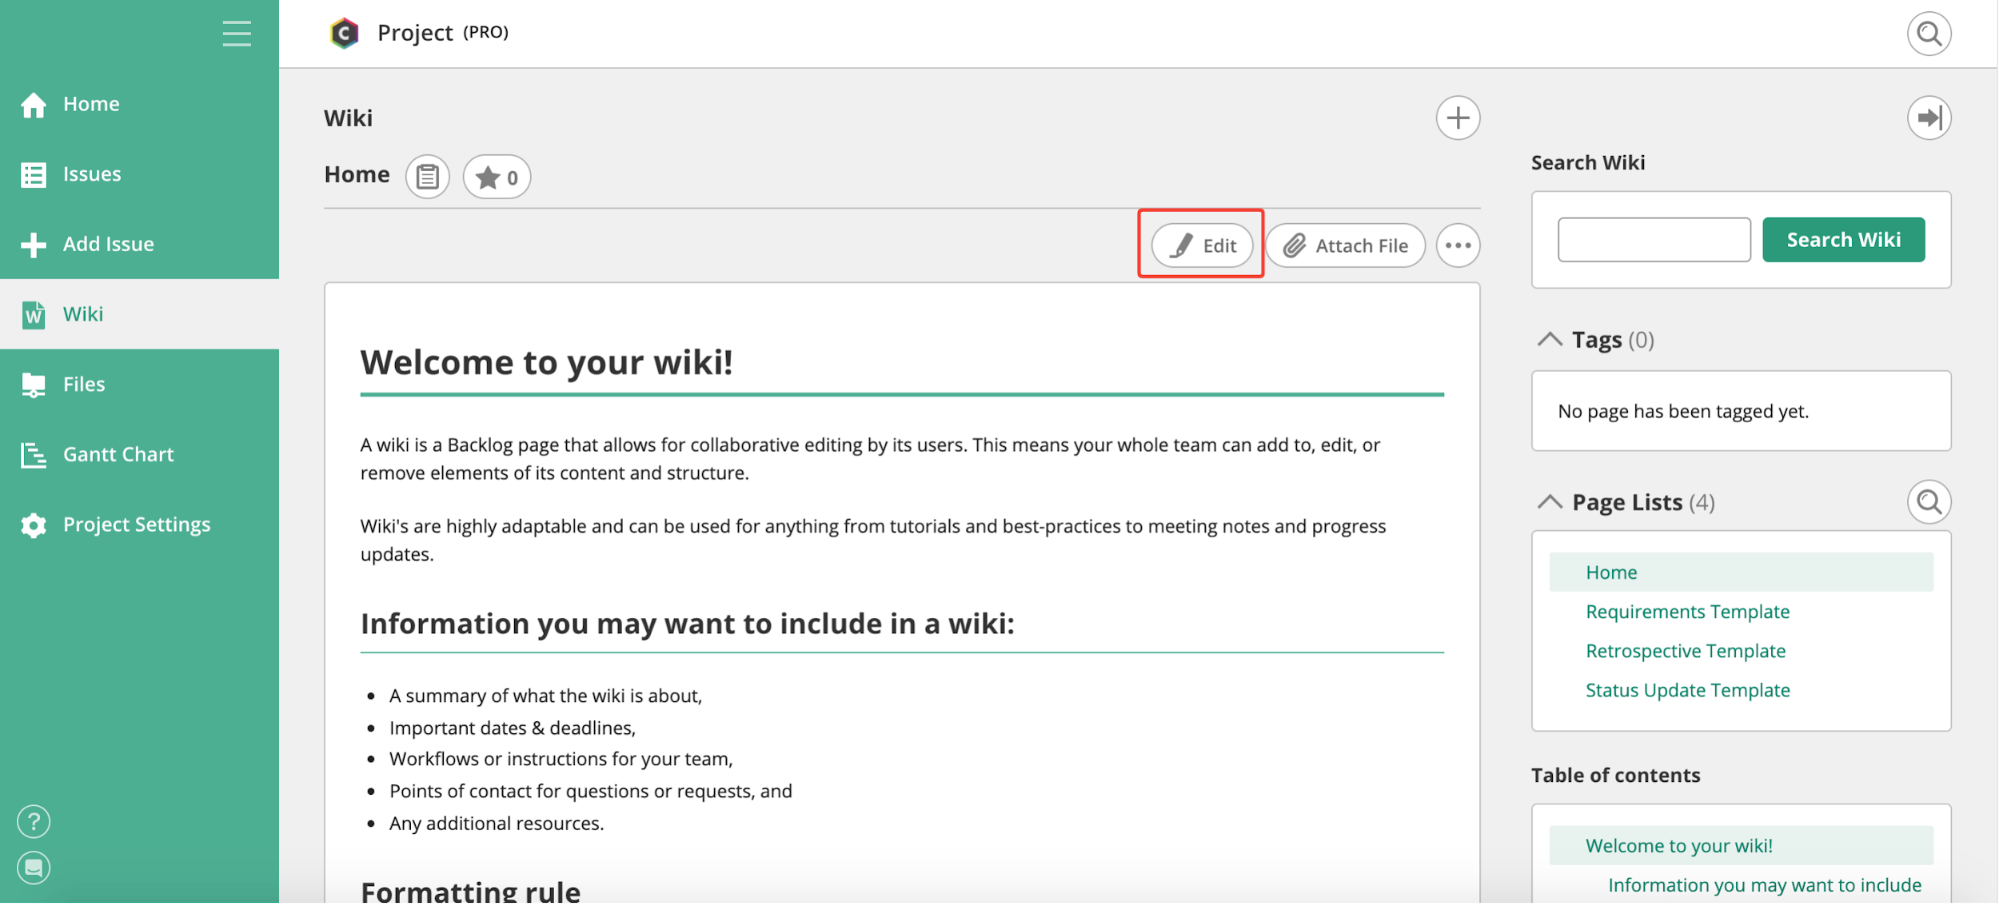
If it says “Text formatting rules (Markdown)” in the top-right of the editing screen, that Wiki is using Markdown notation. If it says “Text formatting rules (Backlog),” it’s using Backlog notation.
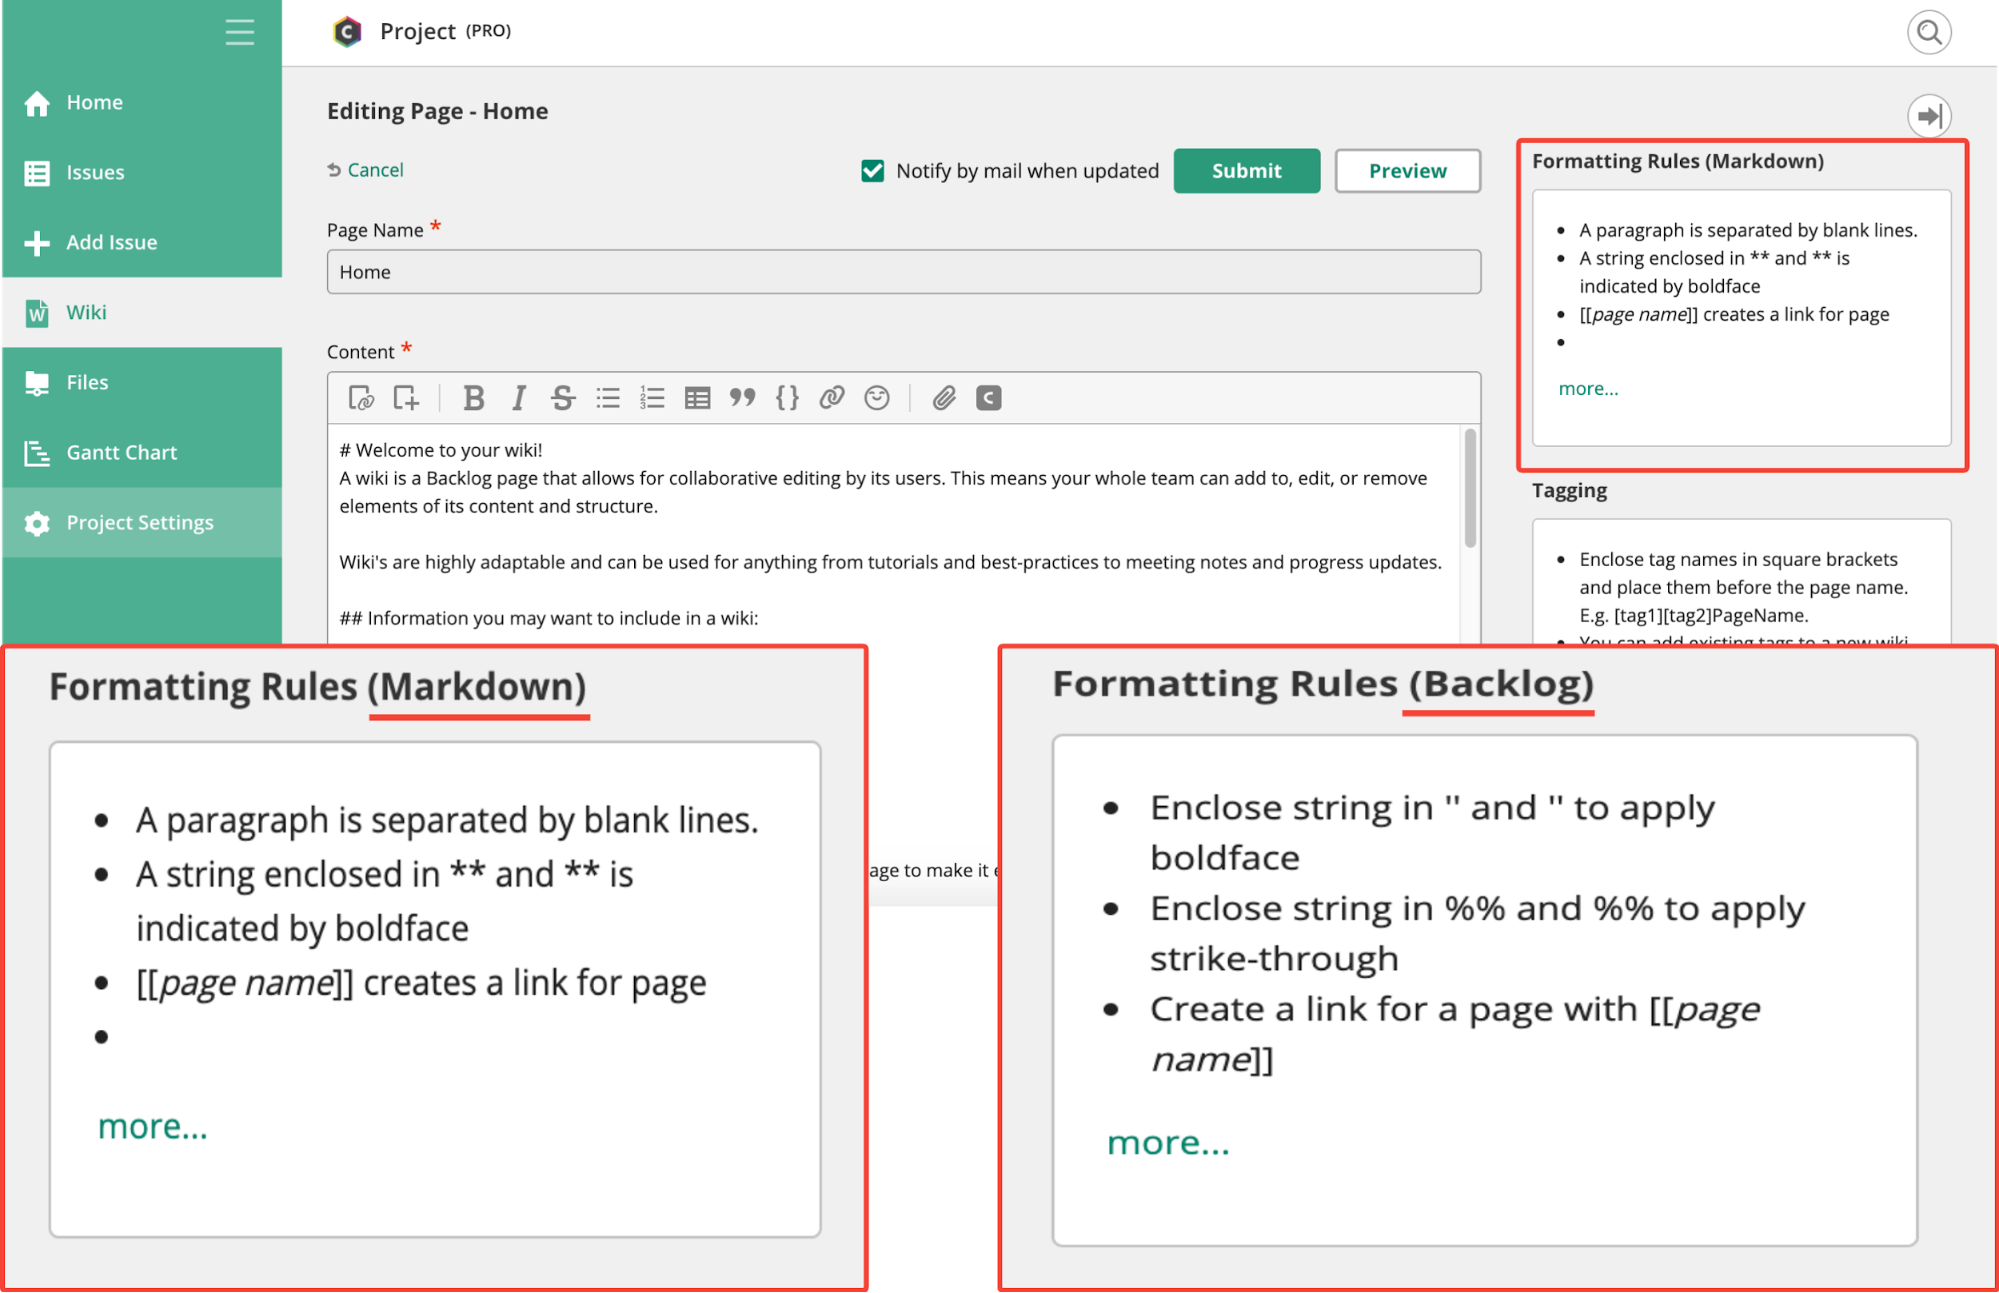
We’ll use both in our examples moving forward, so be sure to follow the example that matches your formatting selection.
Click on “Show full text formatting rules” in the “Text formatting rules” box, and you can view the details of your Markdown (or Backlog) notation.
Adding a page
Now it’s time to start actually adding your Wiki! First off, let’s create a new page. There are two methods of adding a page.
Method 1: Using the “+” button
You can add a new wiki page by clicking the “+” icon in the top-right of the Wiki page.

Using this method, the page won’t be linked to other pages automatically. Be sure to add links to the page later to ensure it’s easy to find.
Method 2: Using the linked title
STEP 1 Edit your Wiki’s Home page
Click the edit icon in the top-right of your Wiki’s Home page to display the page editing screen.
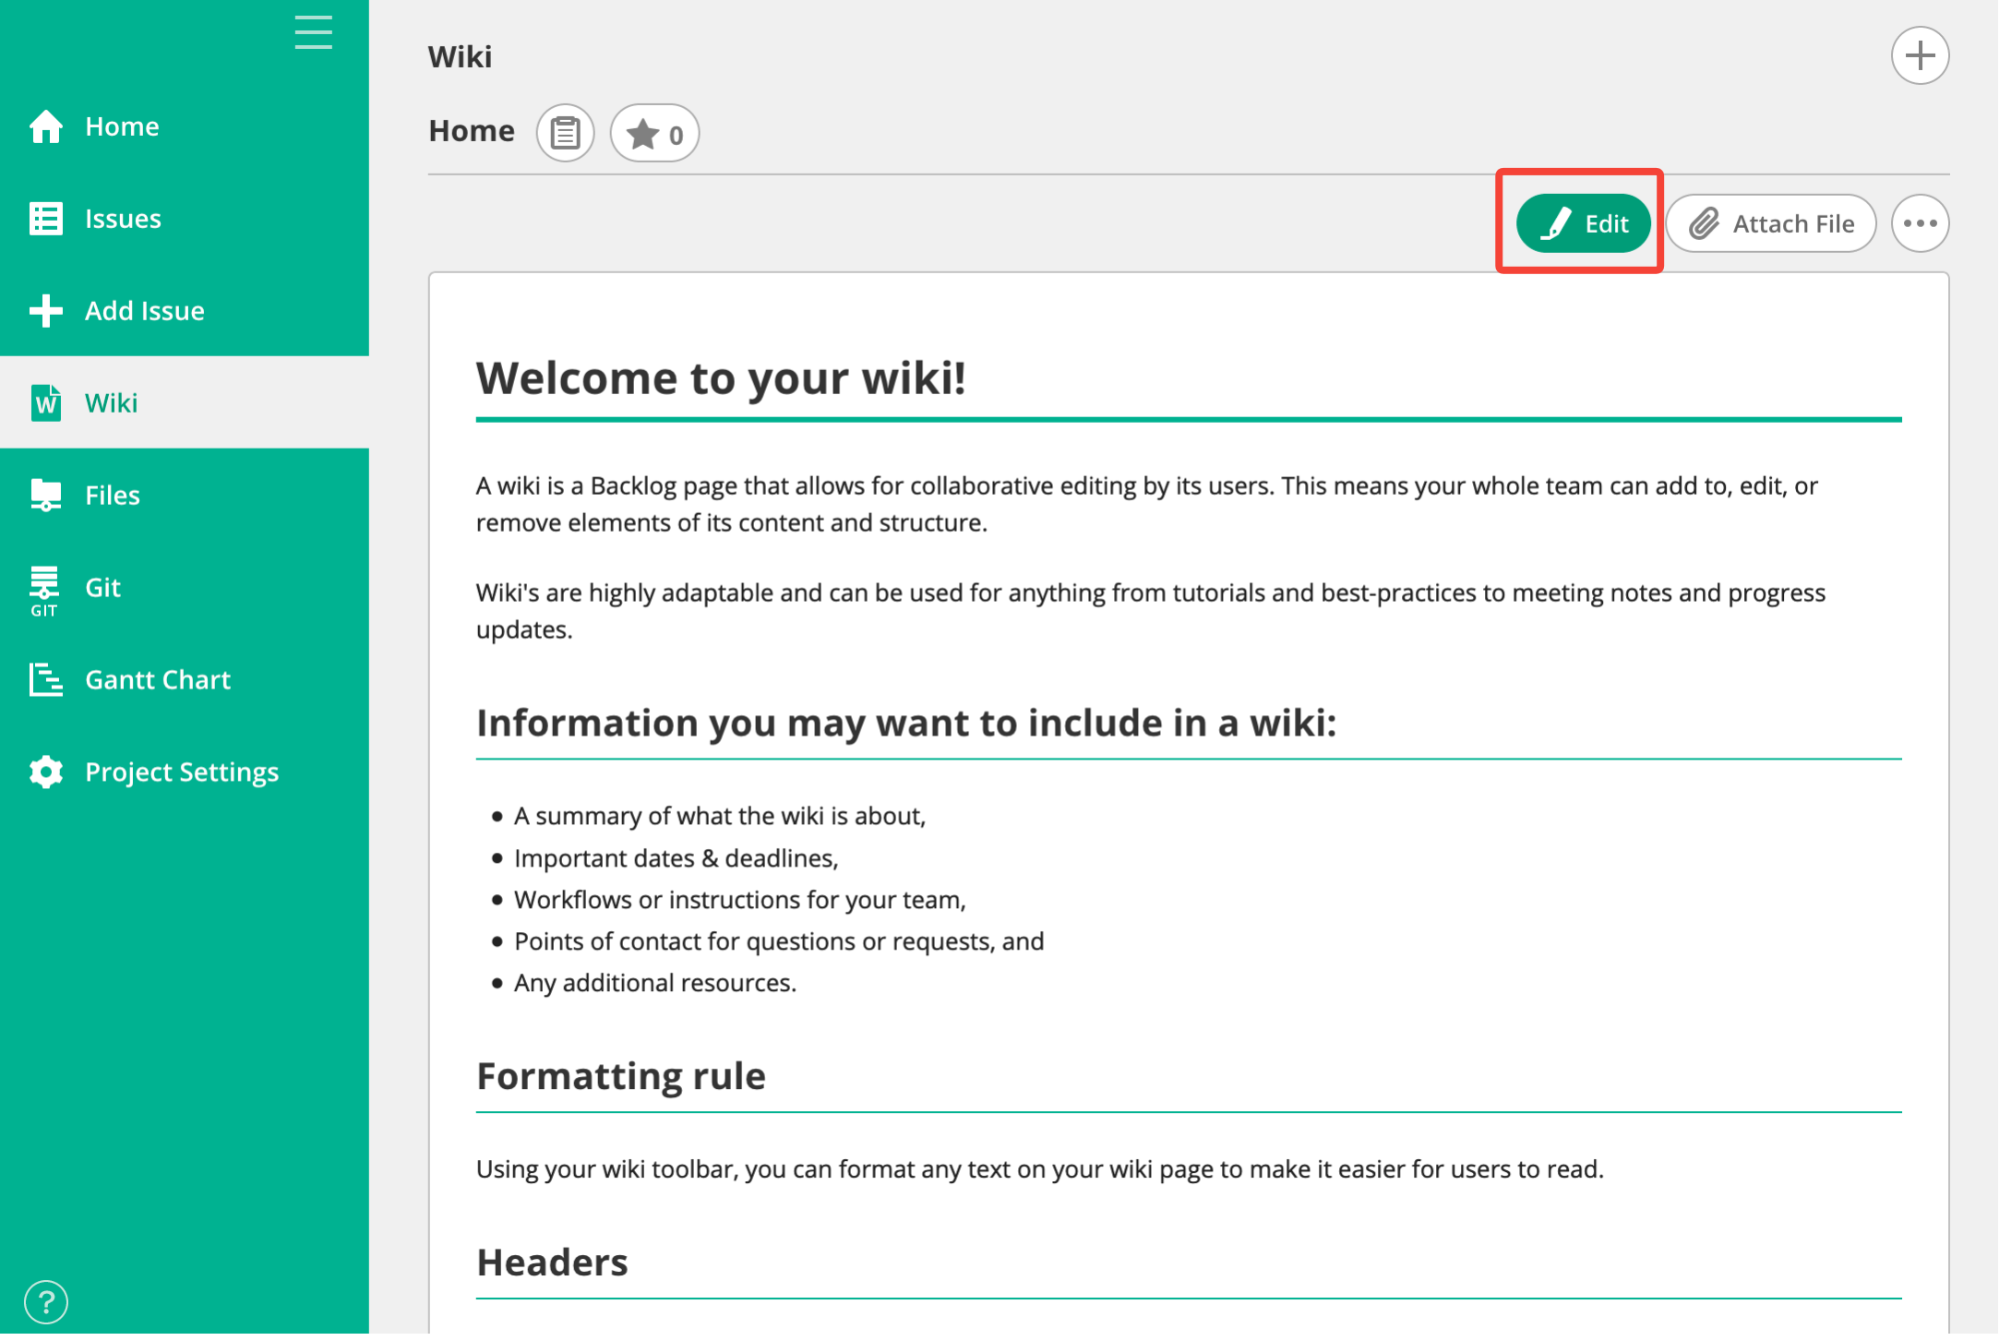
If you’ve just created a new Space, the Home page will display hints on how to use the Wiki. Give them a quick read. When you’re done, go ahead and delete them. Since everyone will see this page, we’re going to rewrite it to make it easier to use.
STEP 2 Write a title enclosed in brackets
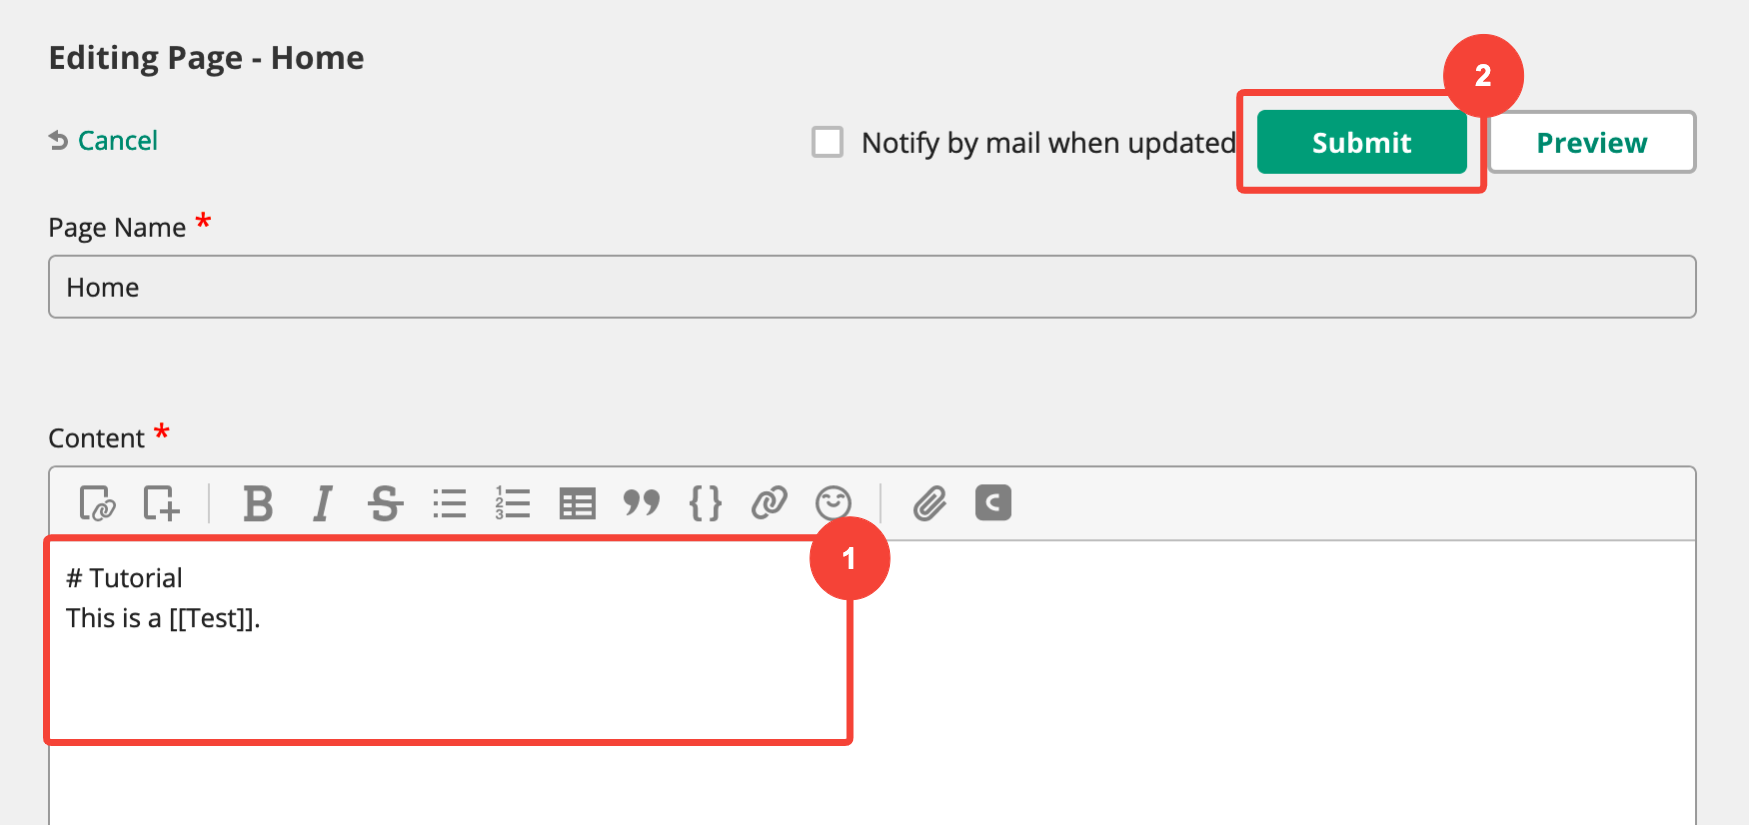
We’re now going to try adding a page called “Test”. You can delete the current Home page content and add the following to the page contents field:
Markdown notation
# Tutorial

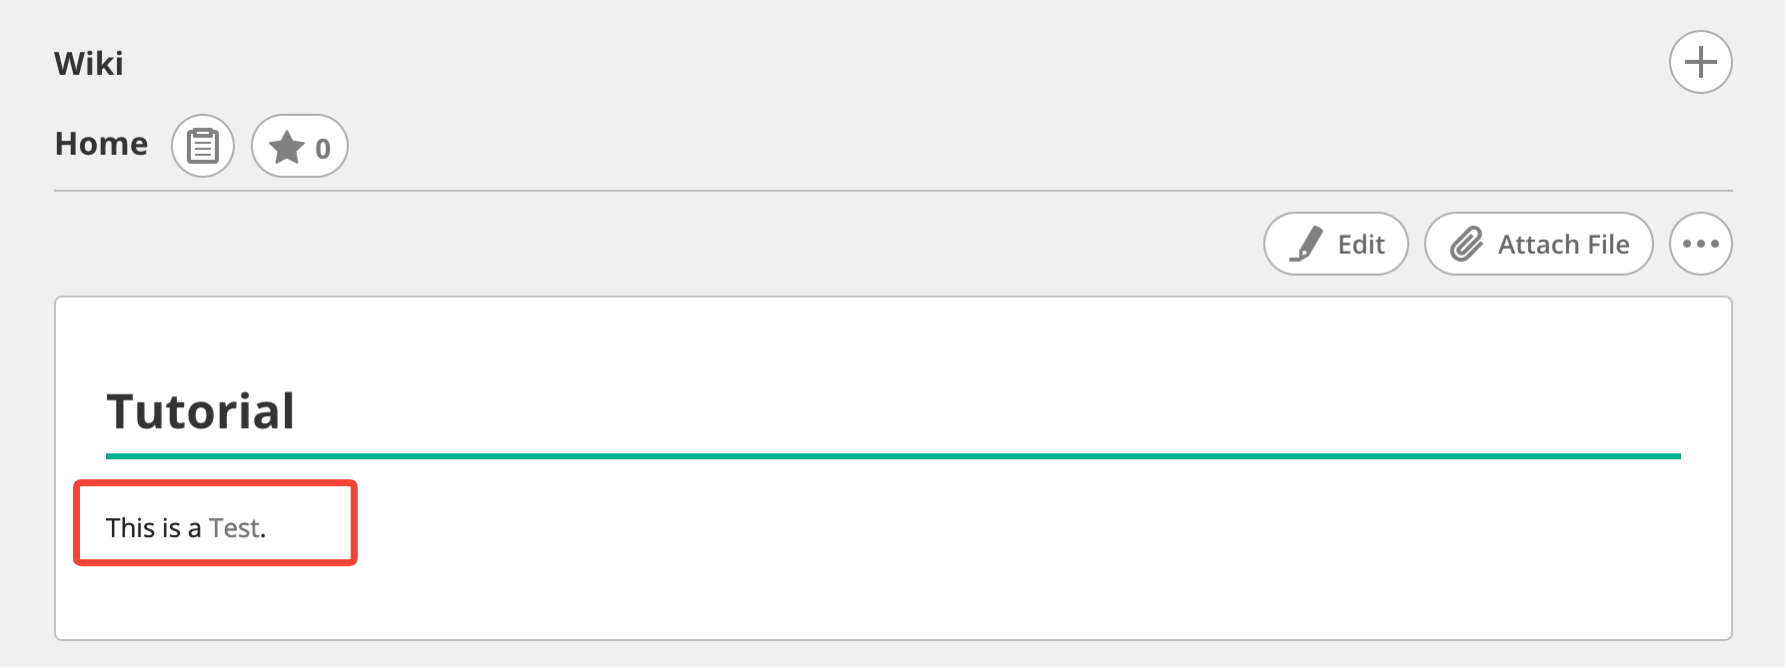
This is a [[Test]].
Backlog notation
* Tutorial

This is a [[Test]].
When you’re done, click the “Submit” button at the top or bottom of the screen.
STEP 3 Click the linked title
When you save your changes, the word “Test” will become a link on the page, as seen below.
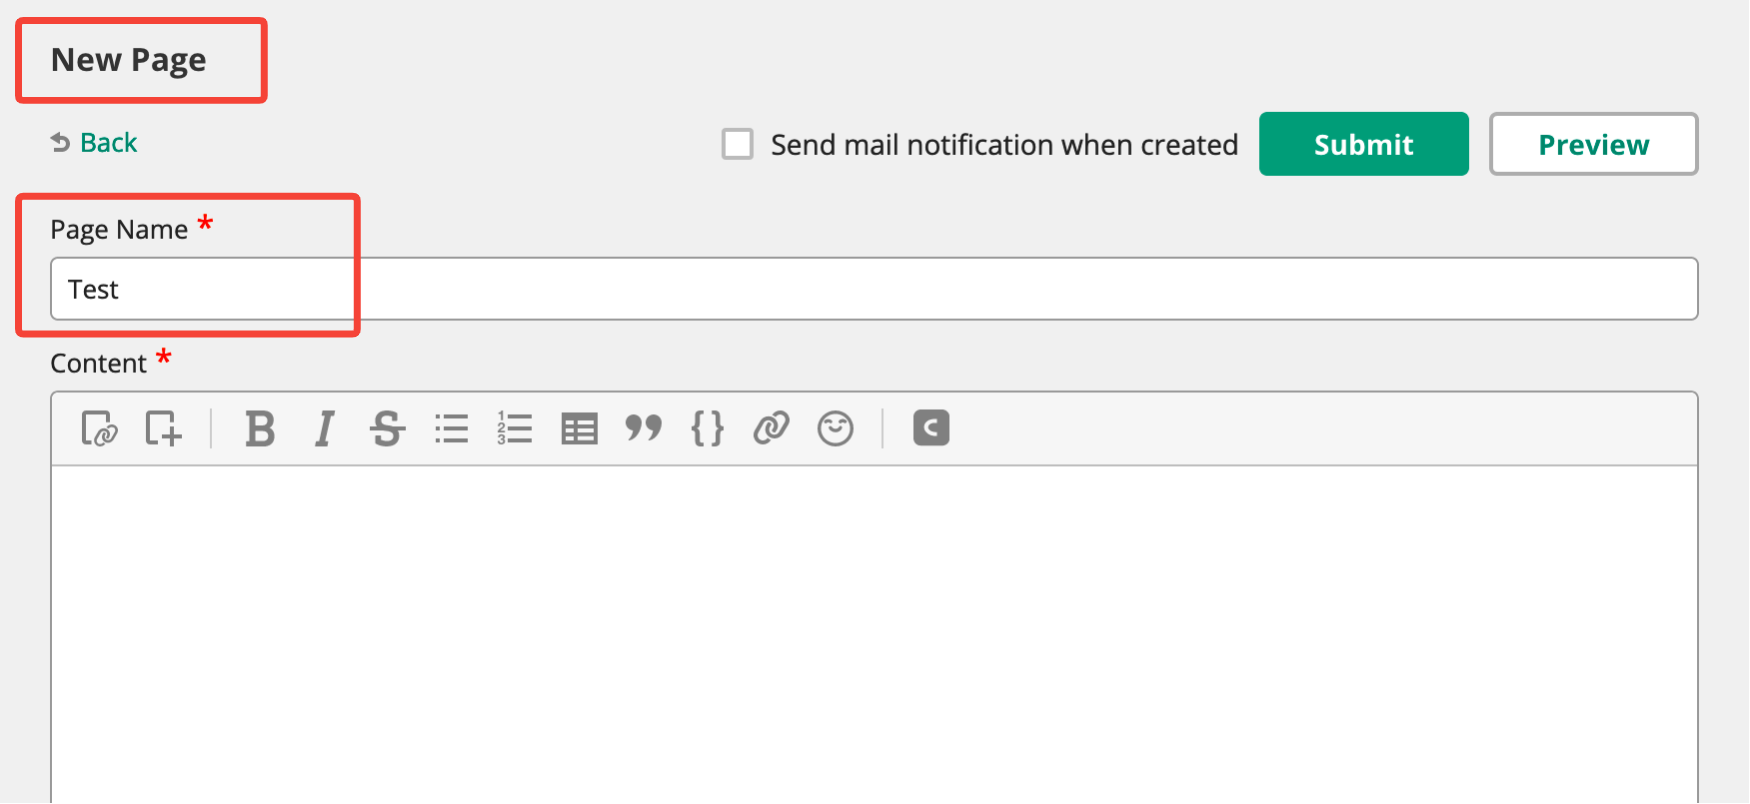
When you click this link, you’ll be brought to a new page creation screen with the page name automatically set to “Test.”
STEP 4 Create “Test” page
Copy and paste the text below into the page contents field, and then click the “Submit” button. A “Test” page will be created.
Markdown notation
This is a test page.

On a Wiki, you can **bold** text, ~~strikethrough~~ text,

* and create lists
* like this.
Backlog notation
This is a test page.

On a Wiki, you can "bold" text, %%strikethrough%% text,

- and create lists
- like this.
Once the changes are saved, the page should look like this:
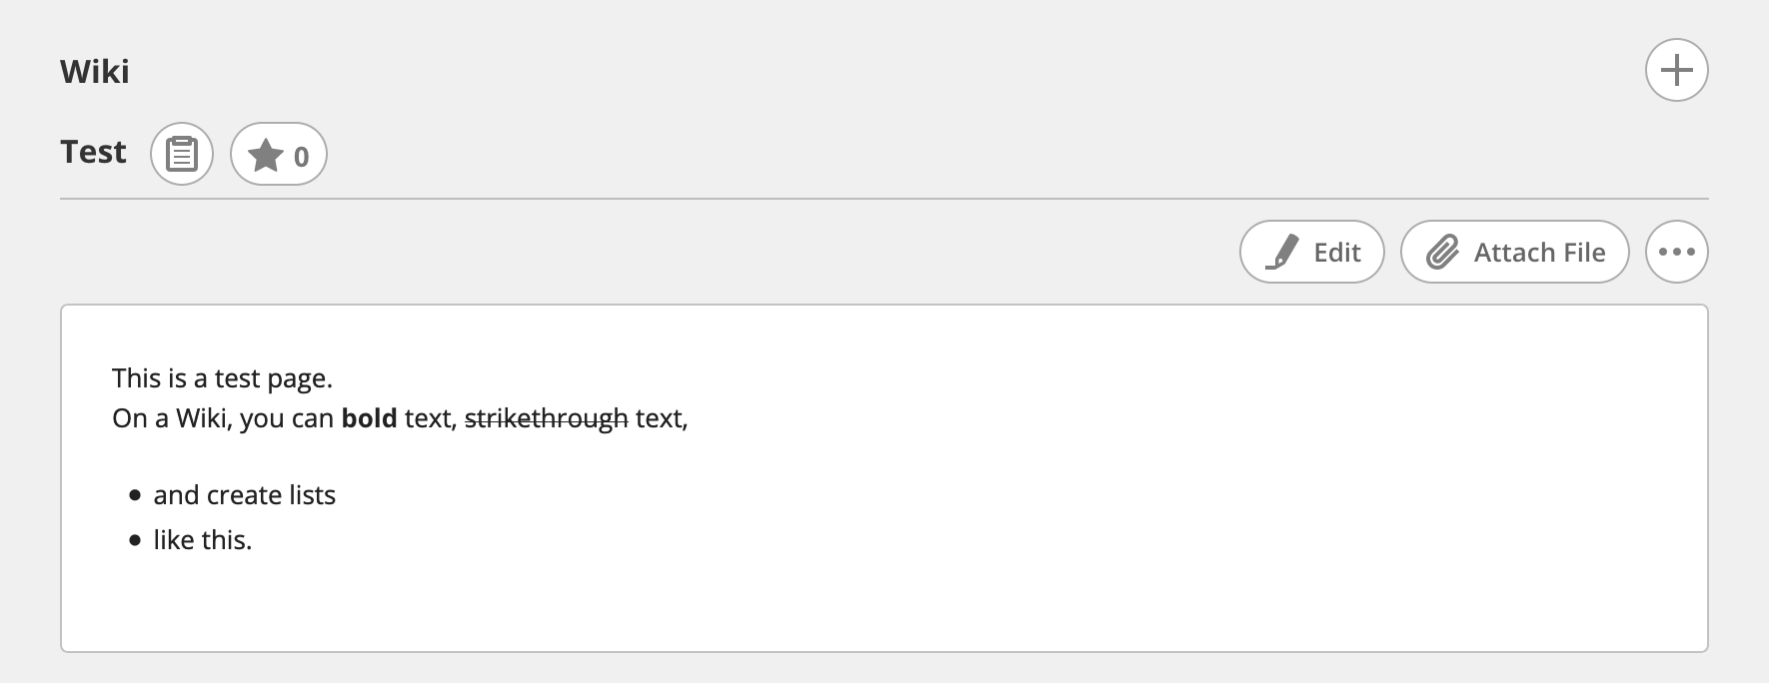
You’ve now made your first new page and linked to it from the Home page! You can return to the Wiki’s Home page and click the “Test” link. This will redirect you to the created Test page rather than the page creation screen.
Making pages easy to read
Now, we’ll introduce you to the most frequently-used text formatting features provided by Wikis.
Headings and highlights
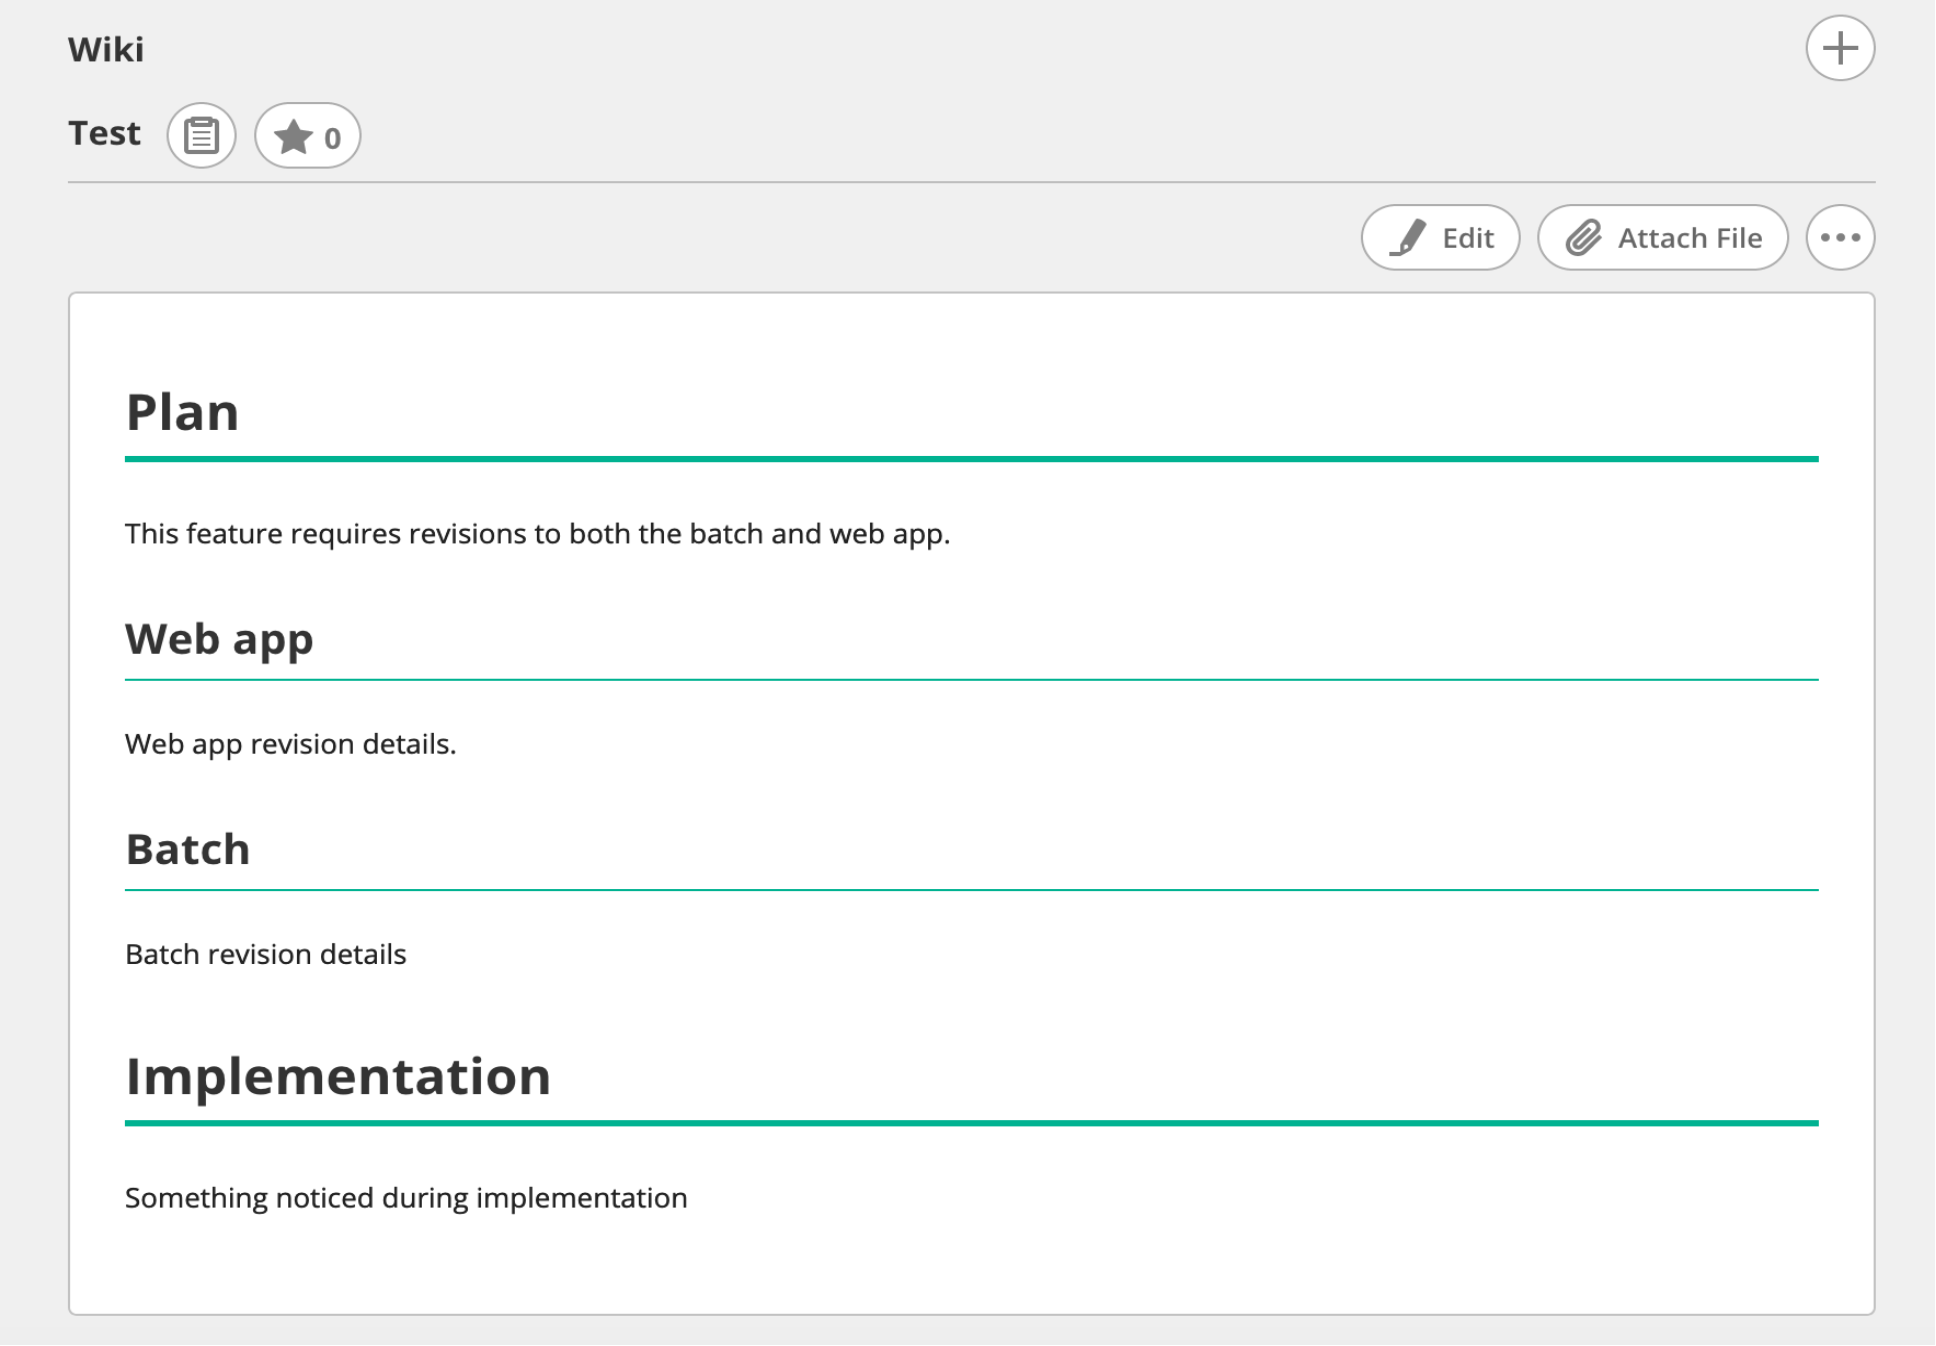
If your page features a lot of text, adding headings can make it much easier to read.
Use the appropriate heading levels (e.g., H1 for main titles, H2 for section titles, and H3 for subsections) to help users quickly navigate your page and find the information they need. Use bold or italic text to highlight key terms, instructions, or concepts.
This can help draw attention to important points without overwhelming the reader with formatting.
Markdown notation
Adding a “#” at the start of a line will designate that line as a heading. You must put a space after the #. “##” will create a level 2 header, while “###” will create a level 3 header.
Copy and paste the text below into your “Test” page, then click the “Submit” button.
# Plan
This feature requires revisions to both the batch and web app.

## Web app
Web app revision details.

## Batch
Batch revision details

# Implementation
Something noticed during implementation.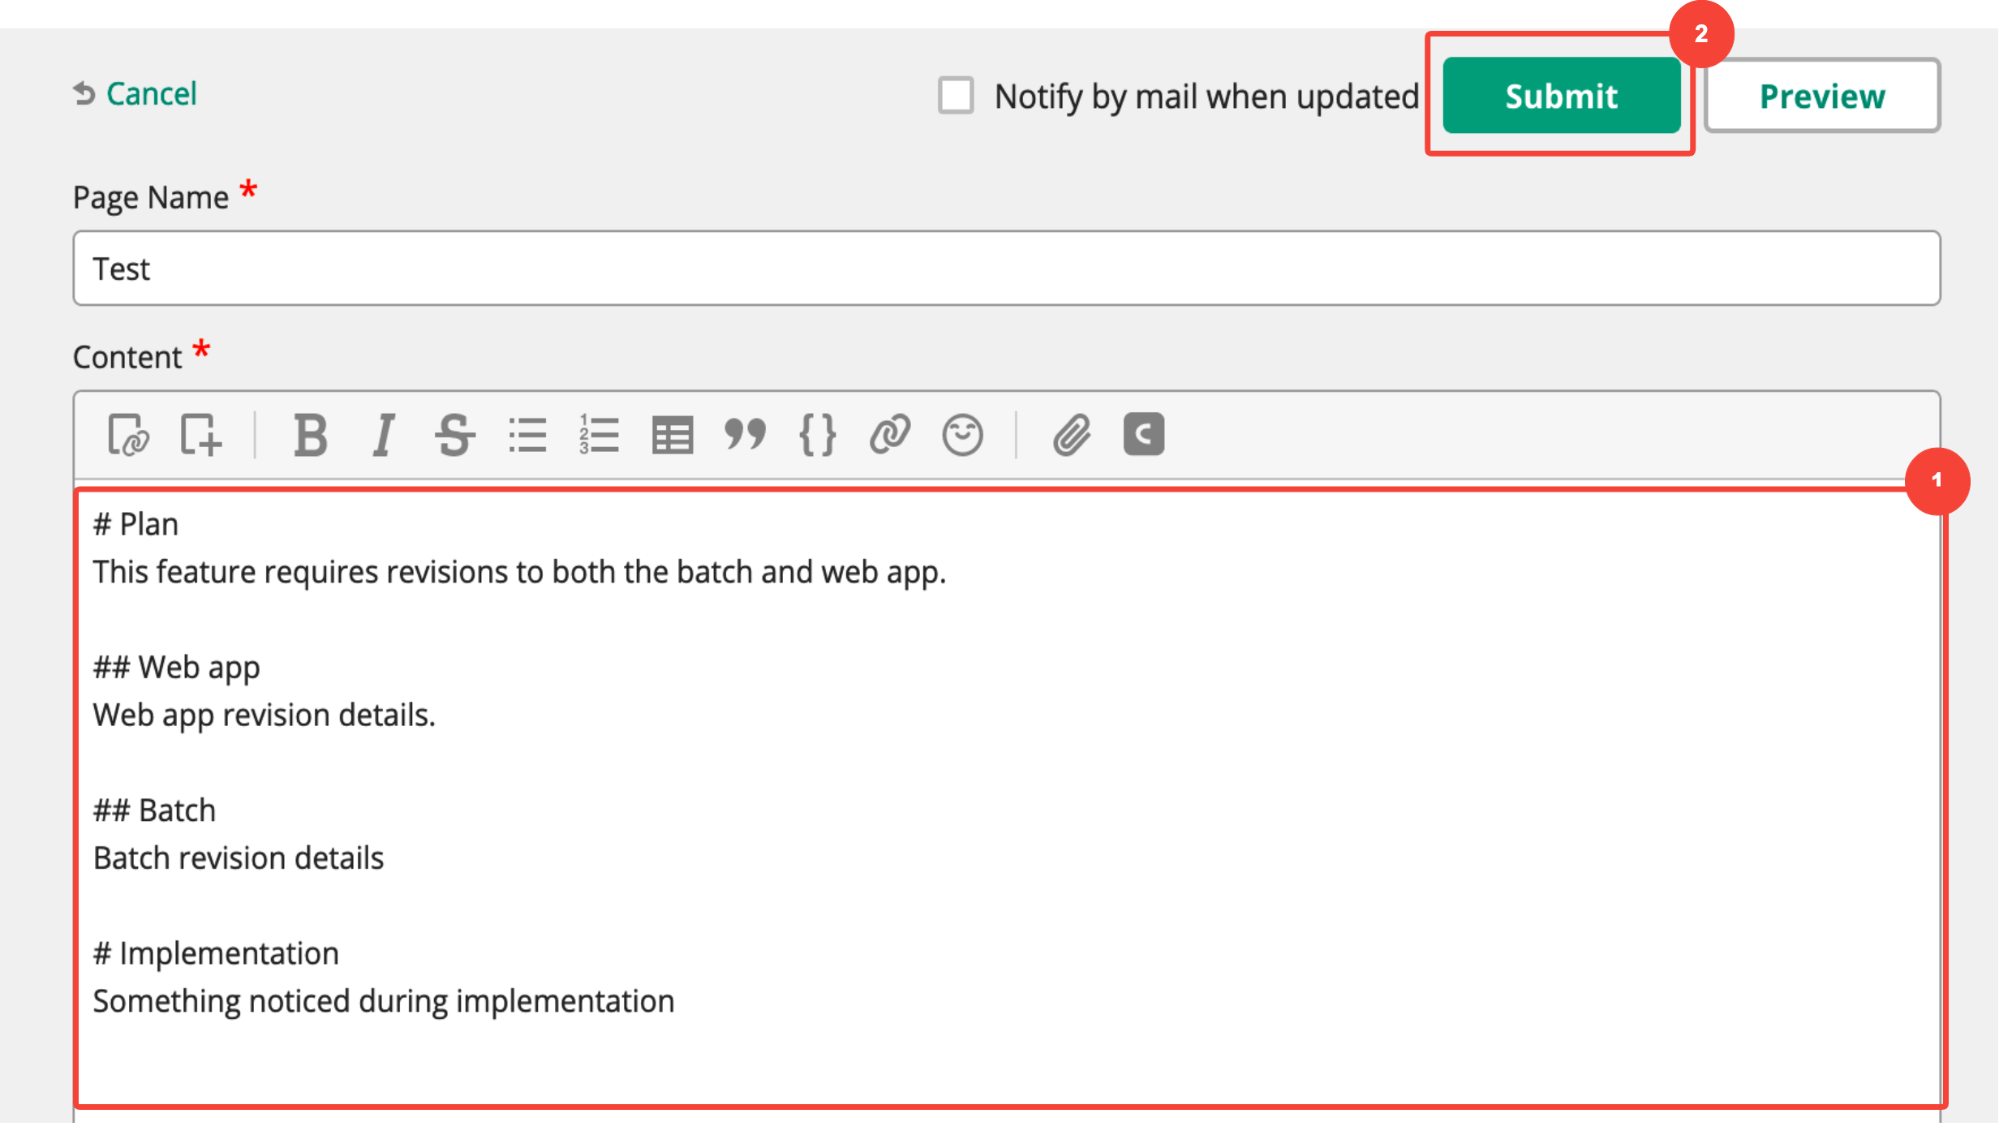
Backlog notation
Adding a “*” at the start of a line will designate that line as a heading. You must put a space after the #. “*” will create a level 2 header, while “***” will create a level 3 header.
Copy and paste the text below into your “Test” page, then click the “Submit” button.
* Plan
This feature requires revisions to both the batch and web app.

** Web app
Web app revision details.

** Batch
Batch revision details

* Implementation
Something noticed during implementation.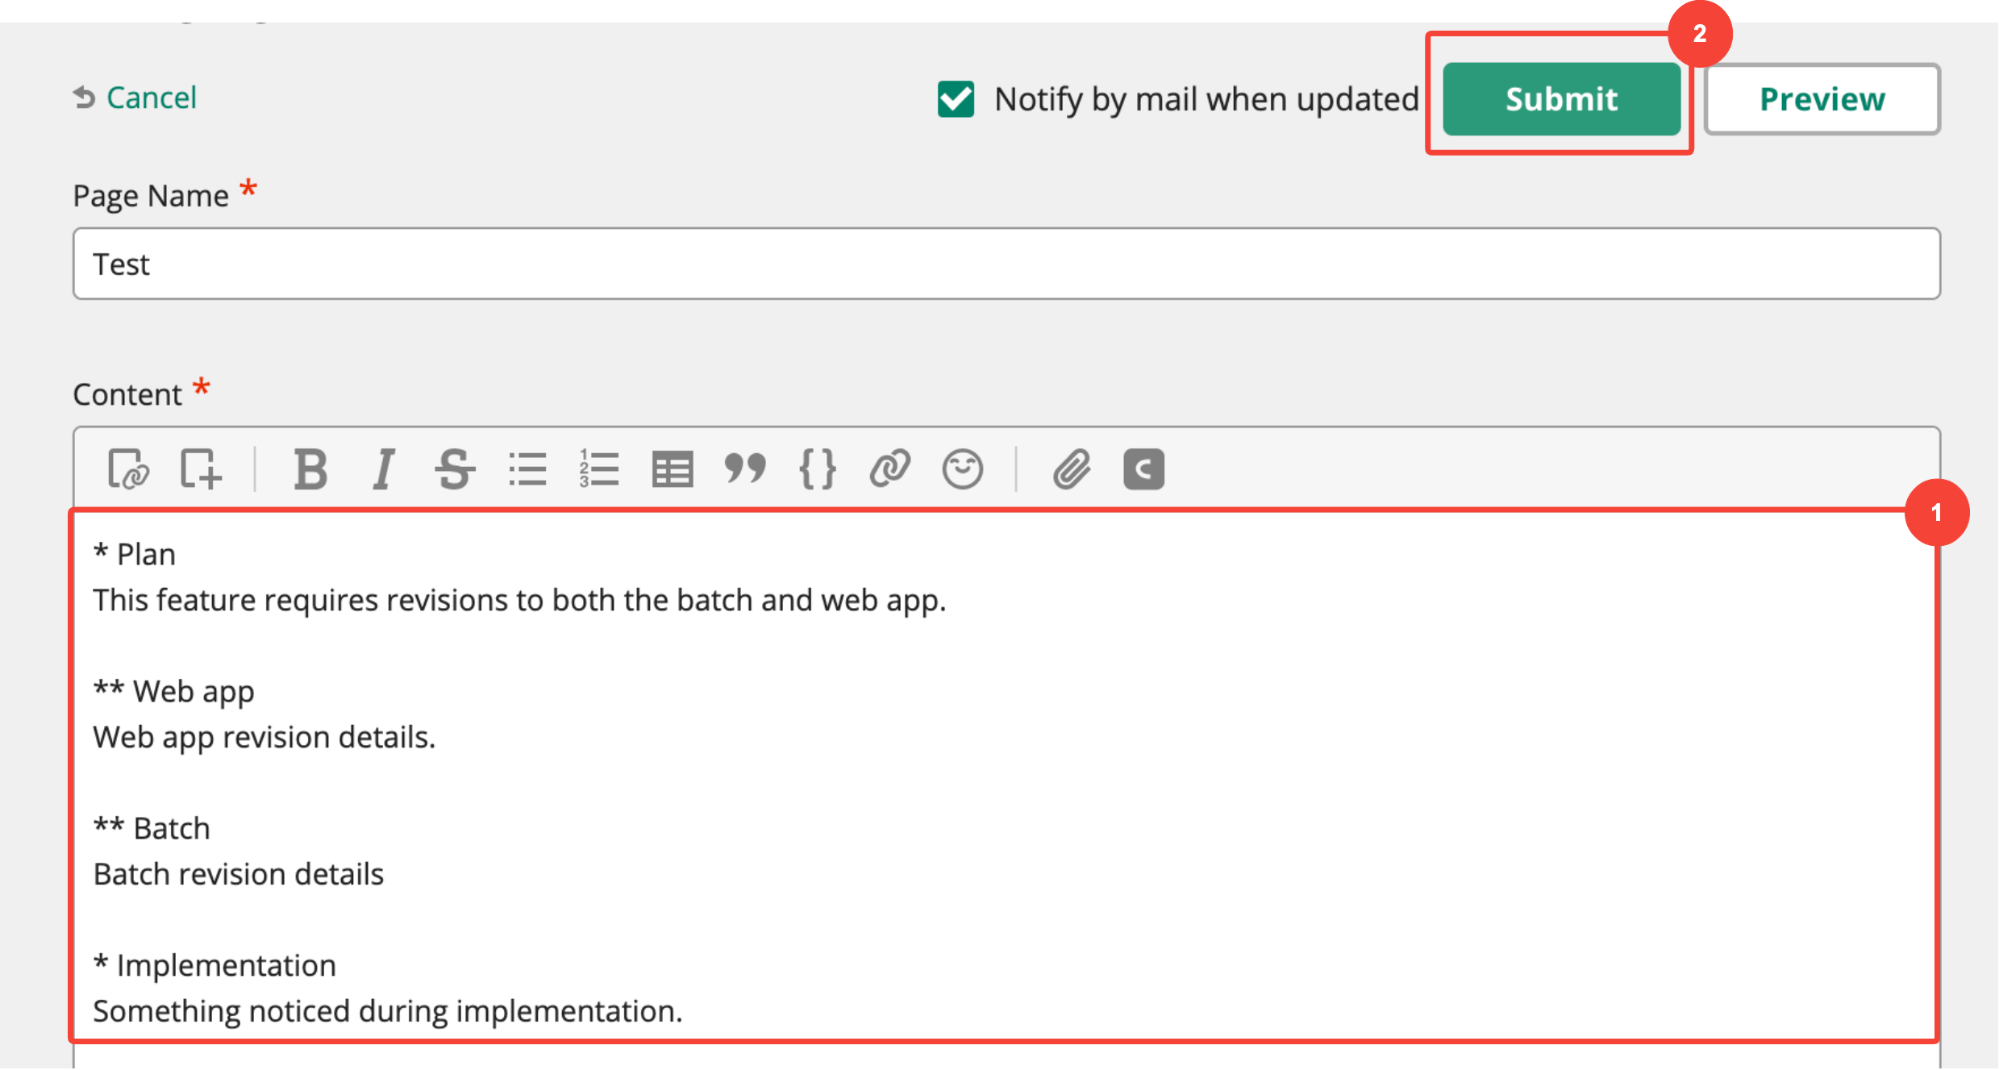
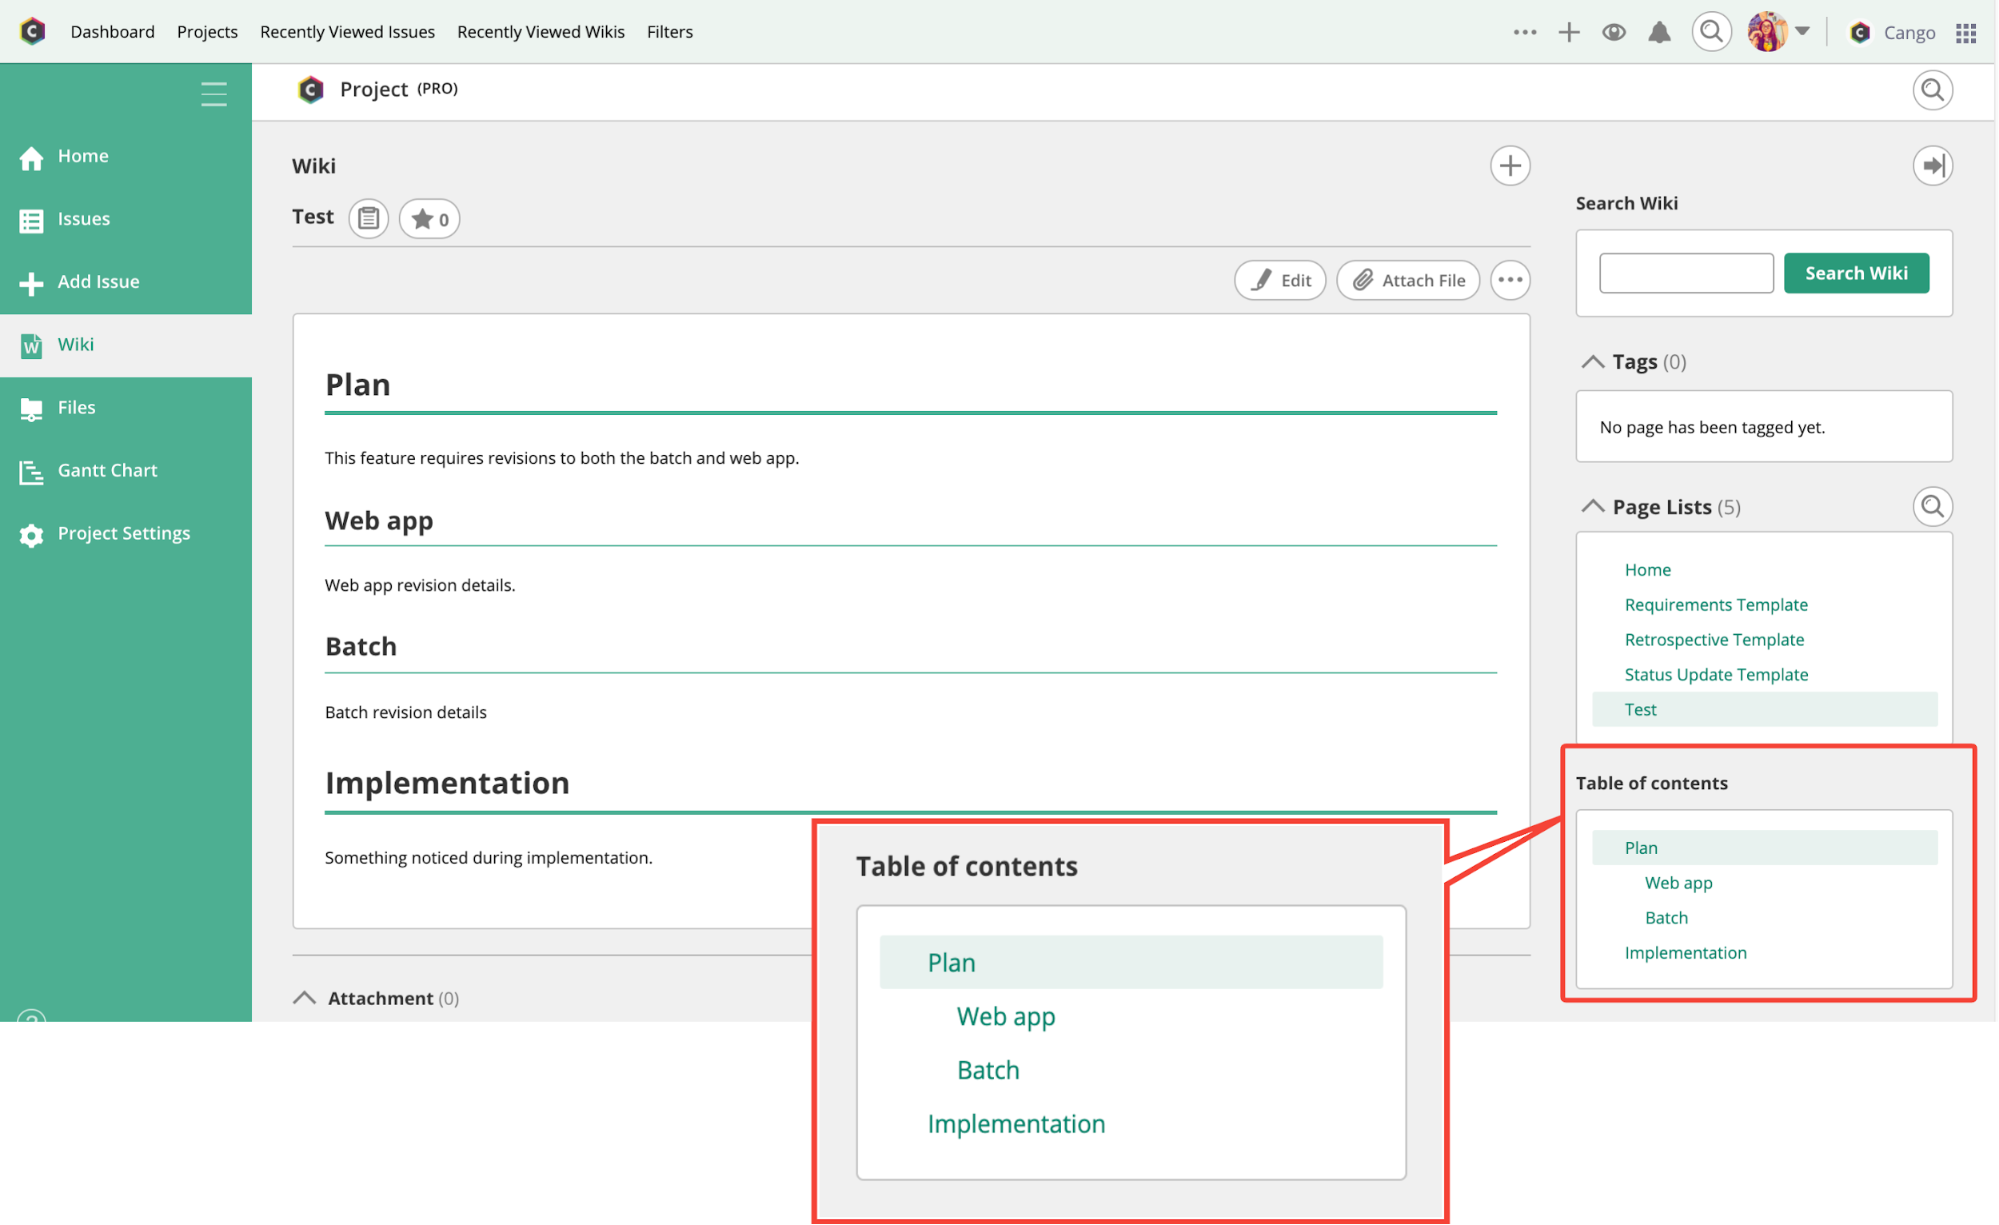
For some Wiki services, headings will automatically display a list of headings on that page. In Backlog’s Wiki, a list of headings will display in the right-hand sidebar.
Lists
Use bullet points for lists of related items or steps that don’t require a specific order. For tasks that need to be followed in sequence, use numbered lists. This makes the content easier to scan.
Backlog’s Wiki supports both bullet-pointed (“・”) and numbered (“1.”, “2.”, “3.”) lists.
Markdown notation
Adding a “ * ” at the start of a line will display that line as part of a list beginning with a “・”. You must put a space after the *. Putting four spaces before the * will make the line display as another list embedded within the first.
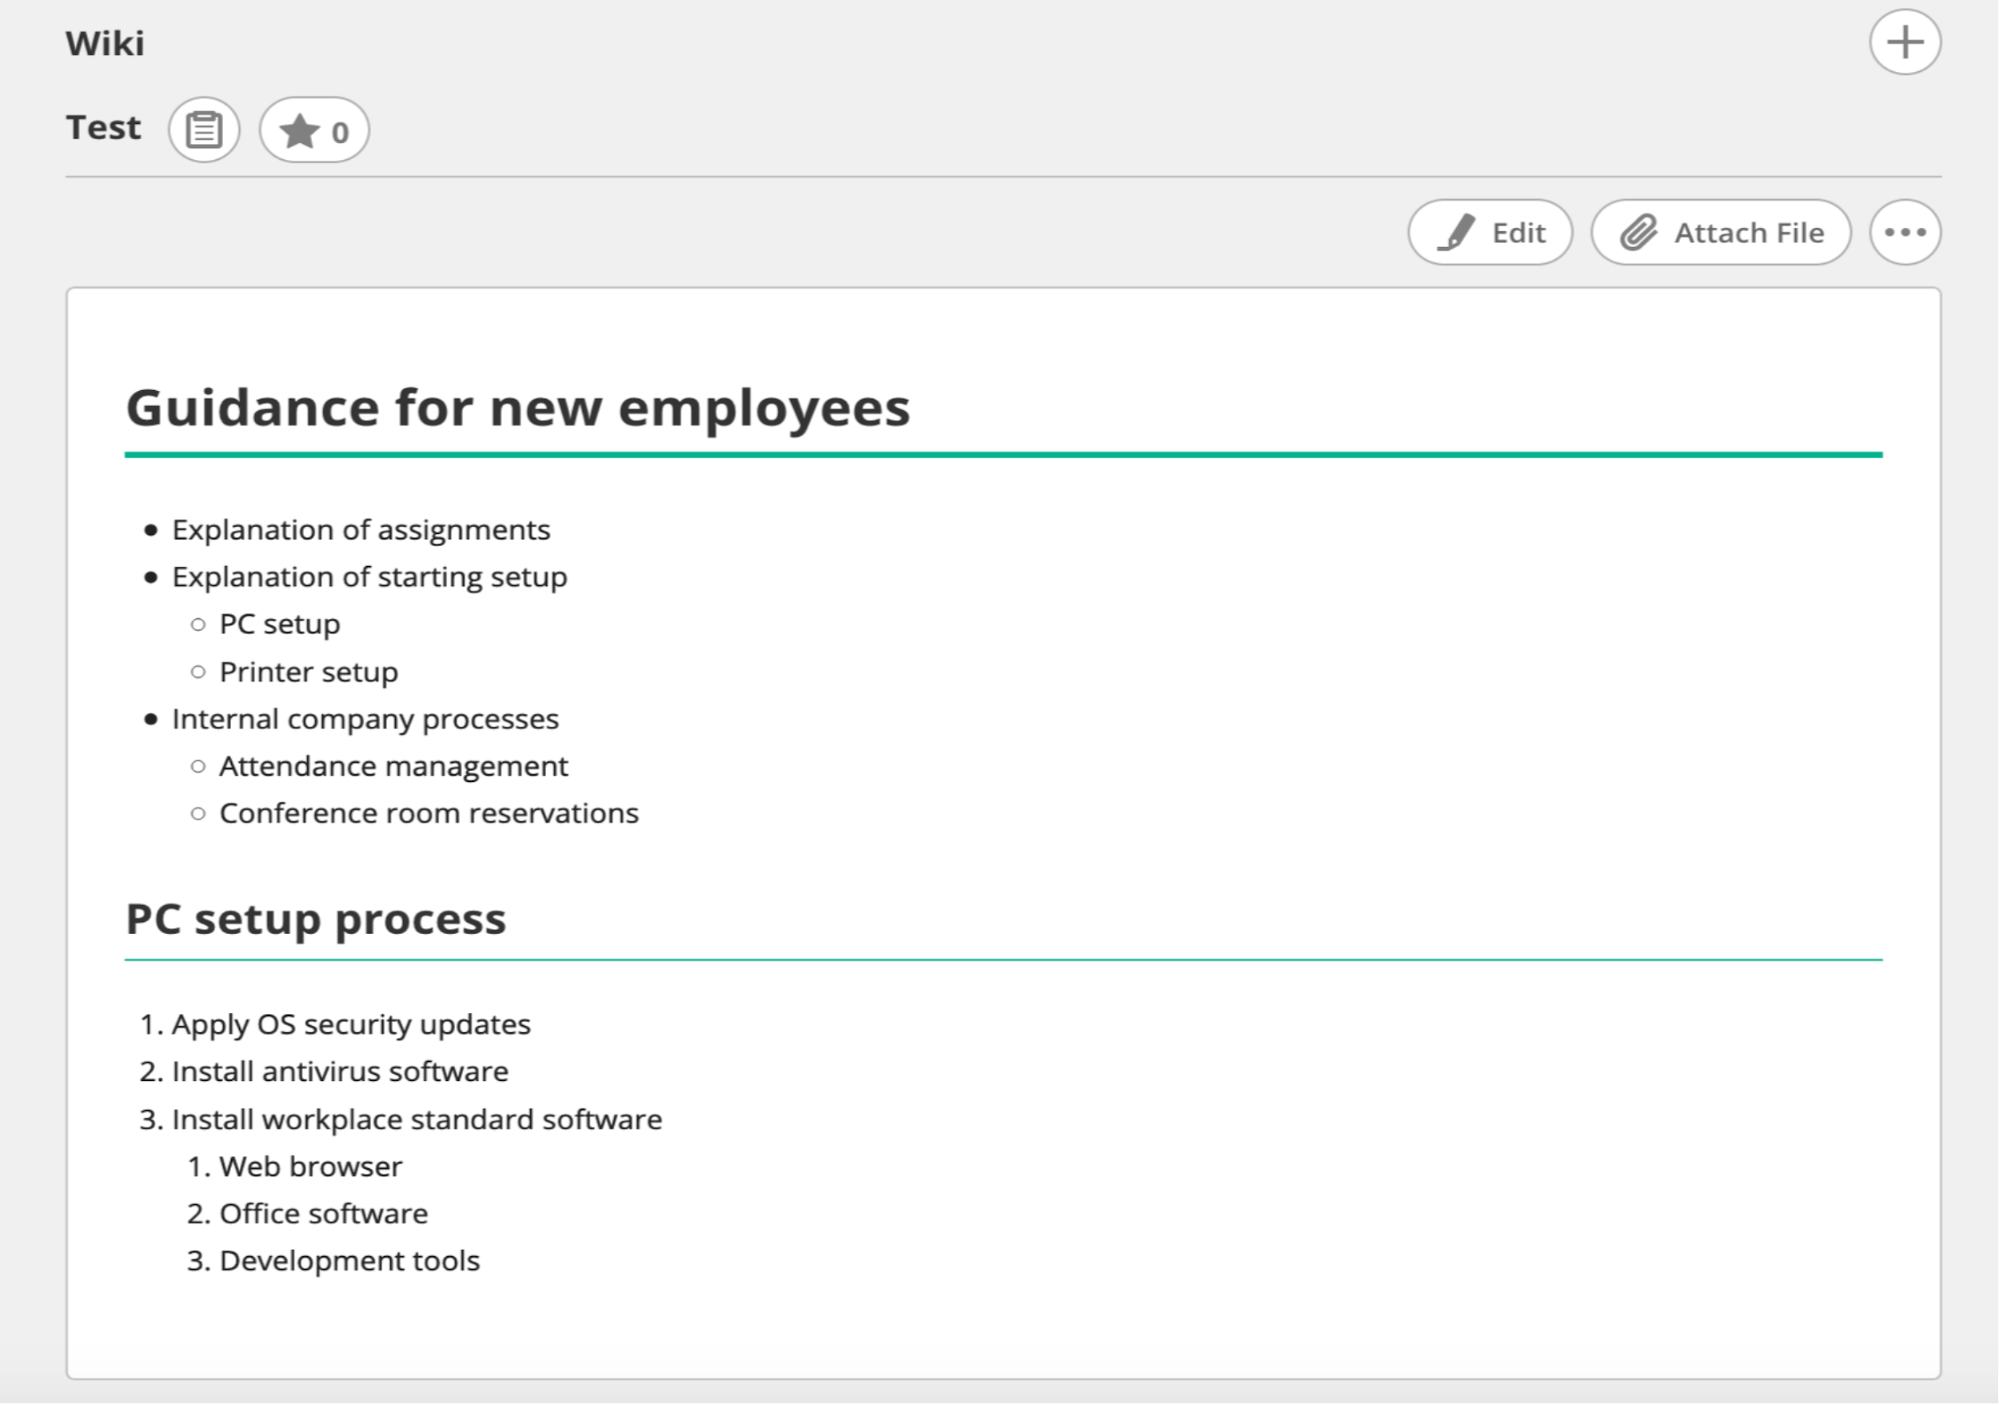
Adding a “1.” at the start of a line will display that line as part of a list beginning with “1.”. You must put a space after the “1.”. It doesn’t matter if you number the following items sequentially with “2.”, “3.”, or just keep typing “1.”. When the list is displayed, the numbers will adjust automatically.
Copy and paste the following text into the contents of the “Test” page, then click the “Submit” button.
# Guidance for new employees

* Explanation of assignments
* Explanation of starting setup
  * PC setup
  * Printer setup
* Internal company processes
  * Attendance management
  * Conference room reservations

## PC setup process

1. Apply OS security updates
2. Install antivirus software
3. Install workplace standard software
  1. Web browser
  1. Office software
  1. Development tools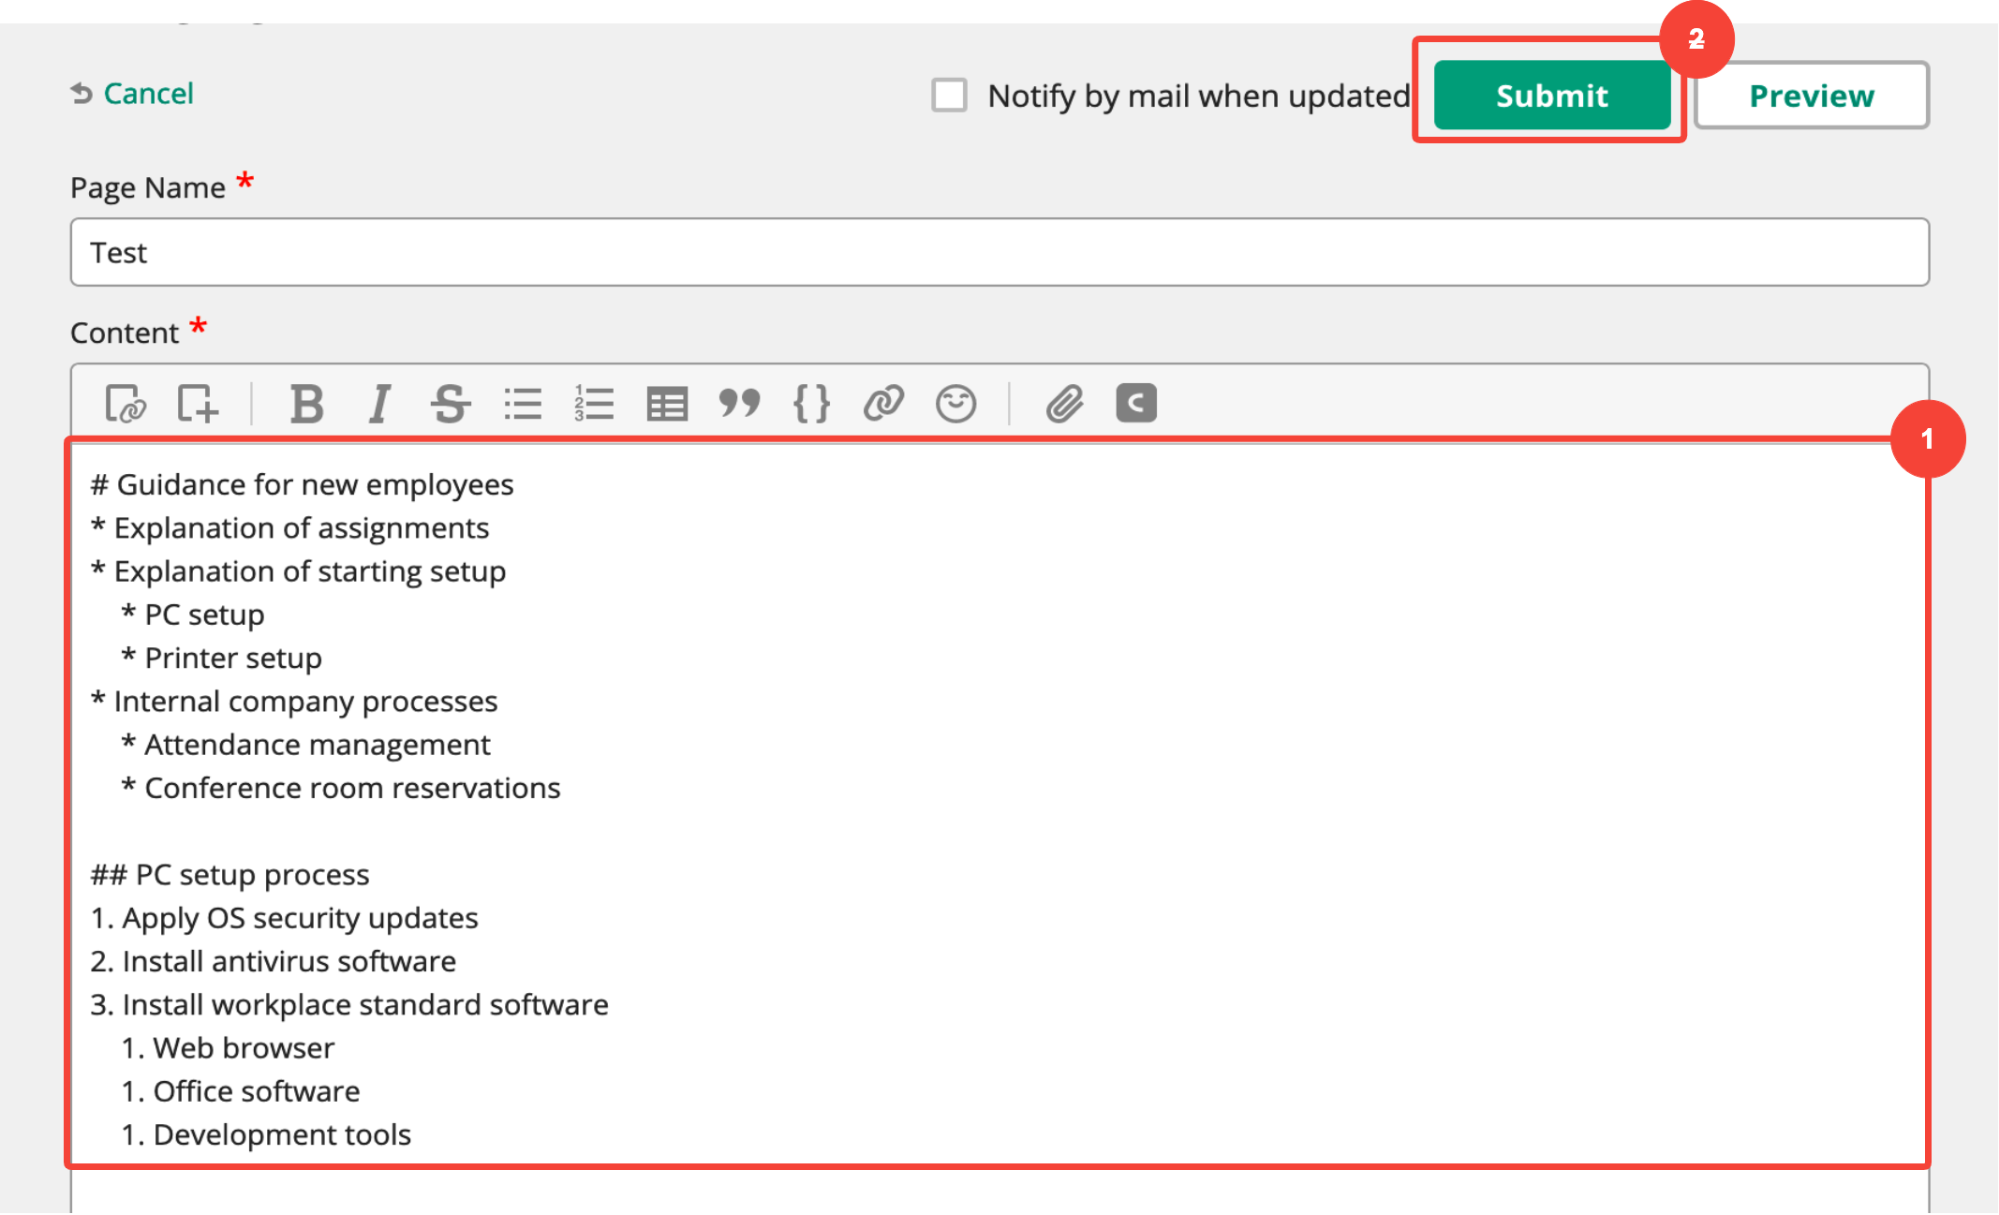
Backlog notation
Adding a “-” at the start of a line will display that line as part of a list beginning with a “・”. You must put a space after the -. Typing “—” will make the line display as another list embedded within the first.
Adding a “+” at the start of a line will display that line as part of a list beginning with “1.”. You must put a space after the +. Adding “++” to the start of a line will make the line display as another list embedded within the first.
Copy and paste the following text into the contents of the “Test” page, then click the “Submit” button.
* Guidance for new employees
- Explanation of assignments
- Explanation of starting setup
-- PC setup
-- Printer setup
- Internal company processes
-- Attendance management
-- Conference room reservations

** PC setup process
+ Apply OS security updates
+ Install antivirus software
+ Install workplace standard software
++ Web browser
++ Office software
++ Development tools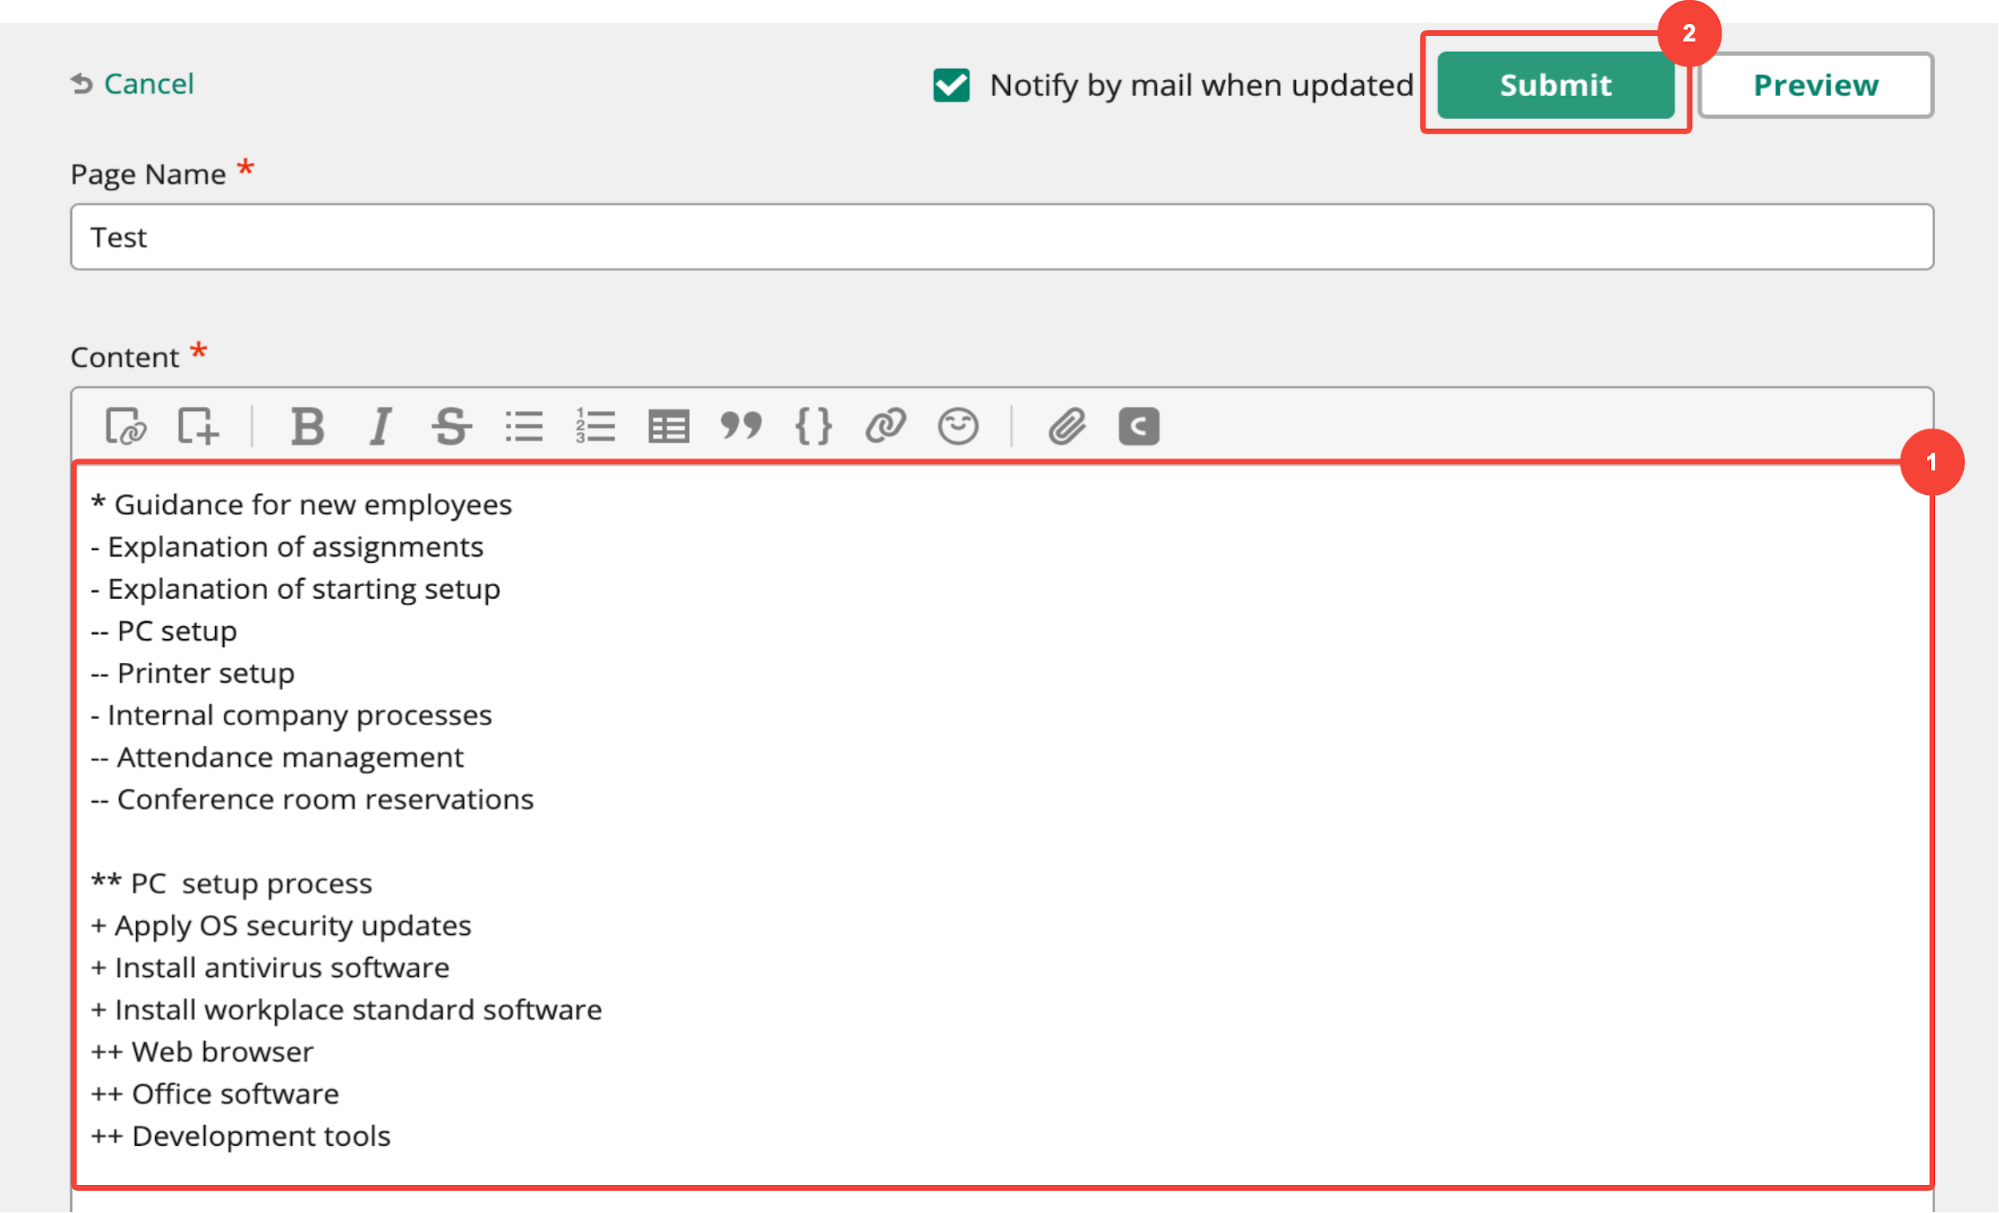
Embedded images
Visual aids can help clarify complex information or add context to your content. Use images, screenshots, or diagrams where appropriate, and ensure they are clear and relevant to the topic.
Make sure images are properly sized so they don’t disrupt the layout of the page.
In Backlog, you can embed images within pages.
Markdown notation
You can embed an image at a specified URL using the  format. The alt text will be displayed if the image can’t be loaded.
Backlog notation
You can embed an image at a specified URL using the #image(Image URL) format. Unlike Markdown notation, you cannot specify the “[Alt text]” characters if the images are unable to be loaded.
#image(https://www.backlog.jp/img/common/header/logo_site.png)
Backlog also provides the option to embed images via our Cacoo online diagram tool. You can also upload image files directly to a Wiki page with any paid Backlog subscription.
Tables
For content that needs to be presented in a structured way, use tables to organize data clearly. Whether it’s a list of features, comparisons, or step-by-step instructions, tables make information easier to digest.
Tables are another great way to make dense information easy to scan.
Markdown notation
Separating text with a “|” will display that text as a table. After your title line, you must include a line of only dashes (e.g. |—|—|—|), to represent the breaks. To right-align fields containing numbers, include a “:” at the far right of the line, as shown in the second table.
| Conference room name | Location | No. of Seats (Left-aligned) |
|----------------------|----------|-----------------------------|
| Gorilla              | 1F       | 6                           |
| Giraffe              | 2F       | 2                           |
| Dog                  | 3F       | 4                           |

| Conference room name | Location | No. of Seats (Right-aligned) |
|----------------------|----------|------------------------------:|
| Gorilla              | 1F       | 6                            |
| Giraffe              | 2F       | 2                            |
| Dog                  | 3F       | 4                            |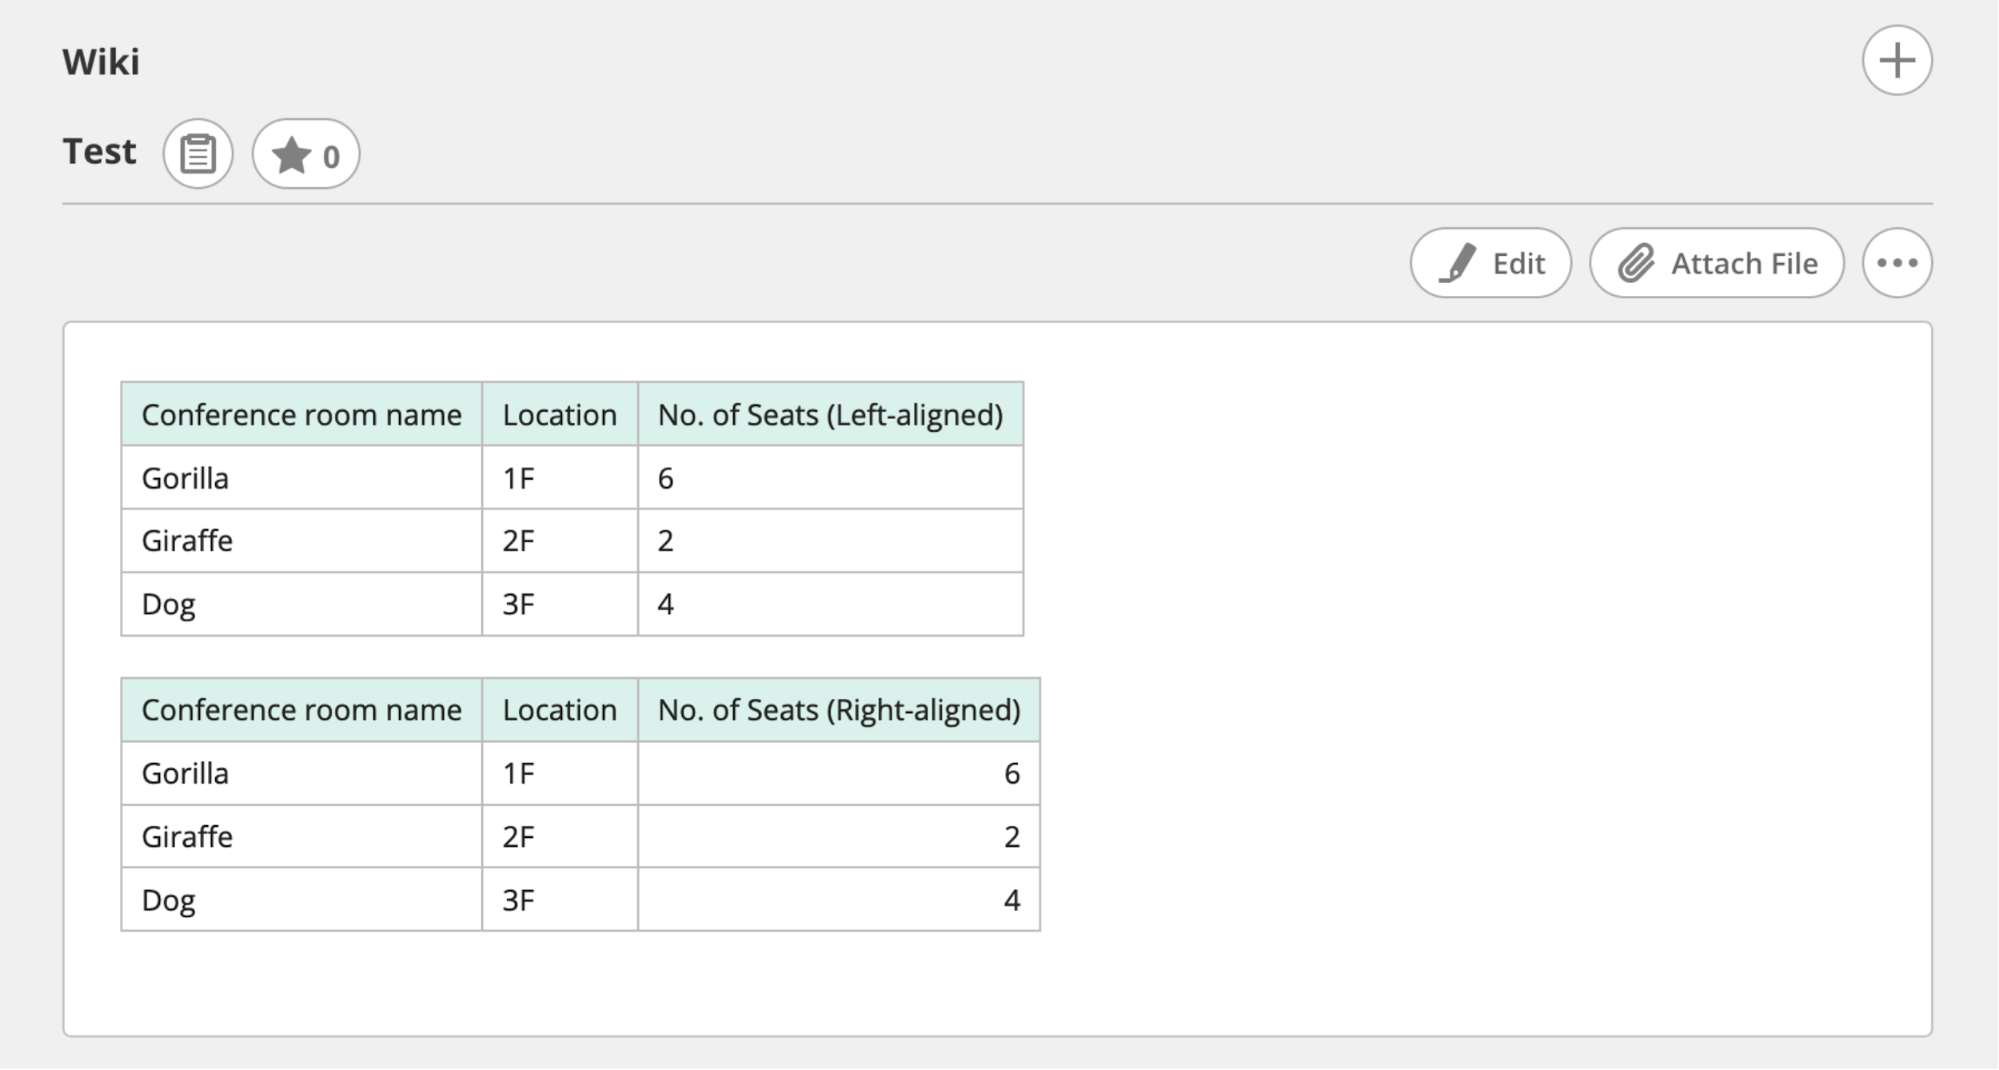
Backlog notation
Separating text with a “|” will display that text as a table. Adding an “h” at the end of a line will display that line as the title line. Adding a ~ at the start of a cell will designate that cell as a title line. You cannot right-align numbers in Backlog notation.
| Conference room name | Location | No. of Seats |h
| Gorilla              | 1F       | 6            |
| Giraffe              | 2F       | 2            |
| Dog                  | 3F       | 4            |

|~ Conference room name | Gorilla | Giraffe | Dog |
|~ Location             | 1F      | 2F      | 3F  |
|~ No. of seats         | 6       | 2       | 4   |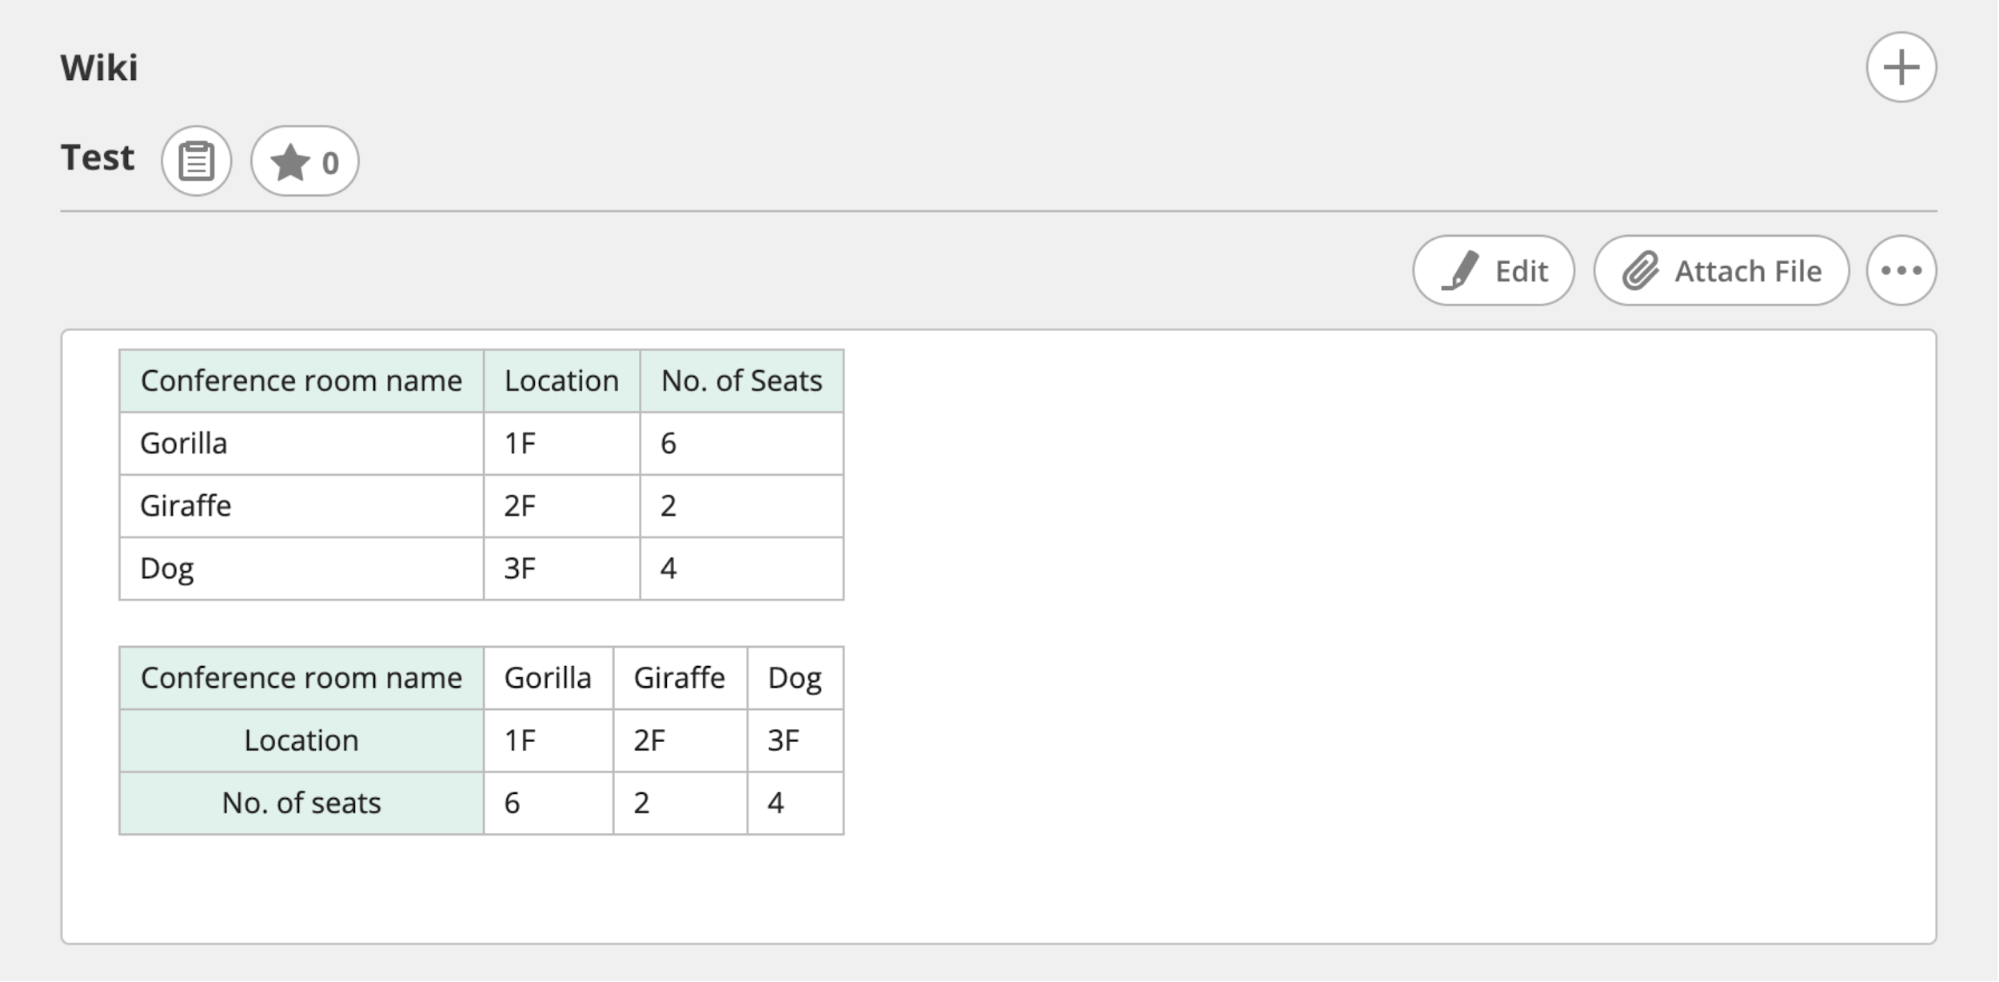
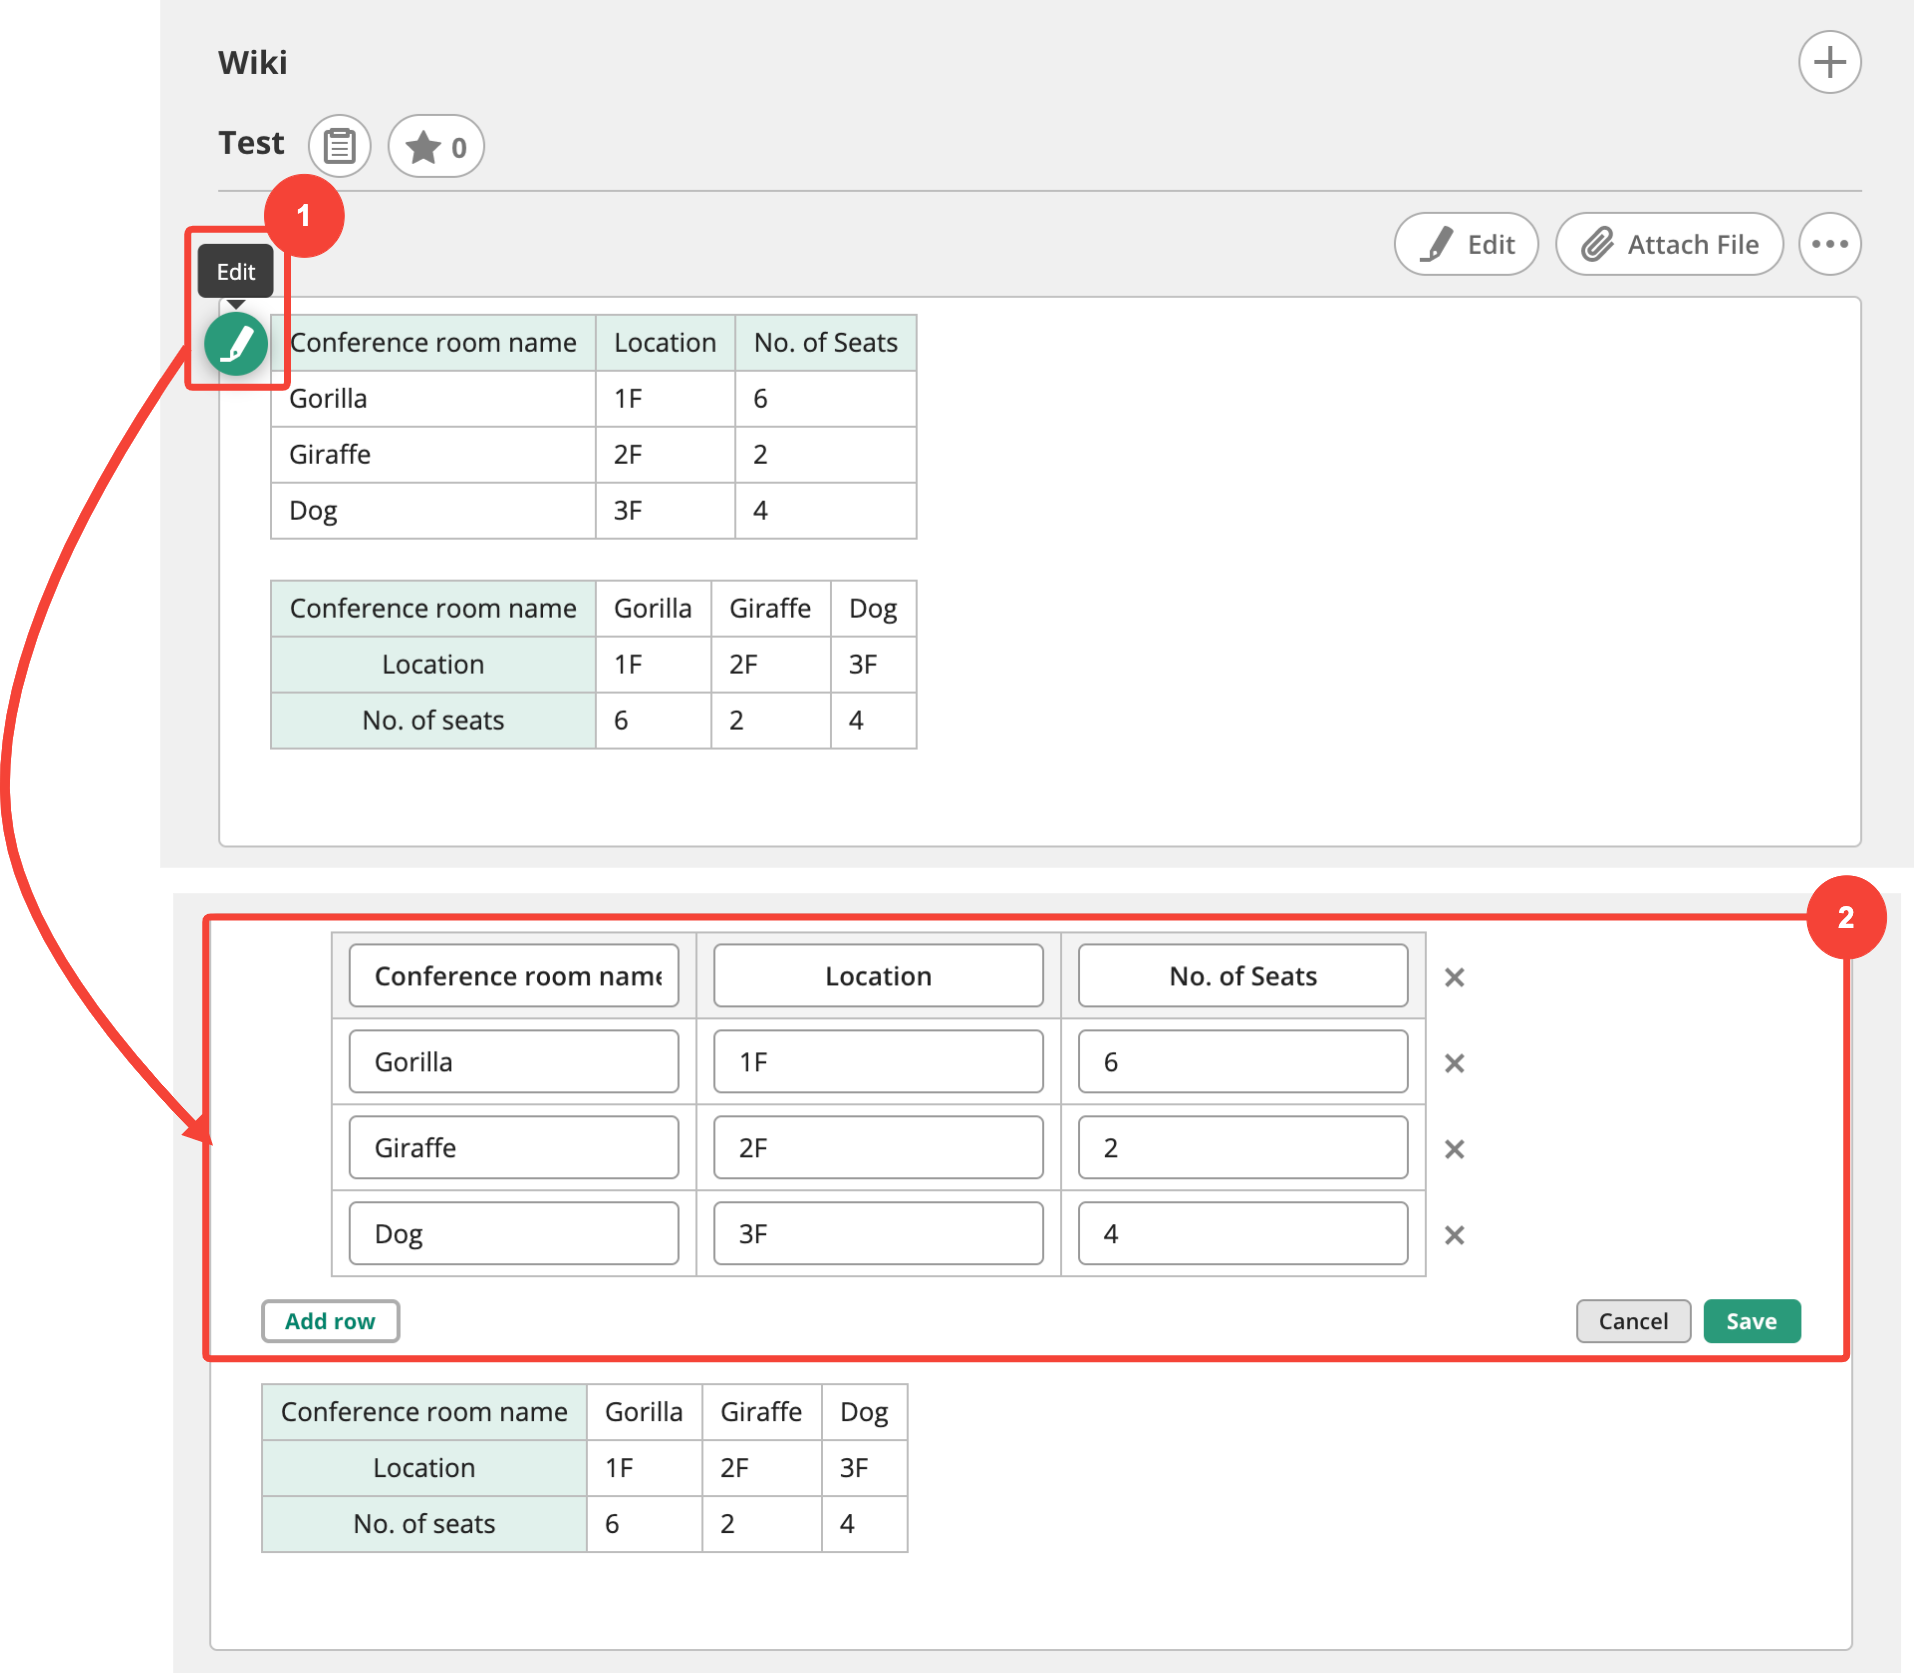
When using Backlog notation, you can easily modify an existing table. Just hover your cursor over the chart and an edit button will appear in the top-left of the table. Click this button to display an input field for each cell which will allow you to edit them directly. You can also add or delete rows.
Reverting page edits
Wikis contain a History feature that makes it easy to review past edits or even restore a page to its previous state at any time. This ensures that edits are tracked, and mistakes can be easily corrected, allowing your team to improve documentation without the fear of losing valuable information.
Once you understand how to use the History feature, you’ll never have to worry about making mistakes when editing pages again.
First, open the “Test” page we’ve been using for this tutorial. Click the “…” button to the right of the Edit button to display the “History” menu.

Click “History” to see all edits that have been made to that page. If you’ve followed each step of this tutorial, you should see a page history like the one shown below. The list shows who updated the page and when.
Click version number “1” on this history list.
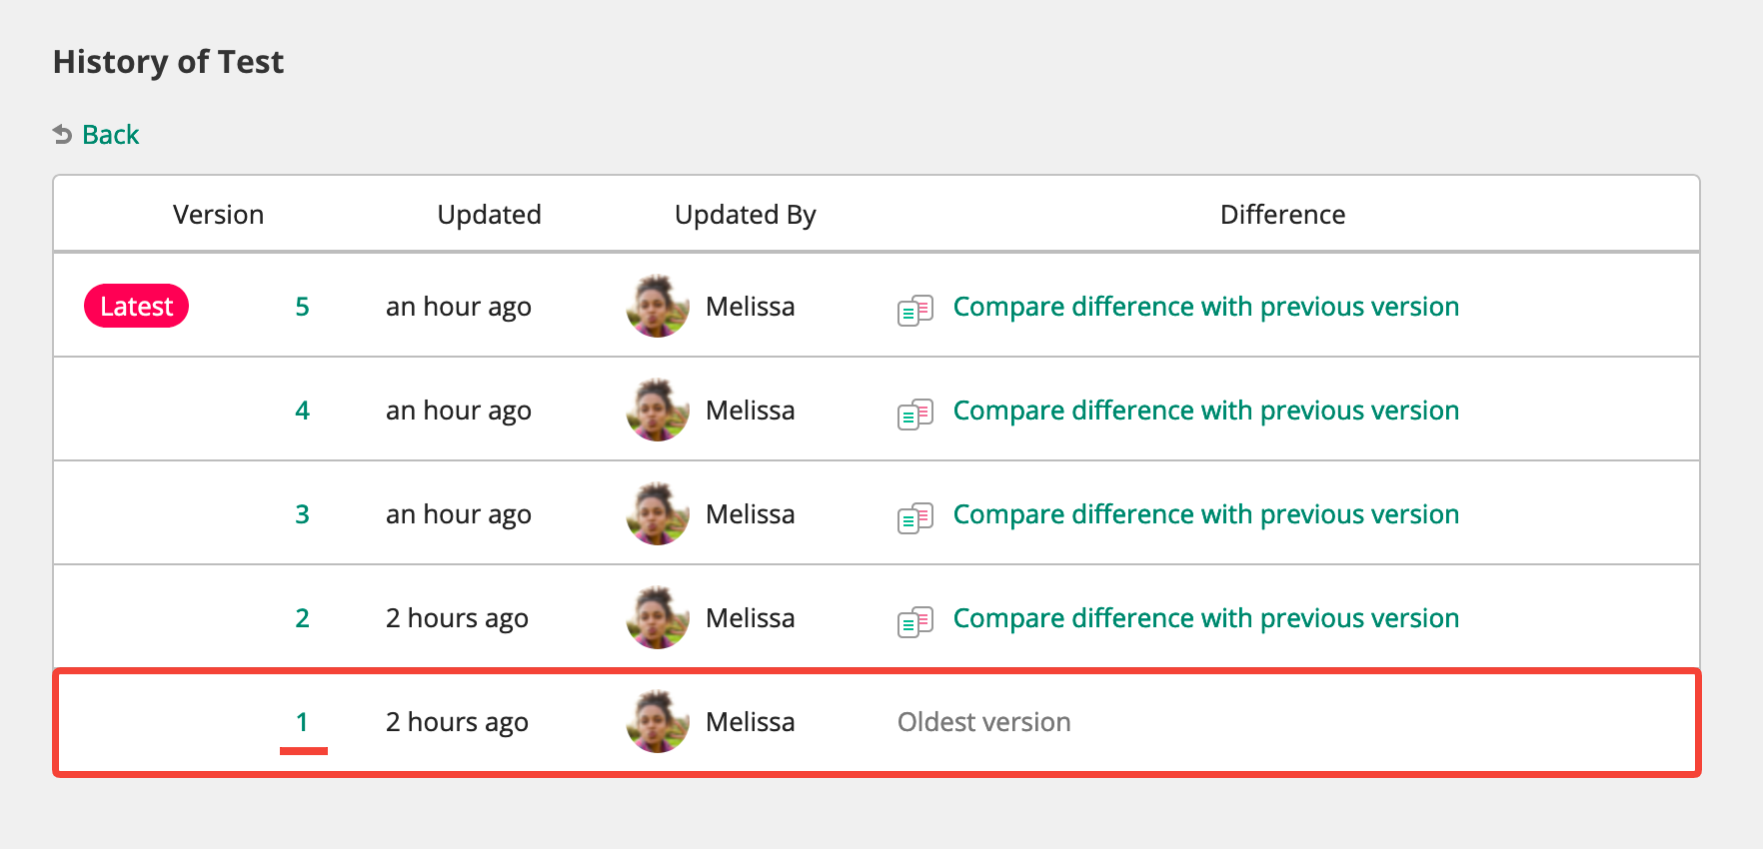
You can now view the page as it was when we first created it, as shown below.
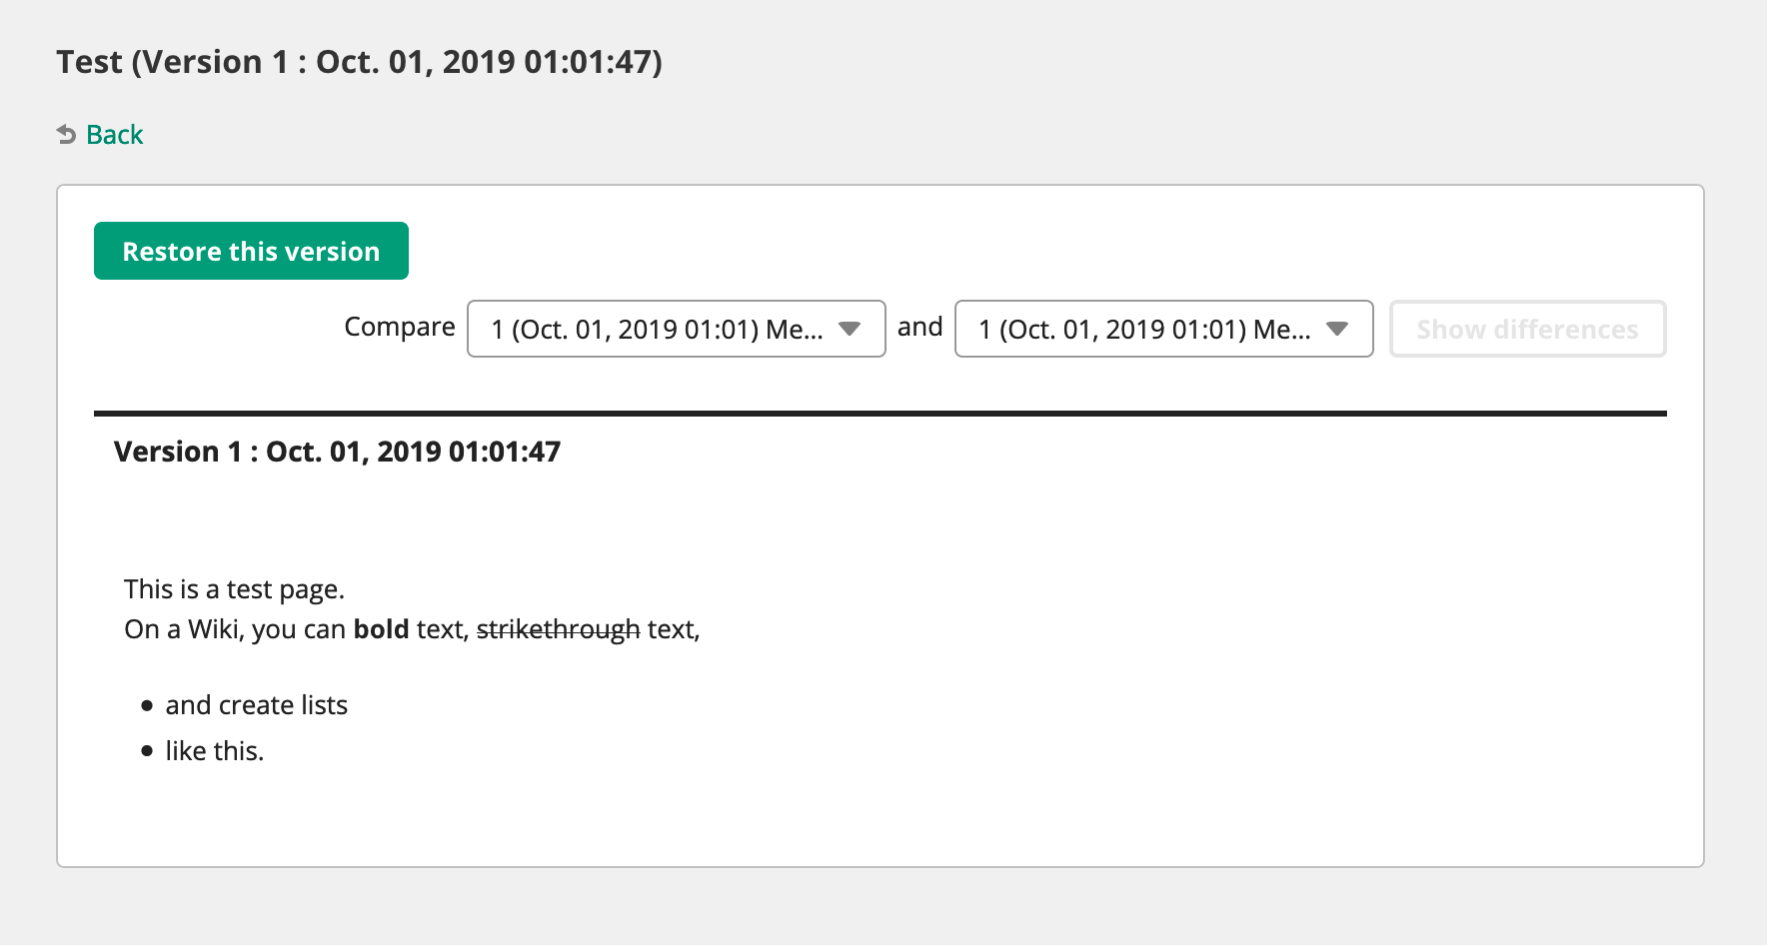
There is a “Restore this version” button in the top-left of the screen. Pressing this button will display the following dialog.
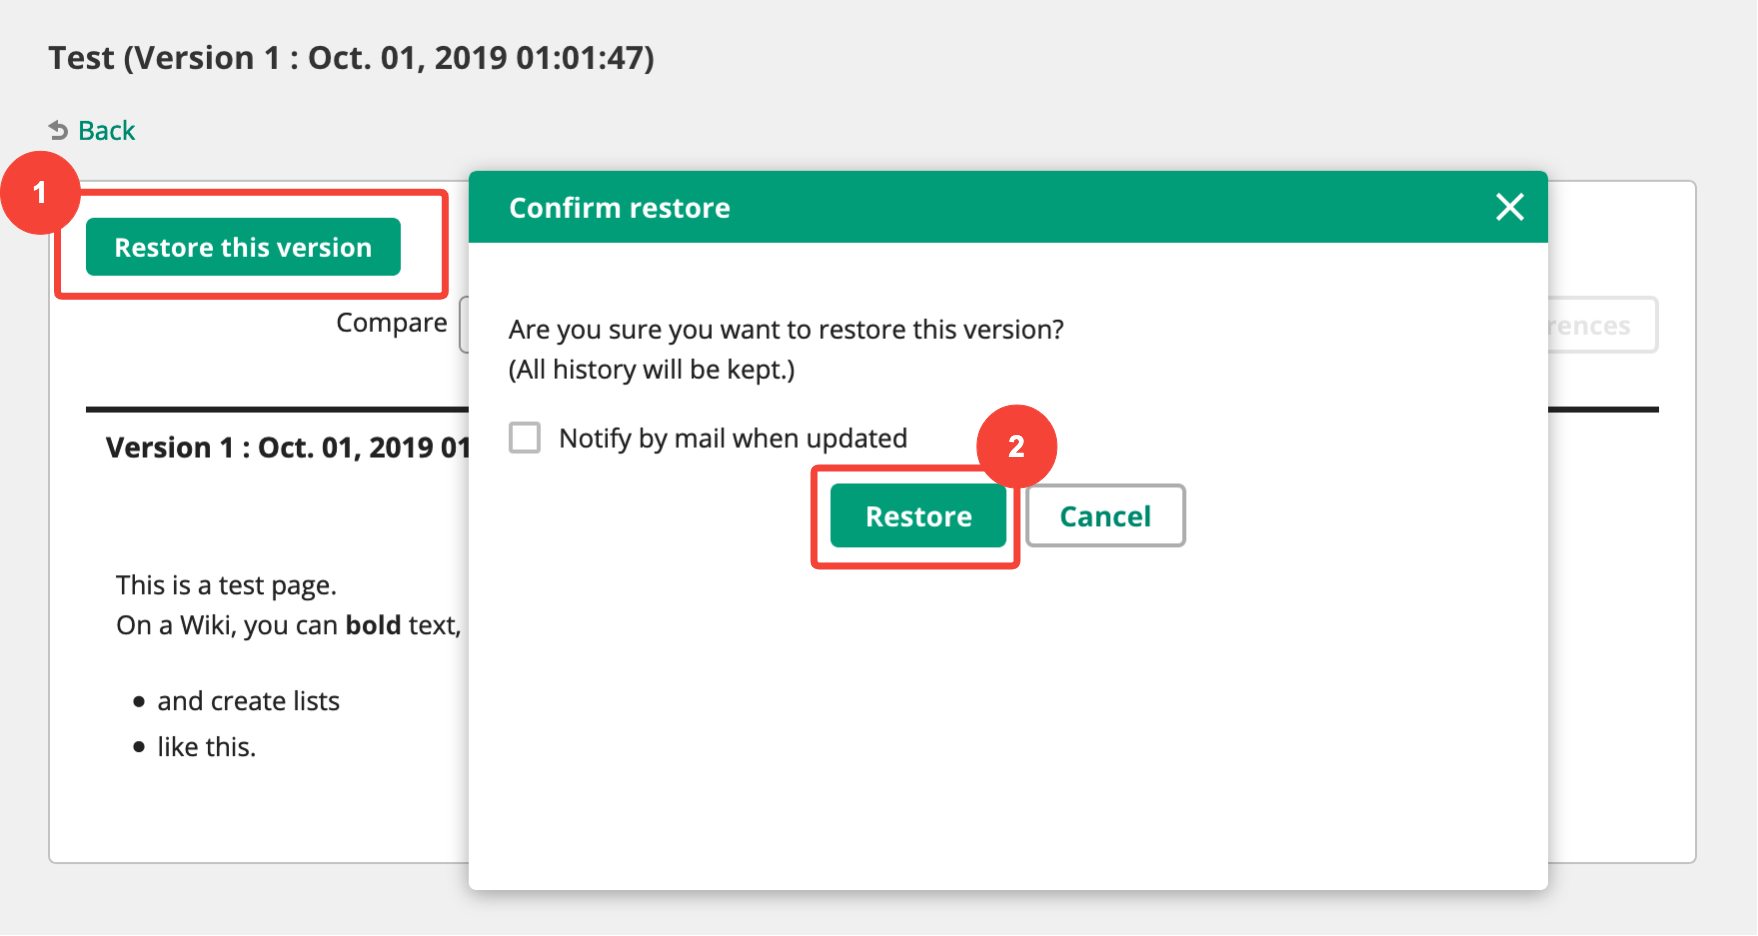
Click the “Restore” button to return the page to its former state. Then return to the page history list once again, and you can see that the page has one more item in its history.
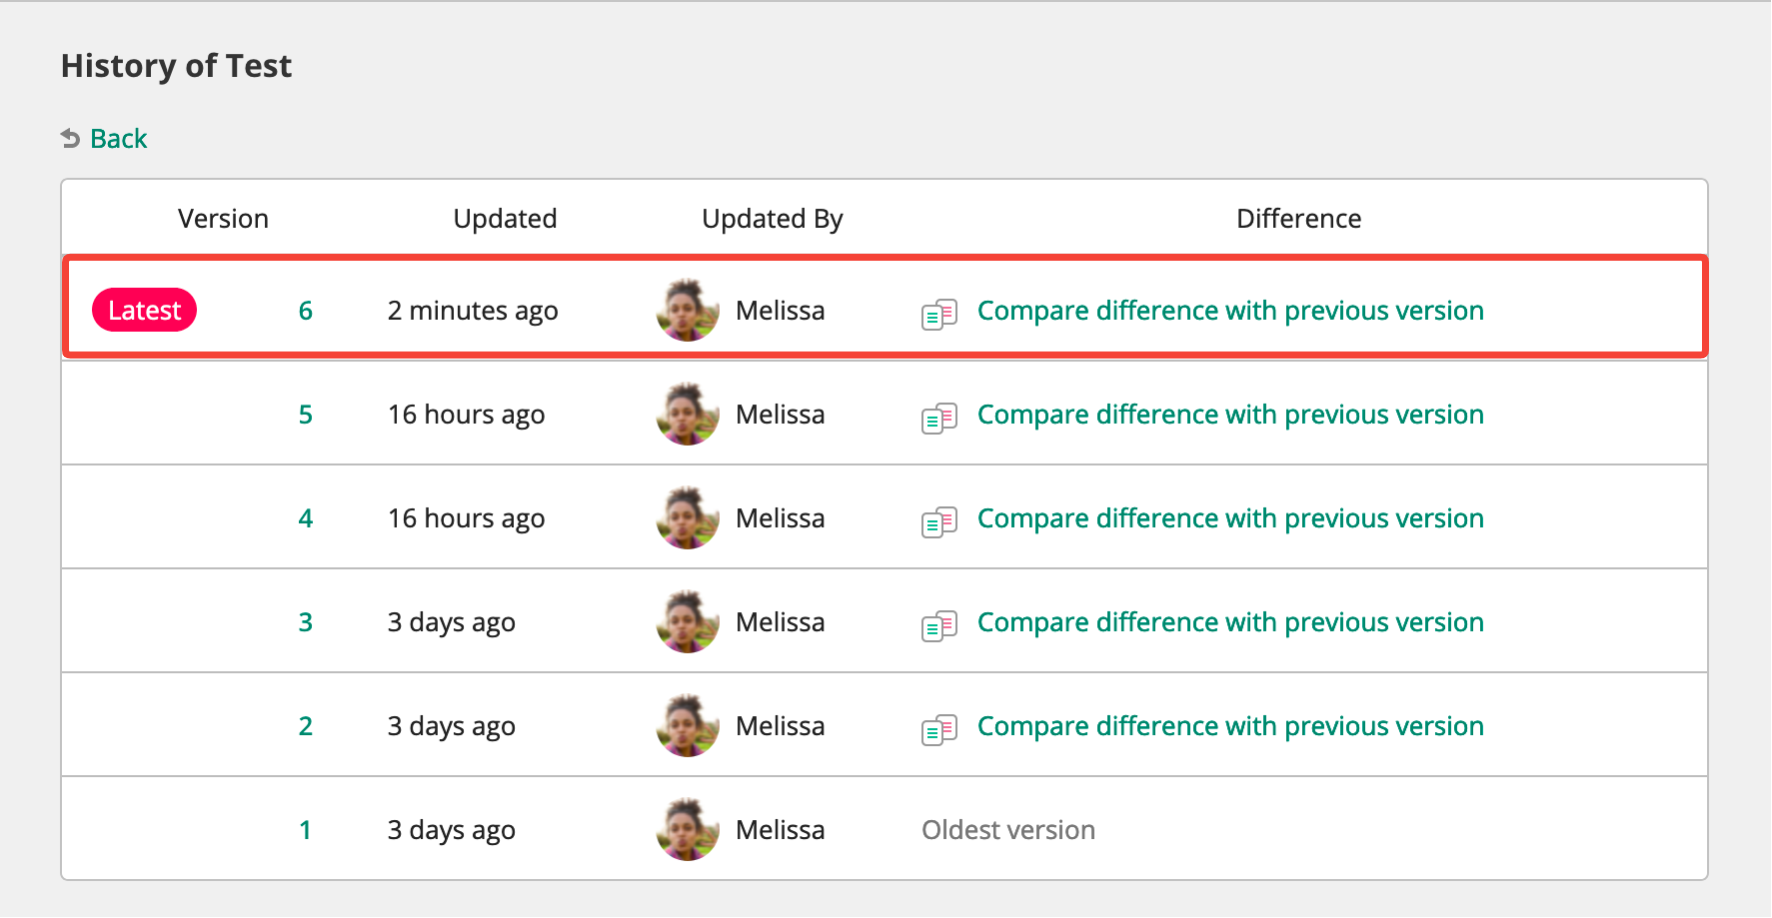
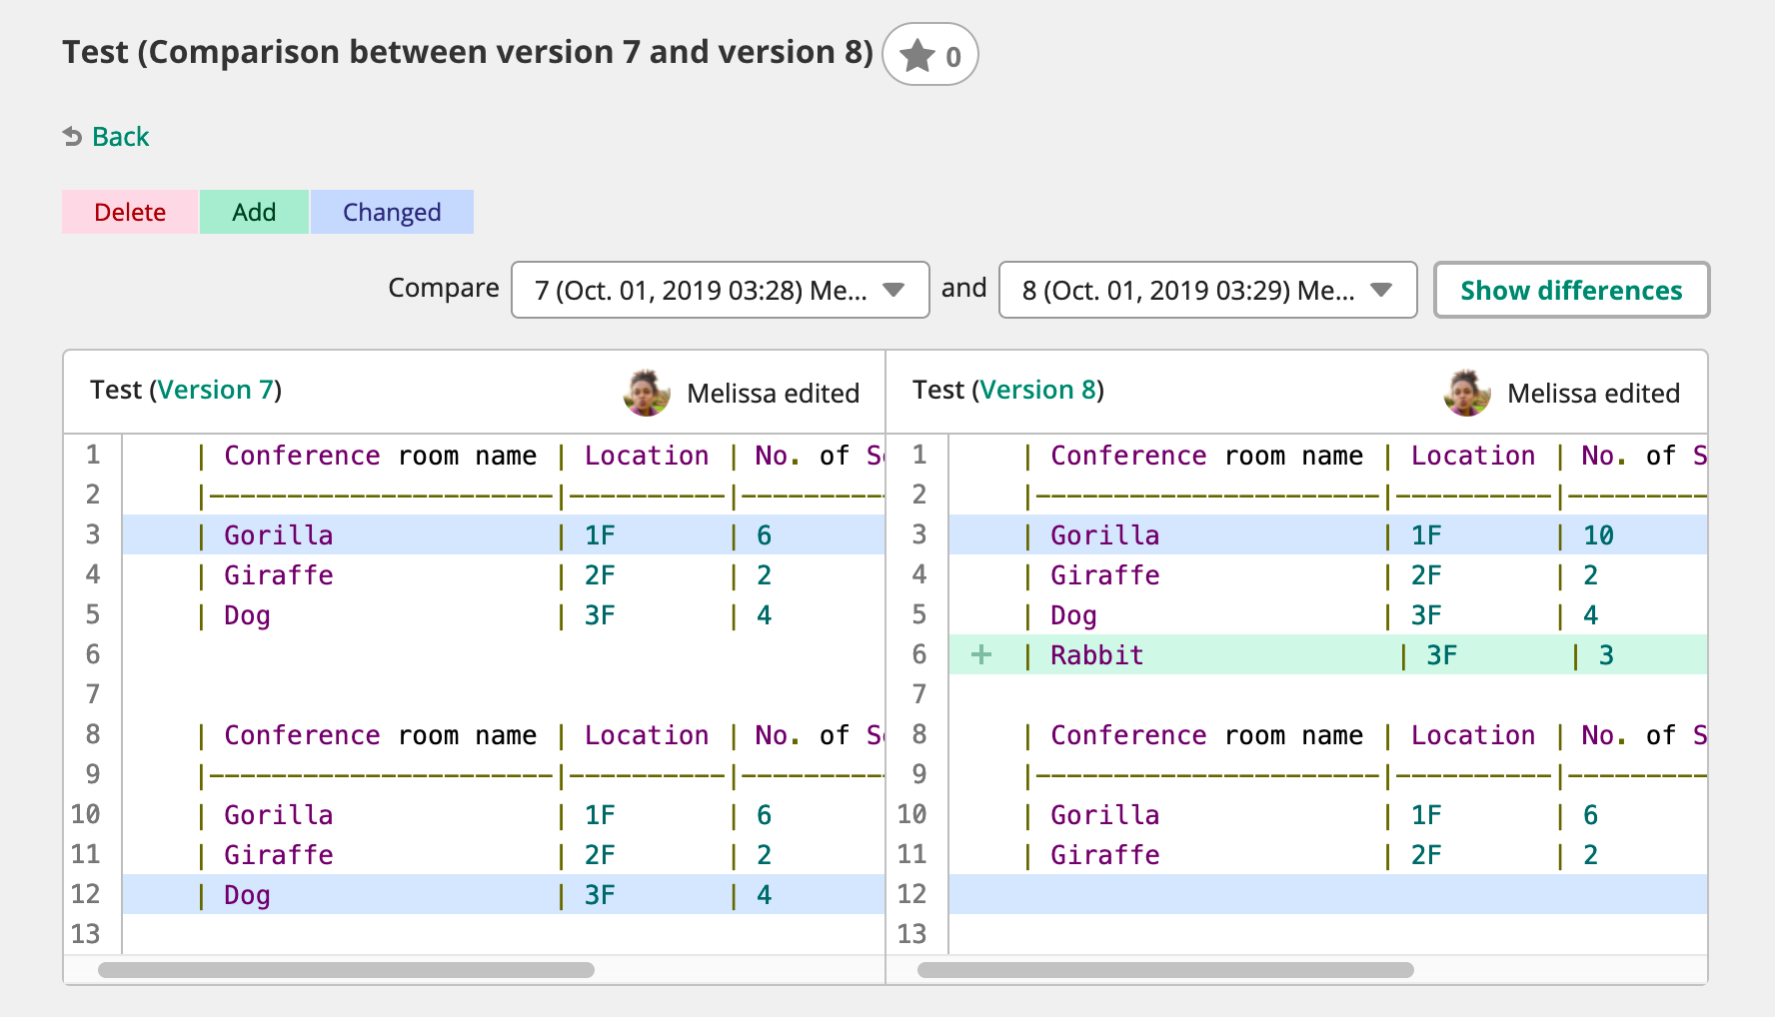
If you click on “View changes from previous version” on this list, you can see the specific changes made in that version.
In practice, this has many applications. For example, if someone edits a page you made, you can use this feature to see what they changed. If something is incorrect, you can either correct it or revert to an older version.
Revising page structure
Keeping your page structure organized is important for making its information useful.
Let’s revise our example page’s structure to make sure information is easy to find.
Make multiple pages
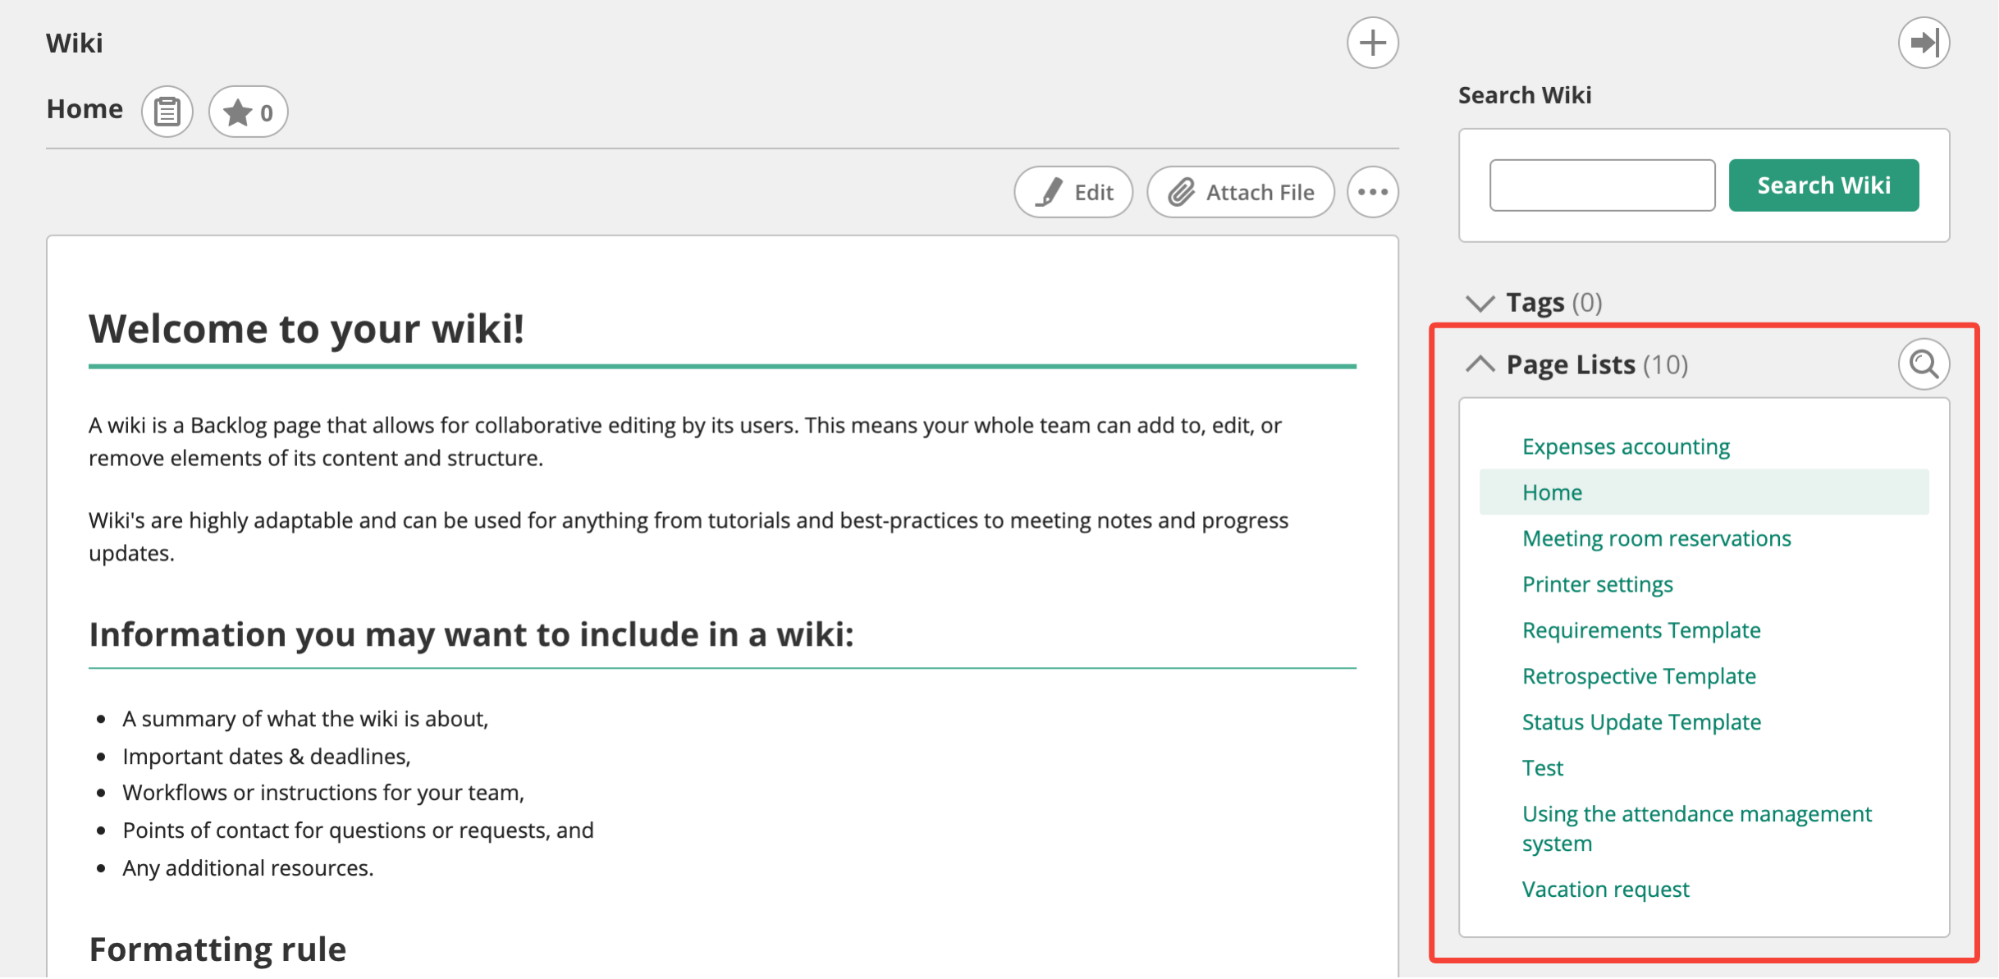
So far in this tutorial, we’ve only made a single page called “Test”. Besides “Home” and “Test”, Backlog provides another three default templates: “Requirements Template”, “Retrospective Template,” and “Status Update Template”. Right now, you should have five pages.
Make the following pages, referring back to the “Adding a page[g]” section if you need to. The contents of these pages aren’t important (it’s okay if they just say “XXXX”, for example). We’ll use these pages in the rest of the tutorial.
- Leave applications
- Using the attendance management system
- Expense claims
- Printer settings
- Meeting room reservations
When you’re done adding pages, the right-hand sidebar should look like the following image.
Adding a table of contents to the home page
As the number of pages in your wiki increases, it becomes difficult to find the information you need from the page listing alone.
Adding a guide on the home page will help new Wiki users find information for themselves. Copy and paste the following content to the “Home” page.
Markdown notation
# Initial setup

New employees should check this page before performing initial setup.

* [[Using the attendance management system]]
* [[Printer settings]]

# Regular duties

Anyone who doesn't understand how to use the duties system should check the
procedural manual here.

* [[Leave applications]]
* [[Expense claims]]
* [[Meeting room reservations]]
Backlog notation
* Initial setup
New employees should check the following pages before performing initial setup.

- [[Using the attendance management system]]
- [[Printer settings]]

* Regular duties
Anyone who doesn't understand how to use the duties system should check the
following procedural manuals.

- [[Leave applications]]
- [[Expense claims]]
- [[Meeting room reservations]]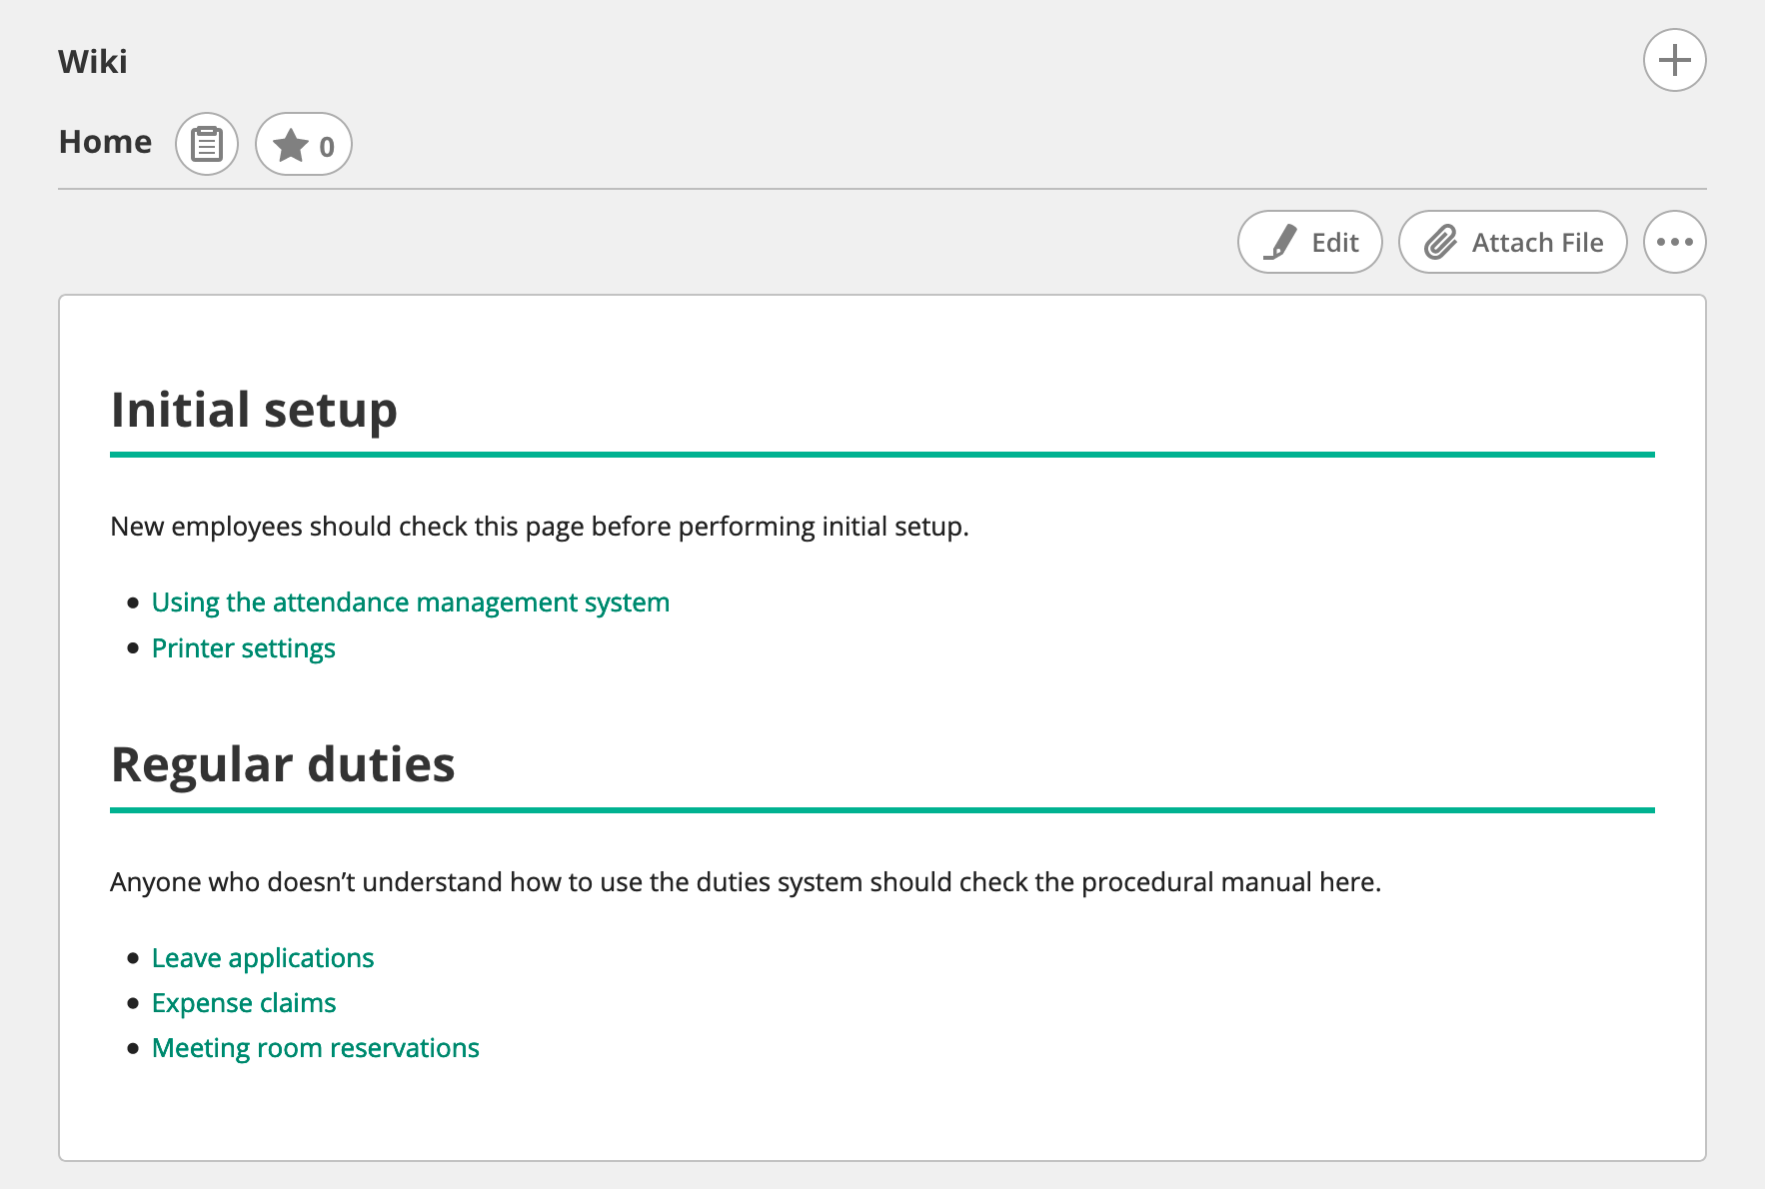
In this example, we have helped new employees to see that they should first read the “Using the attendance management system” and “Printer settings” pages.
Using hierarchies to group pages
For organizations with a large number of pages and contributors, editing the home page like this may be too difficult.
Some Wiki services (including Backlog) have a feature to configure parent-child relationships between pages.
Let’s use this feature to group similar pages together. In Backlog, separating page names with a “/” (slash) establishes a parent-child relationship between those pages.
Separate the pages we added earlier into two groups: “Initial setup” and “Regular duties.” Change the page names to the following.
| Pre-change page name | → | Post-change page name |
|---|---|---|
| Leave applications | → | Regular duties/Leave applications |
| Using the attendance management system | → | Initial setup/Using the attendance management system |
| Expense claims | → | Regular duties/Expense claims |
| Printer settings | → | Initial setup/Printer settings |
| Meeting room reservations | → | Regular duties/Meeting room reservations |

Now we don’t need to enter the name of each page on our home page.
Copy and paste the following into your Home page.
Markdown notation
# Initial setup

New employees should check this page before performing initial setup.

# Regular duties

Anyone who doesn't understand how to use the duties system should check the
procedural manual here.
Backlog notation
* Initial setup
New employees should check the following pages before performing initial setup.

* Regular duties
Anyone who doesn't understand how to use the duties system should check the
following procedural manuals.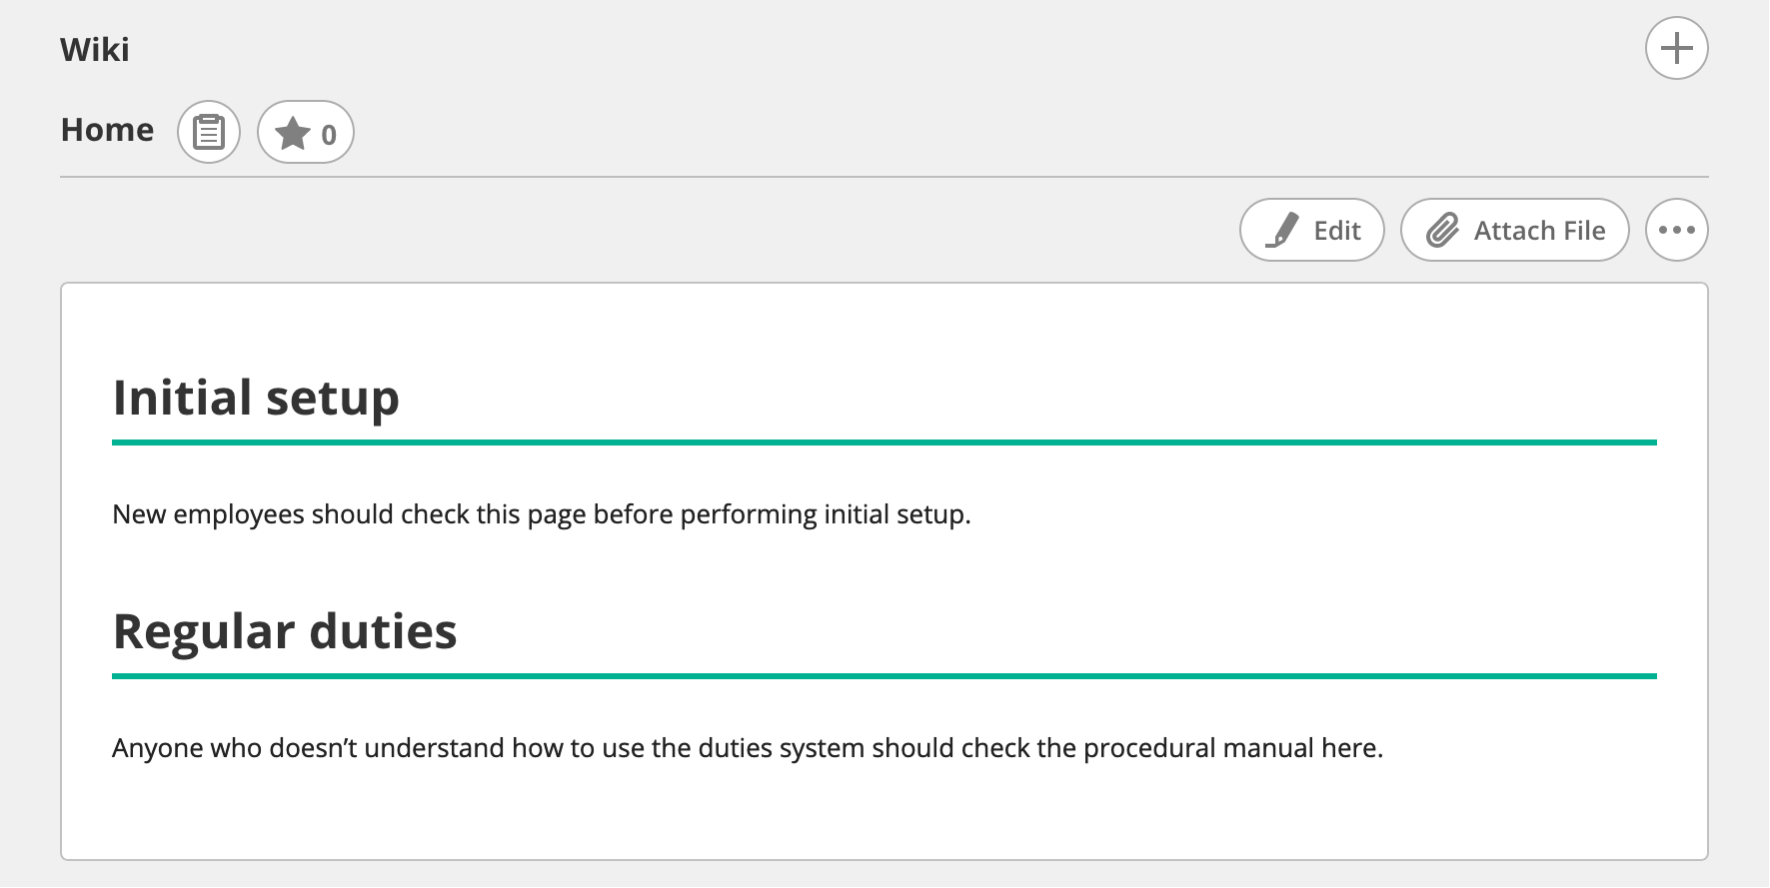
Once you’re done, the home page and right-hand sidebar should appear as follows. Now we can get an overview of the entire Wiki by looking at the page list without having to edit the home page.
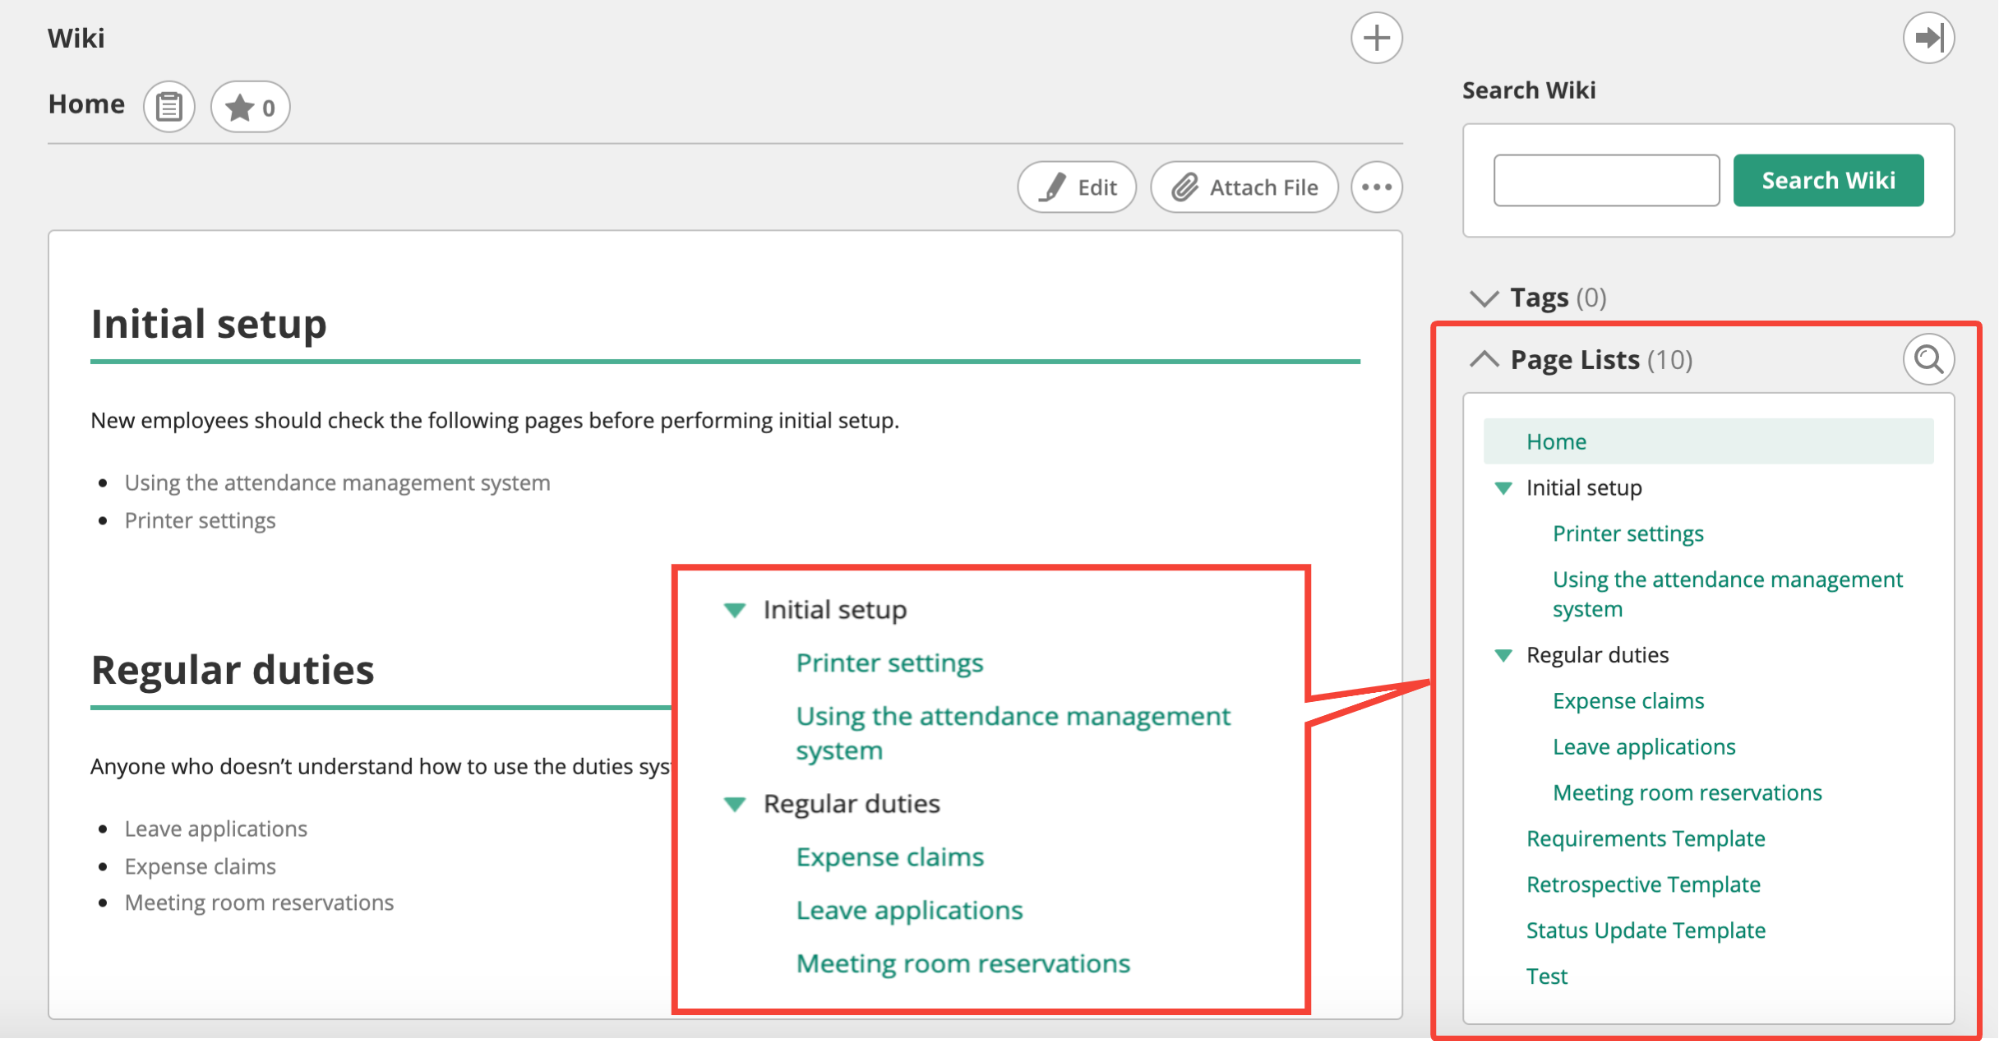
Now you can note particularly important pages on the home page, and search for all other pages using the page list.
Group using tags
Some Wiki services have a feature to add tags to pages. Tags are short snippets of text that describe a page.
On Wiki services with tags, you can use tags, rather than a hierarchical structure, to group pages together.
Let’s try grouping our pages using this feature. In Backlog, we can set up
tags by enclosing text in square brackets (i.e. “[ ]”) before the page name.
Each page can only have one parent page, but each page can have several tags.
Both “Leave applications” and “Using the attendance management system” are related to attendance, so let’s tag both of them with “Attendance”. Change the page names to the following.
| Pre-change page name | → | Post-change page name |
|---|---|---|
| Regular duties/Leave applications | → | [Attendance]Regular duties/Leave applications |
| Initial setup/Using the attendance management system | → | [Attendance]Initial setup/Using the attendance management system |

Tagged pages show their tags underneath the page name. The right-hand sidebar also shows a list of the tags used on this Wiki. “Attendance (2)” indicates that there are two pages tagged with “Attendance” on this Wiki.

Clicking the above tag will display all pages tagged with “Attendance”.
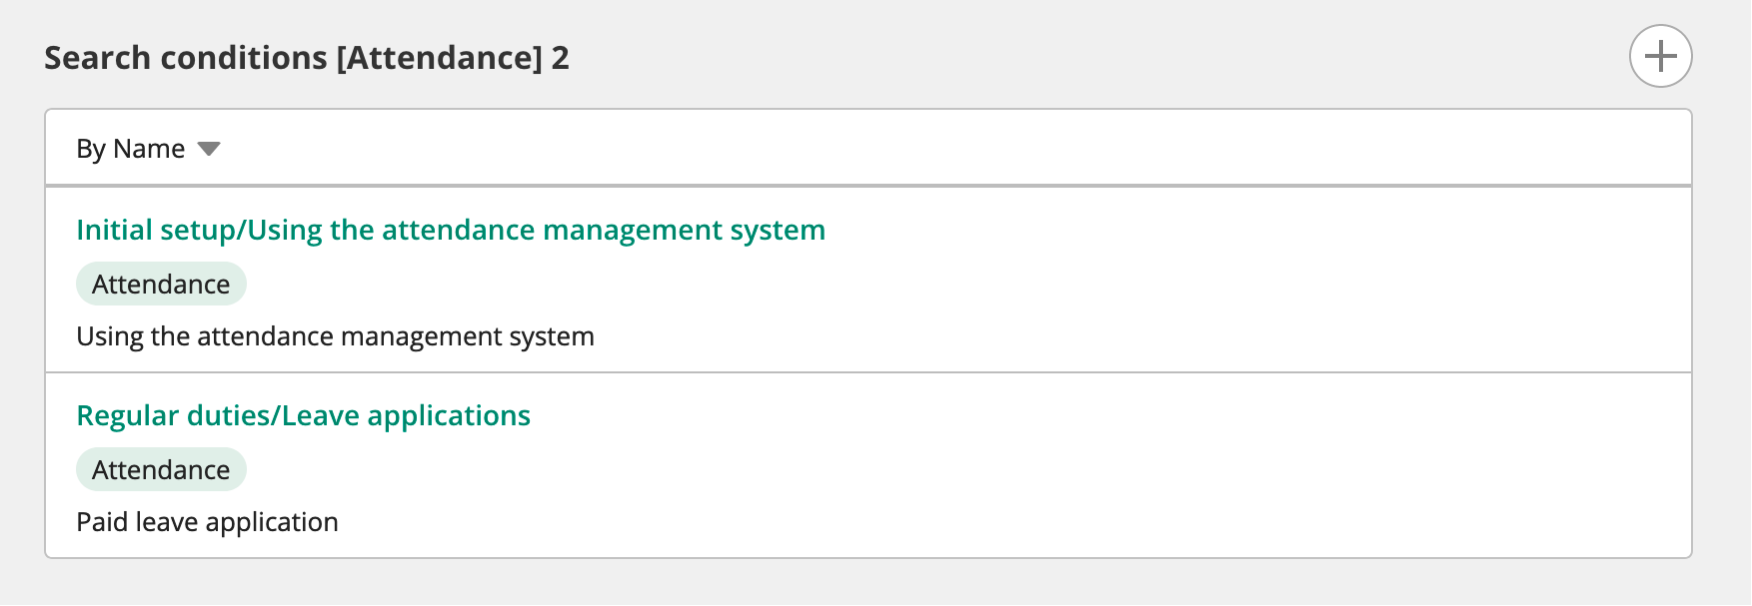
If grouping pages hierarchically proves too tedious, grouping them with tags can be more effective. However, as you accumulate tags, it can become difficult to determine which tag to use. It’s worth trying to keep the number of tags you use as low as possible.
Common page structures
When you first introduce your Wiki, you might have trouble deciding what content to include and how to title your pages.
Let’s review a few examples to get you started. We’ll also provide a few templates that you can use—just copy and paste them into your Wiki’s home page.
Page structure for an organization-wide Wiki
In the When the Wiki starts to take off section in our introduction, we talked about separating your organization-wide Wiki and project-specific Wikis.
An organization-wide Wiki refers to a Wiki that an entire company, department, or team can participate in. So long as that organization continues to exist, they will continue to use that single Wiki. For that reason, it’s extremely important that an organizational page structure is established to make information easy to search for.
The following information is frequently shared on this kind of Wiki:
- Organizational charts for departments/teams
- Information for new/newly transferred employees
- Information relating to department procedures
- Manuals, etc.
- Records of meetings
- Information acquired in the course of work
- Information to be shared by the organization
- Personal memos
The following page structure is one example of how this information could be shared.
| Information to be shared | Page structure |
|---|---|
| Organization chart for that department/team | Add to “Organization chart” page |
| Information for new/newly-transferred employees | Link to from “Page for new employees” |
| Information relating to department procedures | Add as child pages of “Manuals” page |
| Records of meetings | Add as child pages of “Records” page |
| Information acquired in the course of work | Add as child pages of “Memos” page |
Below we’ve provided a template that follows this page structure. You can start creating your Wiki by copying and pasting them into your Wiki’s Home page.
Markdown notation
# _____ Department Wiki

* [[Organizational chart]]
* [[Page for new employees]]
  * Please link all information for new or newly-transferred employees on this page
* [[Records/Regular meeting - (2019-09-03)]]
* [[Records/Regular meeting - (2019-09-06)]]
* [[Manuals/Attendance management]]
* [[Manuals/Expense claims]]
* [[Manuals/Meeting room reservations]]
* [[Memos/Memo title 1]]
* [[Memos/Memo title 2]]
Backlog notation
* _____ Department Wiki
- [[Organizational chart]]
- [[Page for new employees]]
-- Please link all information for new or newly-transferred employees on this page
- [[Records/Regular meeting - (2019-09-03)]]
- [[Records/Regular meeting - (2019-09-06)]]
- [[Manuals/Attendance management]]
- [[Manuals/Expense claims]]
- [[Manuals/Meeting room reservations]]
- [[Memos/Memo title 1]]
- [[Memos/Memo title 2]]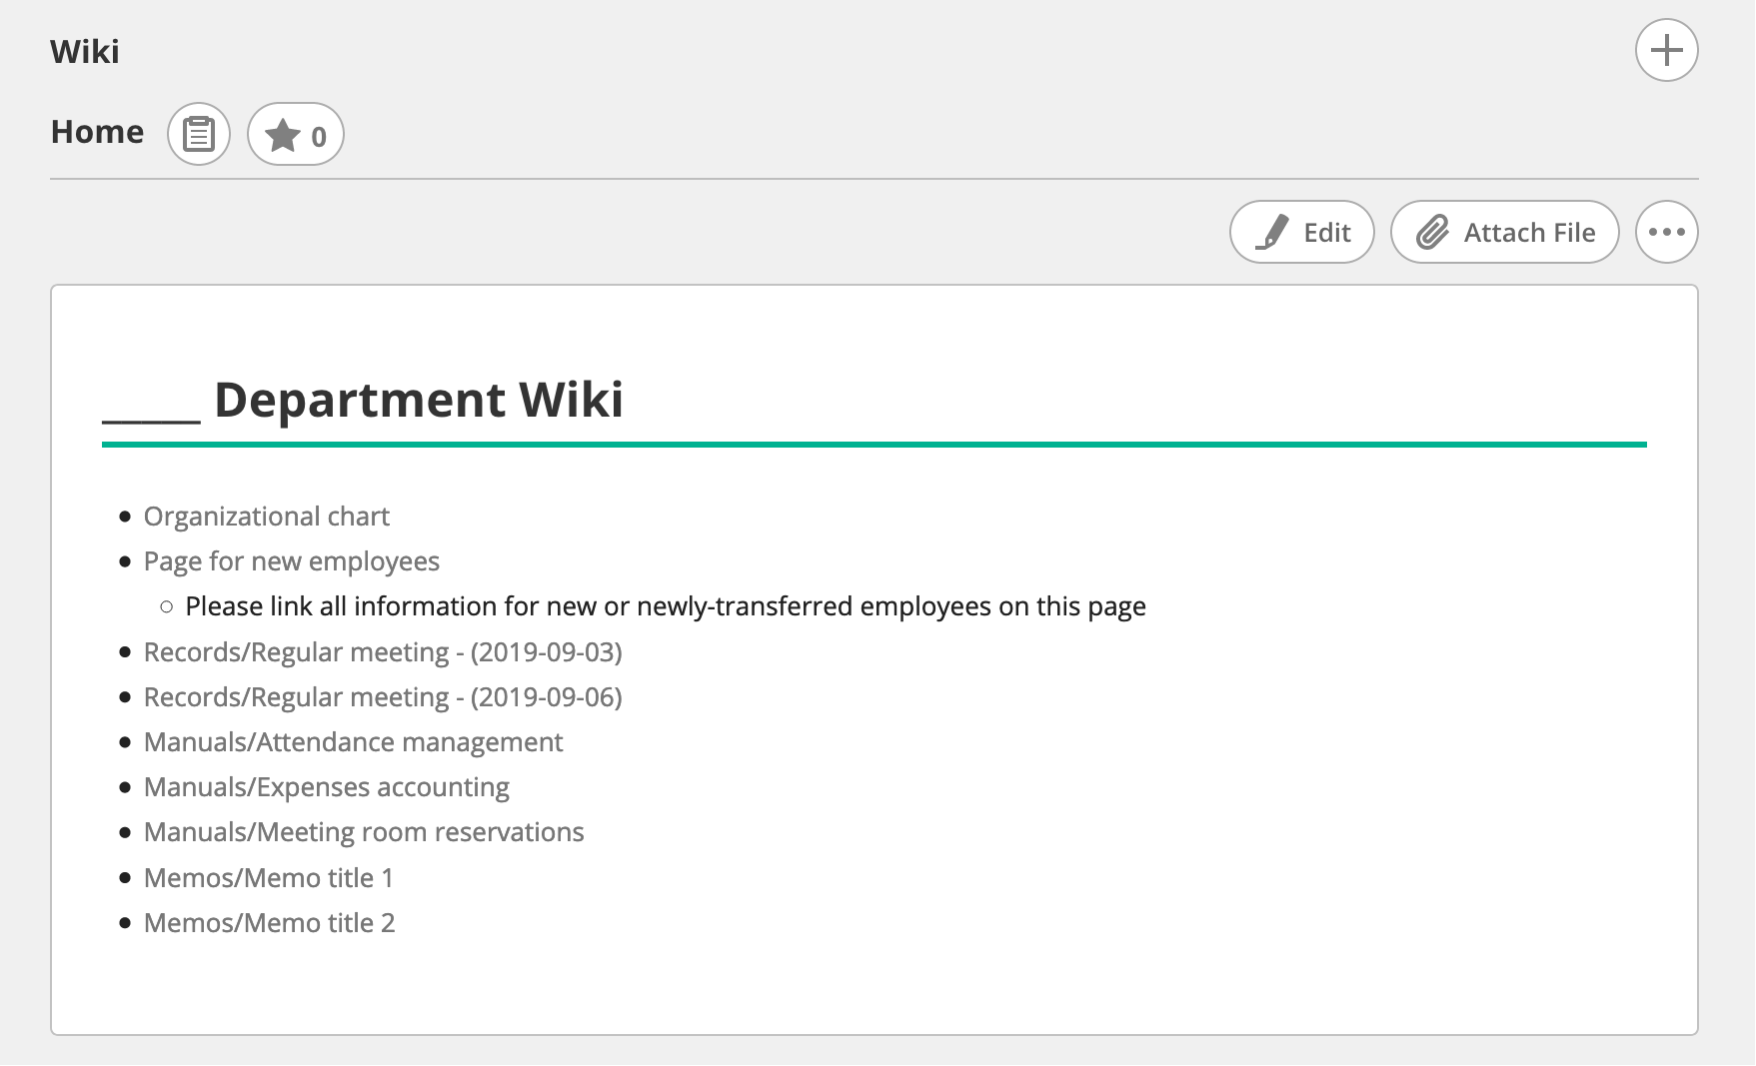
Project Wiki page structure
A project usually lasts for a fixed period of time and leaves behind some results. After the project is over, the Wiki will no longer be updated, and only viewed from time to time by people wanting to look at the results. It therefore isn’t that important to have the cleanest page structure, so long as the results are clear.
If a project is to last more than one year, it is important to make information easy to search for, just as with an organization-wide Wiki. Let’s work out a project-wide page structure to share with the project members.
The following types of information are frequently shared on these kinds of Wikis.
- Project goals
- Project schedule
- Project organizational structure & list of personnel
- Information for new team members
- Records of meetings
- Mid-project deliverables
- Materials made for internal debates, etc.
- Final project deliverables
- Materials finally delivered to a customer, etc.
- Information acquired in the course of work of particular relevance to the
project- Information to be shared project-wide
- Personal memos
The following is one example of a page structure for sharing this information.
| Information to be shared | Page structure |
|---|---|
| Project goals | Add to “Goals” page |
| Project schedule | Add to “Schedule” page |
| Project organizational structure & list of personnel | Add to “Organization chart” page |
| Information for new team members | Link to from “Page for new members” |
| Records of meetings | Add as child pages of “Records” page |
| Mid-project deliverables | Add as child pages of “Mid-project deliverables” page |
| Final project deliverables | Add as child pages of “Deliverables” page |
| Information acquired in the course of work | Add as child pages of “Memos” page |
The following is a template that follows this page structure. You can start creating your Wiki by copying and pasting them into your Wiki’s home page.
Markdown notation
# ______ Project Wiki

* [[Goals]]
* [[Schedule]]
* [[Organizational chart]]
* [[Page for new members]]
  * Please link all information for new members on this page
* [[Records/Regular meeting - (2019-09-03)]]
* [[Records/Special meeting - (2019-09-06)]]
* [[Mid-project deliverables/Materials for first review]]
* [[Mid-project deliverables/Materials for second review]]
* [[Deliverables/Specification document]]
* [[Deliverables/Manual]]
* [[Memos/Memo title 1]]
* [[Memos/Memo title 2]]
Backlog notation
* ______ Project Wiki
- [[Goals]]
- [[Schedule]]
- [[Organizational chart]]
- [[Page for new members]]
-- Please link all information for new members on this page
- [[Records/Regular meeting - (2019-09-03)]]
- [[Records/Special meeting - (2019-09-06)]]
- [[Mid-project deliverables/Materials for first review]]
- [[Mid-project deliverables/Materials for second review]]
- [[Deliverables/Specification document]]
- [[Deliverables/Manual]]
- [[Memos/Memo title 1]]
- [[Memos/Memo title 2]]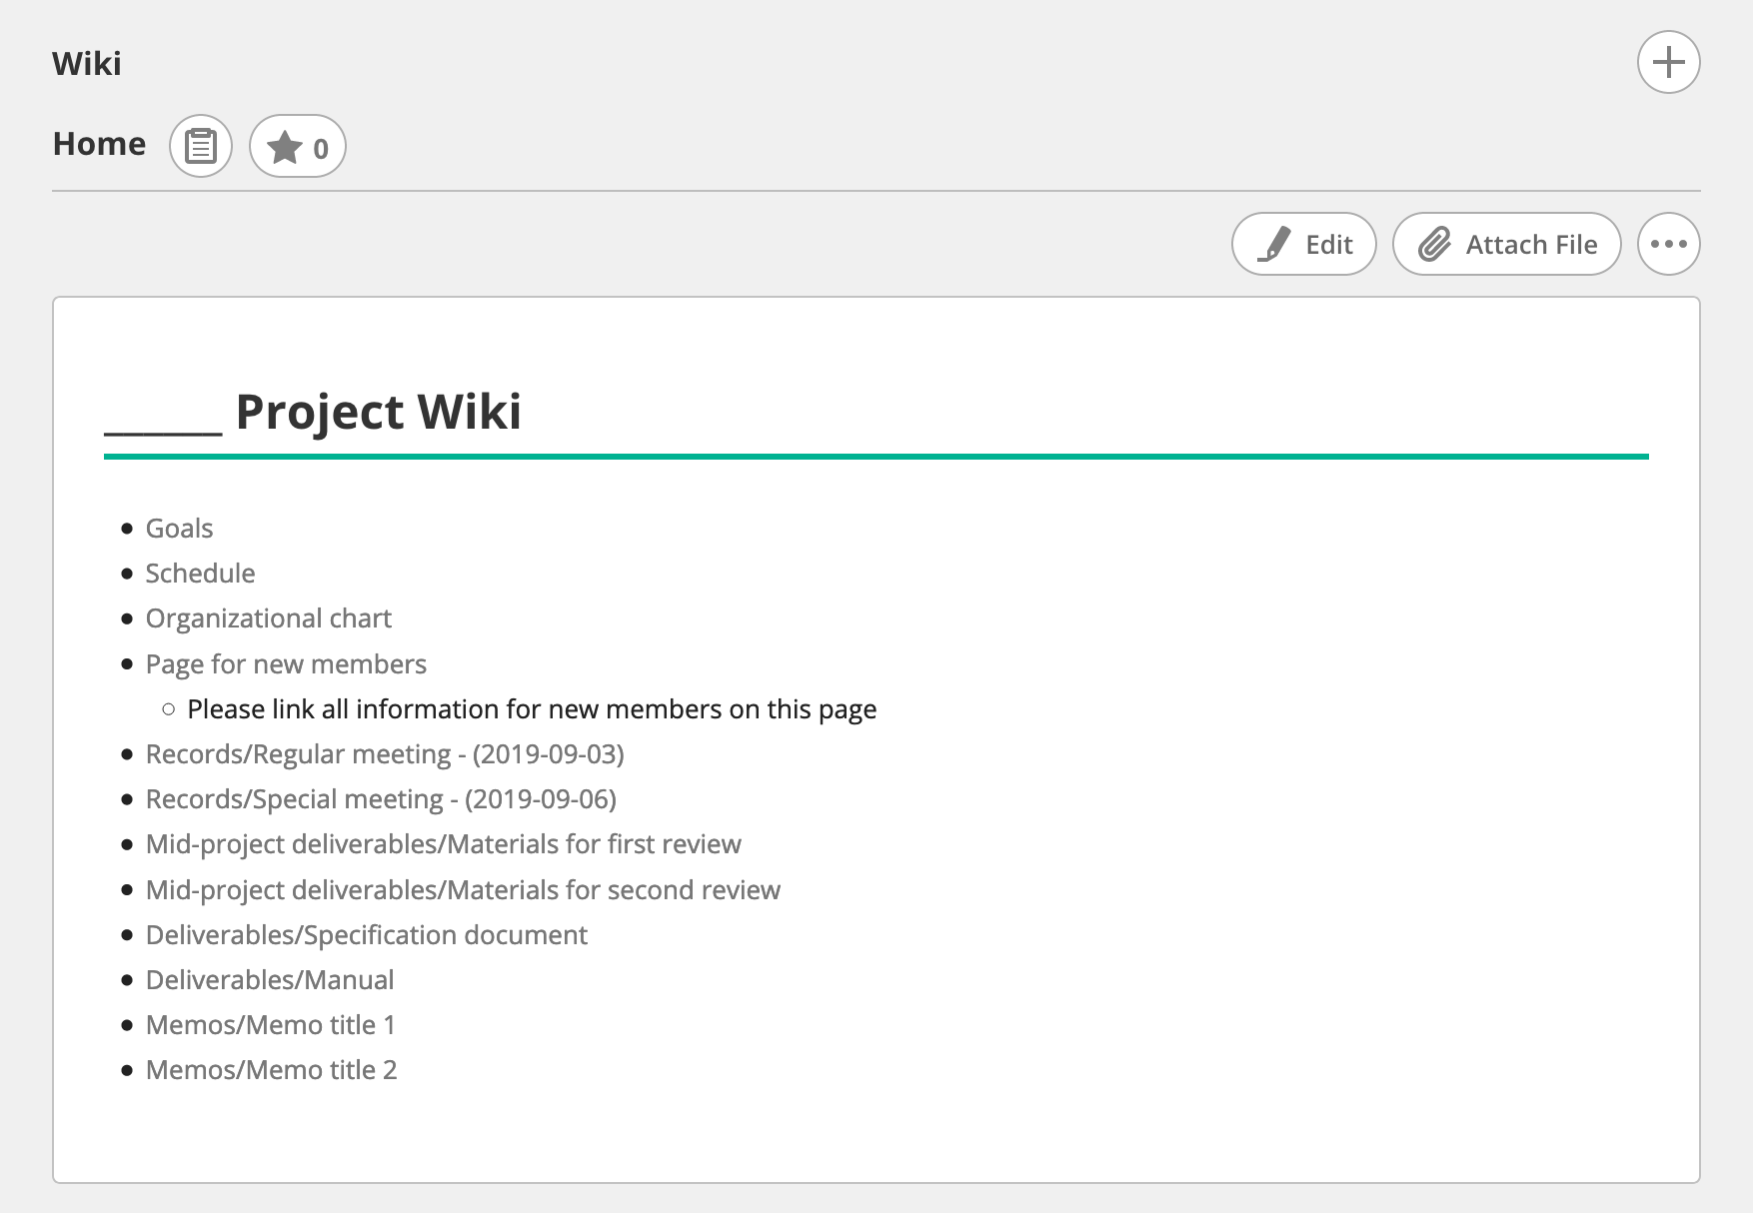
If you have a lot of projects, we recommend standardizing your templates company-wide or department-wide. Doing so will make it easier for employees to get used to a new Wiki when transferring between projects.
Information that doesn’t conform to your page structure
Adopting a page structure like the ones we discussed above makes it easy to determine new page names, but they can make it difficult to know what to do with information that doesn’t conform to that structure. Some people might think, “I don’t know where to put this, so I won’t bother putting it anywhere.”
To account for this, you can establish additional rules for adding information that does not easily conform to the standard page structure. Take the following rules as an example.
Example 1: Child pages of the “Memo” page can be named anything you like
The above template follows this rule. However, this might result in too many “Memo” child pages being made. In that case, the following rule might work better.
Example 2: Child pages of your personally-named page can be named anything you like
Markdown notation
* [[Memos/Williams/Memo Title 1]]
* [[Memos/Harrison/Memo Title 2]]
Backlog notation
- [[Memos/Williams/Memo title 1]]
- [[Memos/Harrison/Memo title 2]]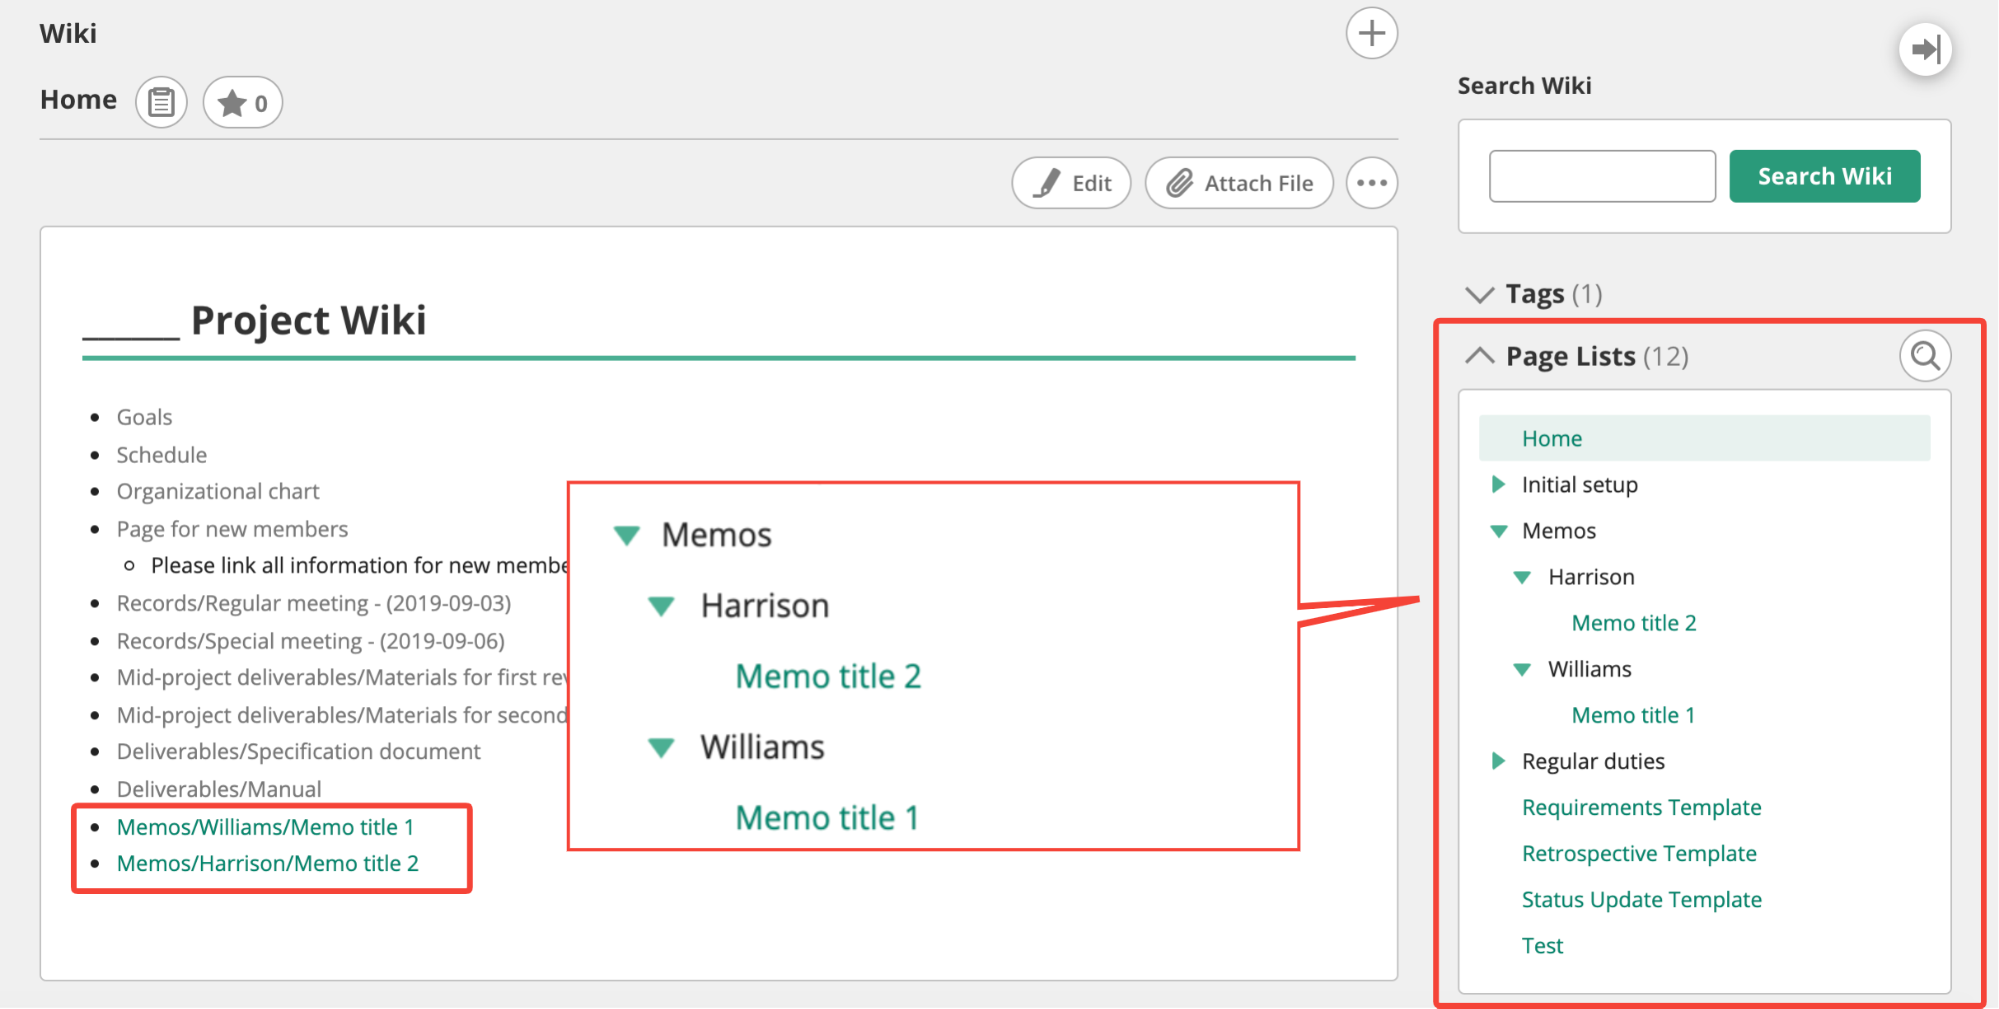
Revising page structure
Let’s restructure the “Memos” page to make it more useful to other people.
Move pages to more useful sections
You can change a page’s name and its parent page later on. For example, since “Memos/Notes on troubleshooting” will also be useful to new team members, it can be moved to “Page for new members/Notes on troubleshooting”
Ensure others know they can update pages
Pages that begin as personal memos can end up only being updated by that person, even after they’re moved. Since the effort that any one person can expend is limited, make sure to acquire a company/project-wide understanding that this page can now be updated by other people. This will ensure that the information continues to be updated.
Using Wiki as a knowledge base
Using Wiki as a knowledge base helps you to collaboratively manage your information and the content structure with other members.
We will explain the basics of using a Wiki as a knowledge base while introducing some of Backlog’s unique features.
Adding overviews of emails and chats to the Wiki
As time passes, past emails and chats can become difficult to search through. It can also be difficult to quickly find the conclusions of a conversation without reading through several emails.
As we touched on in the “Other information sharing tools[i]” section, you can make information easier to find by summarizing the conclusions of conversations and adding those to the Wiki. It may also be wise to use quote and code block notation to copy and paste the most important parts of chats to the Wiki.
Adding tasks and issues to a Wiki page
Issue management tools (i.e. ticket management tools, bug tracking systems) help teams record, track, and resolve issues. When searching through past issues, it can be difficult to understand their conclusions with reading sifting through several comments, attachments, and even subtasks.
In such cases, as with email, adding a summary of the conclusion of the issue can make finding the necessary information much easier.
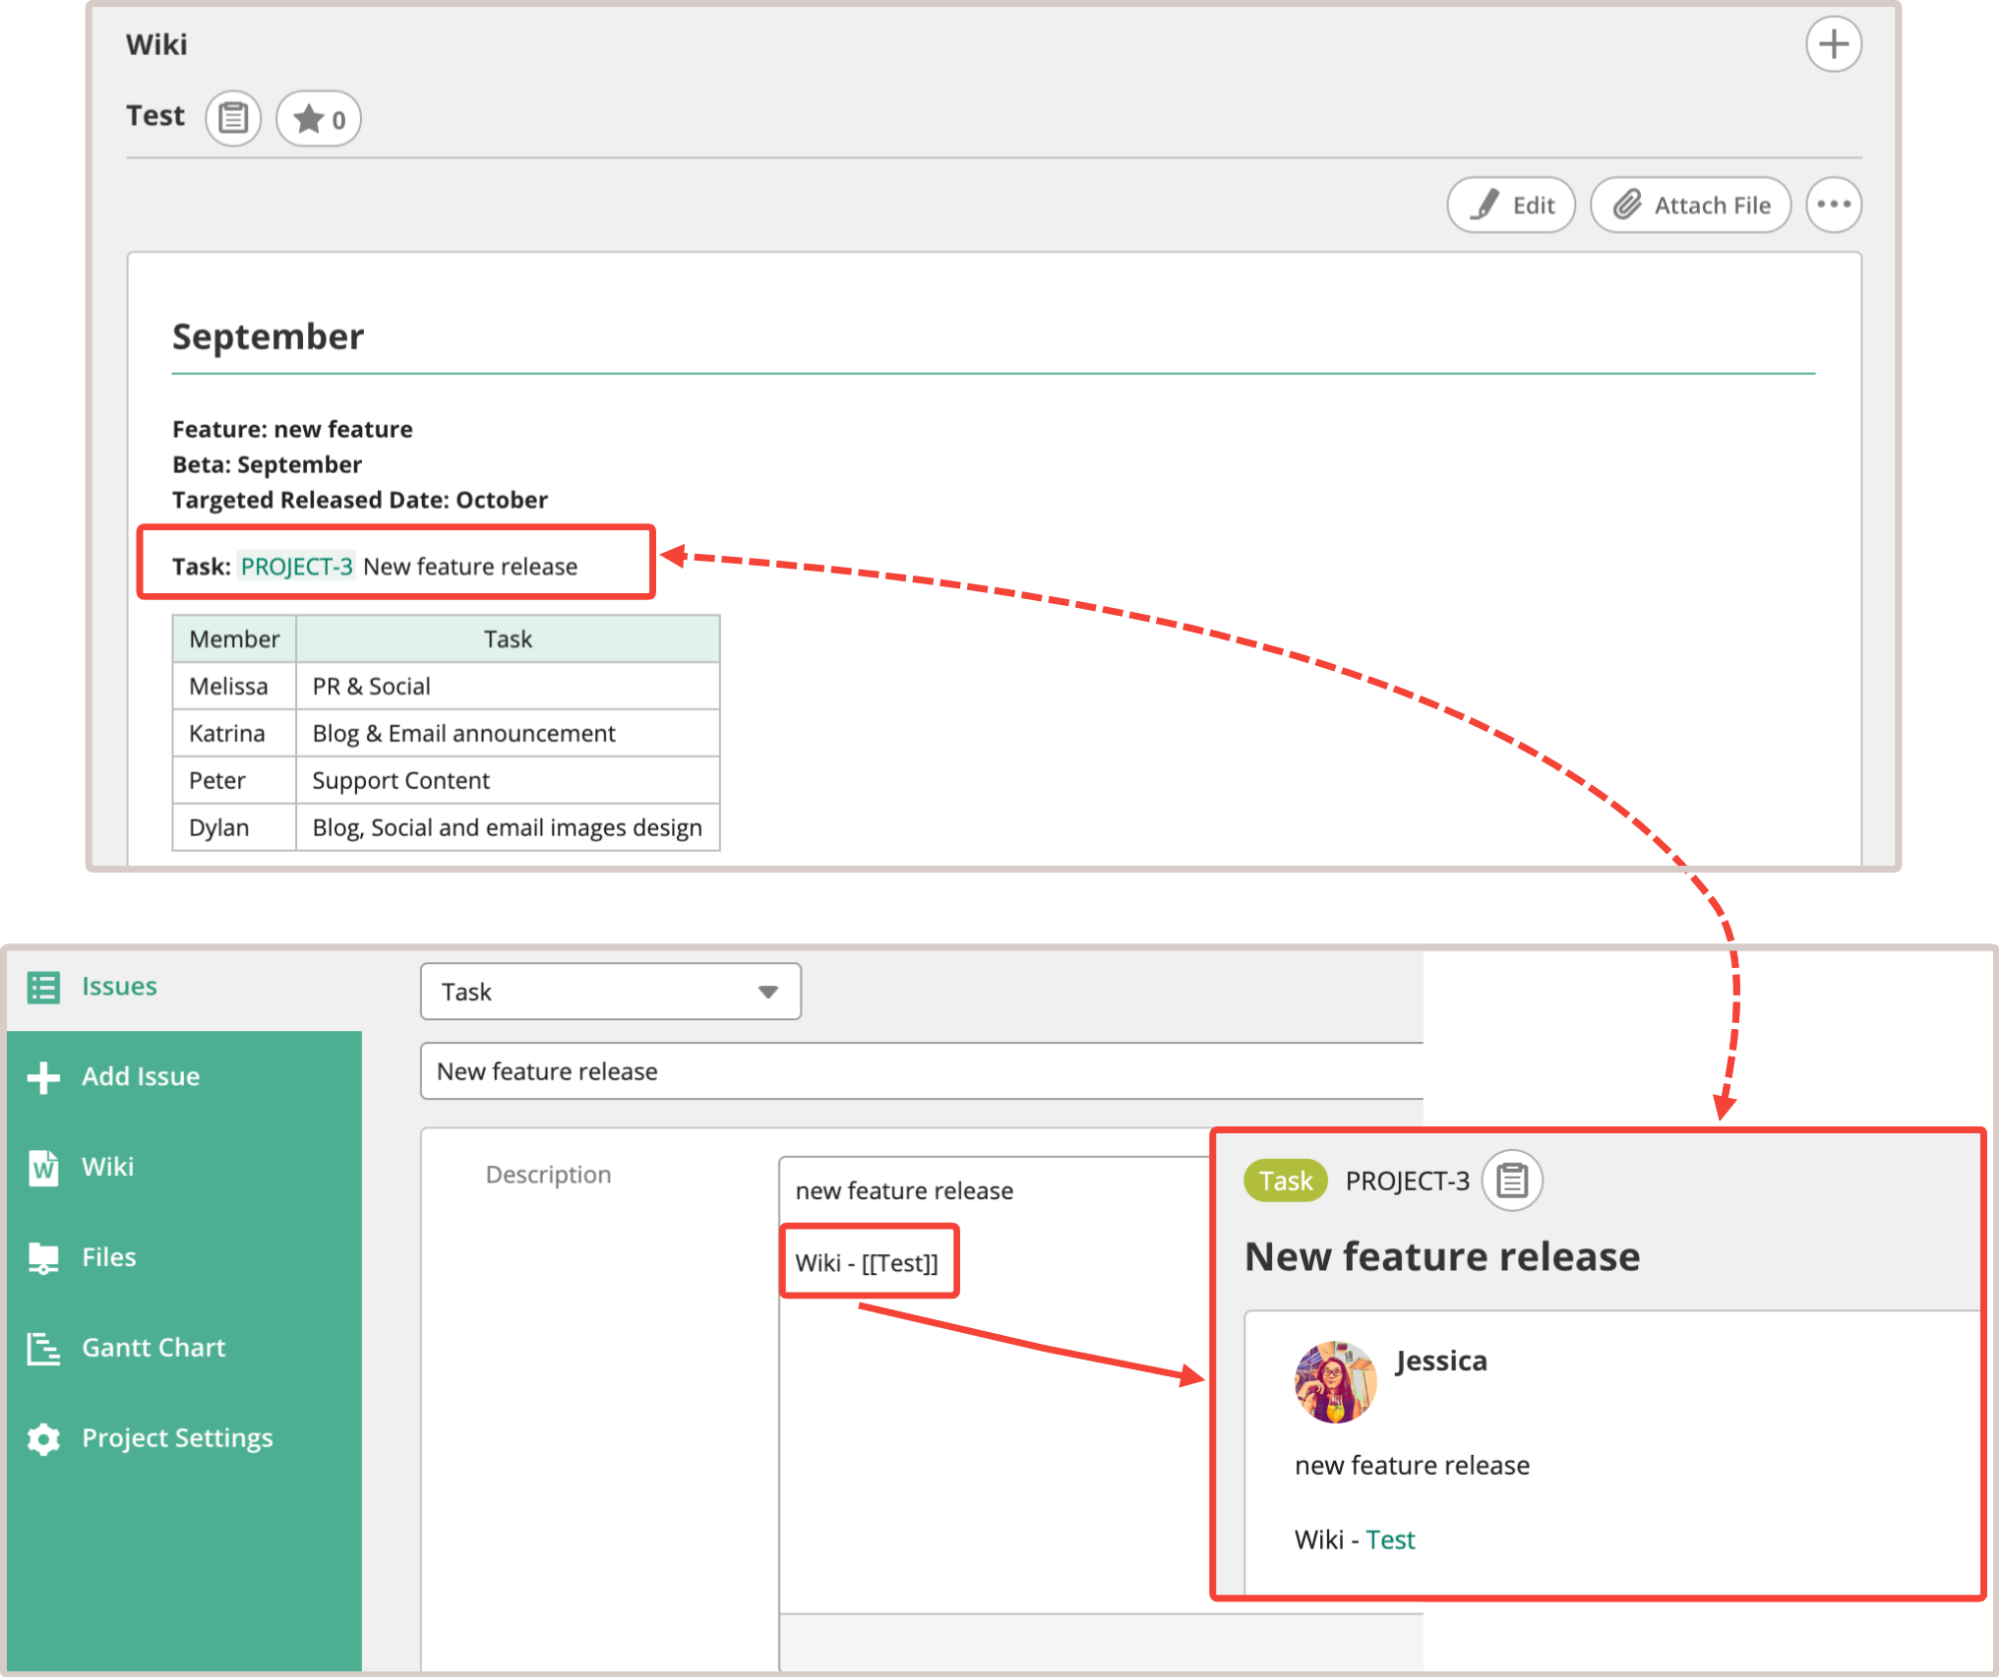
With Backlog, you can easily link Wiki pages and tickets. Adding a ticket key (e.g. PROJECT-3) to the Wiki page will automatically turn it into a link to the ticket page.
Separating continuously updated pages and non-updated pages
A Wiki is used as a knowledge base, but, over time, some pages will naturally be continuously updated, while others won’t. You can use the page structure to communicate what members should expect.
Examples of pages that require continuous updates:
- Pages that provide an overview of a topic
- Example 1: An “Organizational chart” page for a given project with the names of all personnel provided
- Example 2: A “System structure” page providing connectivity relationships between servers on a software development Wiki
- Pages providing an introduction for new team members
- Example: A “Page for new members” linked to from the Home page.
Examples of pages that do not require updates:
- Pages representing a particular date and time
- Example: A page with a disclaimer like “This page provides the results of an investigation made in August of 2019” at the top of the page.
- Pages that are referenced in a parent page
- Example: A child page with results of a materials review housed under a “Mid-project deliverables” page. Items to be updated in the future are on a child page of the “Deliverables” page.
In extreme cases, you might also note which pages are continuously updated on your Wiki’s Home page. For example, you could modify the organization-wide Wiki from the Common page structures section to clarify which pages are continually updated.
Markdown notation
# _____ Department Wiki

## Continually updated pages

* [[Organization chart]]
* [[Page for new employees]]
  * Please link all information for new or newly-transferred employees on this page
* [[Manuals/Attendance management]]
* [[Manuals/Expense claims]]
* [[Manuals/Meeting room reservations]]

## Non-updated pages

* [[Records/Regular meeting - (2019-09-03)]]
* [[Records/Special meeting - (2019-09-06)]]
* [[Memos/Memo title 1]]
* [[Memos/Memo title 2]]
Backlog notation
* _____ Department Wiki
** Continually updated pages
- [[Organization chart]]
- [[Page for new employees]]
-- Please link all information for new or newly-transferred employees on this page
- [[Manuals/Attendance management]]
- [[Manuals/Expense claims]]
- [[Manuals/Meeting room reservations]]

** Non-updated pages
- [[Records/Regular meeting - (2019-09-03)]]
- [[Records/Special meeting - (2019-09-06)]]
- [[Memos/Memo title 1]]
- [[Memos/Memo title 2]]
Tutorial conclusion
In the first half of this tutorial section, we walked through the features available in Backlog’s Wiki. You learned how to create Wiki pages, make them easy to read, and maintain them over time.
In the second half, you learned how to structure your pages for different uses and how to store different kinds of information in the Wiki.
Congratulations: you’re now ready to use a Wiki in your organization! Give it a try, and never hesitate to reach out to us if you need help using Wikis in Backlog.

